I was standing in my kitchen on a cold December night, half‑asleep, when my roommate dared me to create a dessert that could out‑shine the Christmas lights. I stared at the pantry, saw a lonely pack of Oreos, a tub of cream cheese, and a half‑finished bowl of whipped cream, and thought, “Why not?” That moment sparked the birth of what I now call the ultimate holiday indulgence: No‑Bake Christmas Oreo Lasagna. This isn’t just another no‑bake cheesecake; it’s a layered masterpiece that looks like a lasagna, tastes like a holiday cookie dream, and requires zero oven time. I promise you, this is hands down the best version you’ll ever make at home.
Picture the scene: the kitchen smells like vanilla and butter, the countertop is a mosaic of crushed cookies and glossy cream, and the air hums with the faint jingle of distant carolers outside. As you stir the pudding, the thick mixture clings to the whisk like velvet, and when you spread the cream cheese layer, it spreads with the confidence of a seasoned pastry chef. The final garnish of peppermint shards and red‑green sprinkles lands with a satisfying crunch, echoing the crackle of a fireplace. Every bite delivers a chorus of textures—crunch, cream, and melt‑in‑your‑mouth softness—that makes your taste buds sing “fa‑la‑la‑la‑la”.
Most recipes for Oreo “lasagna” either demand a refrigerator for a full day or rely on a bland, watery pudding that never quite sets. I’ve been there, waiting for a dessert that never lived up to the hype, and I’m here to say: Most recipes get this completely wrong. Here’s what actually works. The secret? A buttery crust that holds together like a firm foundation, a pudding that’s thick enough to support the layers without wobbling, and a topping that adds both visual drama and a burst of festive flavor. I dare you to taste this and not go back for seconds.
Now, I’ll let you in on a little secret that most bakers keep to themselves: the addition of a pinch of peppermint extract to the pudding layer. It’s subtle, but it gives the whole dish that unmistakable holiday sparkle without overwhelming the Oreo flavor. And if you’re feeling extra daring, a swirl of melted white chocolate through the cream cheese adds a glossy sheen that looks like freshly fallen snow.
Okay, ready for the game‑changer? Let me walk you through every single step — by the end, you’ll wonder how you ever made it any other way. Grab your mixing bowls, pre‑heat your imagination, and let’s build this edible holiday masterpiece together.
What Makes This Version Stand Out
- Texture: A crunchy Oreo crust meets a silky, pudding‑thickened cream that holds its shape like a true lasagna. The contrast is as satisfying as the first bite of a fresh‑baked cookie.
- Flavor: The classic chocolate‑cream combo is amplified with peppermint and vanilla, creating a festive flavor profile that sings louder than any Christmas carol.
- Simplicity: No oven, no stovetop drama—just a few bowls, a whisk, and a refrigerator. You can assemble it while the tree lights are being untangled.
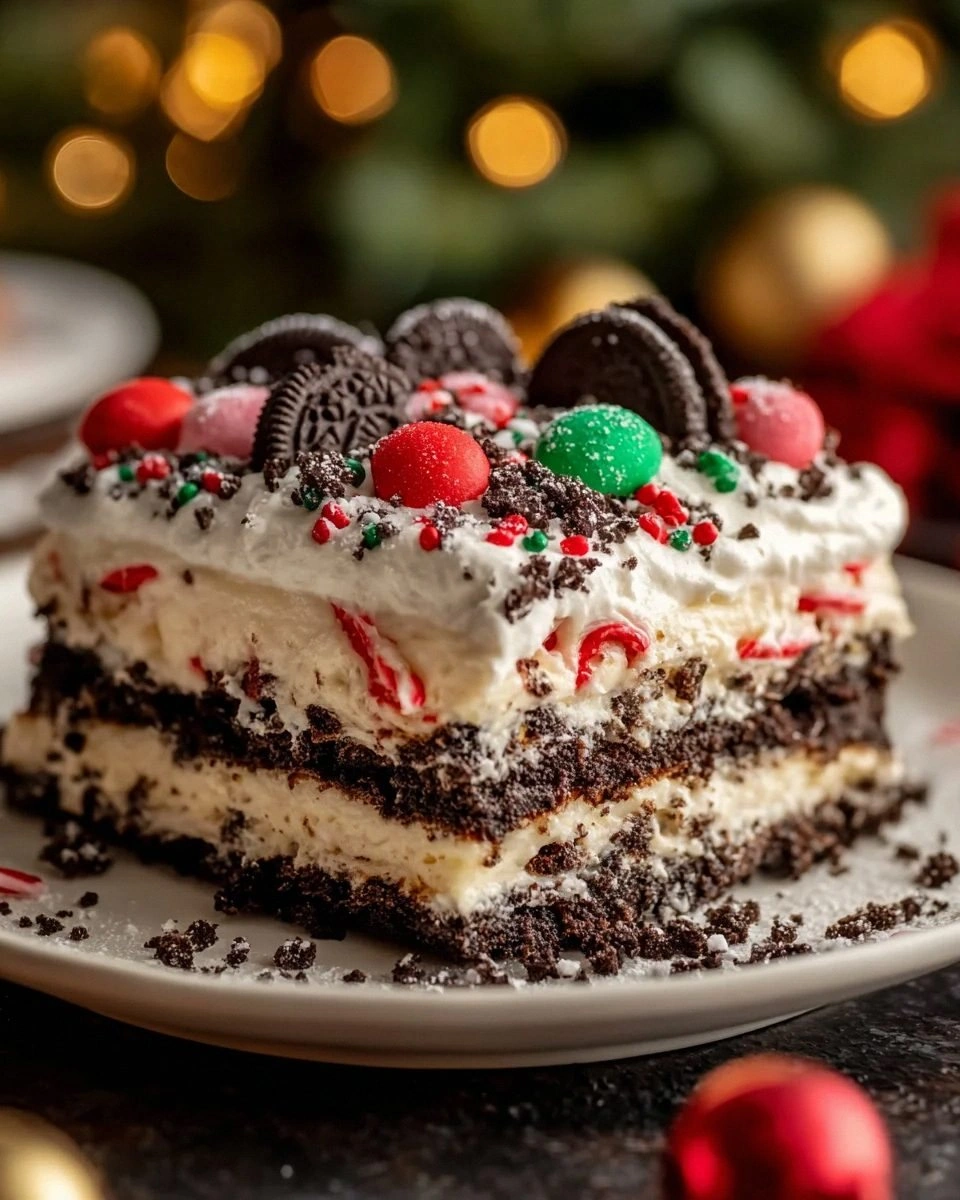
- Visual Impact: Layered like a lasagna, topped with whole Oreos and colorful sprinkles, it looks like a holiday centerpiece worthy of a table full of guests.
- Make‑Ahead Power: This dessert sets in the fridge, meaning you can prep it the night before and spend Christmas morning sipping cocoa instead of sweating over a stove.
- Ingredient Flexibility: Regular Oreos work, but holiday‑themed Oreos add a surprise pop of color. You can swap peppermint for crushed candy canes or M&Ms for a different crunch.
- Crowd Reaction: Expect gasps, exclamations, and the inevitable “What’s in this?!” when you slice through the layers. It’s a conversation starter and a dessert rolled into one.
- Nutrition Balance: While indulgent, the recipe balances protein from cream cheese with the lighter feel of whipped cream, keeping it from feeling overly heavy.
Inside the Ingredient List
The Flavor Base
The heart of this dessert is the instant vanilla pudding mix. It’s the glue that binds the creamy layers together, giving them that thick, custard‑like body. If you skip it, the cream cheese layer will be too loose, and the whole thing will slide off the plate like a slippery sled. For a richer flavor, use a high‑quality pudding mix that contains real vanilla beans rather than artificial flavor.
Vanilla extract adds depth beyond the pudding mix. A splash (about two teaspoons) lifts the entire flavor profile, making the dessert feel warm and inviting—like a cozy blanket on a frosty night. If you’re out of vanilla, a dash of almond extract works, but keep it subtle; you don’t want to mask the Oreo’s chocolatey charm.
The Texture Crew
Unsalted butter is melted and blended with crushed Oreos to form the crust. The butter’s richness holds the crumbs together, creating a base that’s firm enough to slice yet buttery enough to melt in your mouth. Use real butter, not margarine, for that authentic, buttery snap.
Cream cheese (softened) brings the tangy creaminess that balances the sweet pudding. It’s the “cheese” in our lasagna, giving structure and a subtle tang that prevents the dessert from becoming cloyingly sweet. If you prefer a milder flavor, you can substitute part of the cream cheese with mascarpone.
Heavy whipping cream is whipped to soft peaks and folded into the pudding mixture. This adds airy lightness, ensuring each bite feels like a cloud of holiday joy. Over‑whipping will make the mixture grainy, so stop as soon as soft peaks form.
The Unexpected Star
Mini marshmallows (optional) bring a playful fluffiness that mimics the “sauce” in a traditional lasagna. They melt slightly into the pudding, creating pockets of sweet goo. If you’re allergic to marshmallows, substitute with a handful of toasted coconut flakes for a similar texture.
Crushed peppermint candies or mini M&Ms are the festive crunch that makes this dessert unmistakably Christmas. The peppermint adds a cool, minty zing that cuts through the richness, while M&Ms give a burst of chocolate and color. Feel free to mix both for a double‑impact garnish.
The Final Flourish
Red and green sprinkles (optional) aren’t just for looks; they add a subtle sugary crunch that brightens each bite. Sprinkle them just before serving to keep them crisp.
Extra whole Oreos used for topping provide that iconic cookie‑and‑cream look. They’re placed on top just before chilling, so they stay crisp and don’t get soggy. If you want a more decadent top, drizzle melted white chocolate over the whole Oreos for a snow‑like glaze.
Everything's prepped? Good. Let’s get into the real action…
The Method — Step by Step
- Crush the Oreos. Place 12 Oreo cookies (or holiday‑themed Oreos) into a zip‑top bag, seal, and smash with a rolling pin until they become fine crumbs. Transfer the crumbs to a mixing bowl, add 1/2 cup melted unsalted butter, and stir until the mixture resembles wet sand. This will be your crust, firm enough to hold the layers without falling apart. Kitchen Hack: If you don’t have a rolling pin, a heavy skillet works just as well for crushing.
- Press the crust. Spoon the crumb‑butter mixture into the bottom of a 9×9‑inch square dish. Using the back of a spoon or a flat glass, press firmly and evenly until the base is compact. Feel the pressure; the crust should feel like a firm, buttery pancake that won’t crumble when you lift the dish. Refrigerate the crust while you prepare the filling to let it set.
- Prepare the pudding layer. In a medium saucepan, whisk together 1 packet instant vanilla pudding mix, 2 cups milk, and a pinch of salt. Cook over medium heat, stirring constantly, until the mixture thickens and starts to bubble—about 2‑3 minutes. Remove from heat and let it cool for a minute. Then, fold in 1 cup heavy whipping cream (softly whipped to soft peaks) and 2 teaspoons vanilla extract. This step is pure magic; the pudding becomes glossy and thick, ready to hold the next layer.
- Add the optional marshmallows. If you love extra fluff, gently fold in 1/2 cup mini marshmallows now. They’ll melt slightly, creating tiny pockets of sweet, gooey surprise throughout the pudding. Watch Out: Over‑mixing can cause the marshmallows to dissolve completely, turning the pudding into a sugary syrup.
- Blend the cream cheese layer. In a large bowl, beat 8 oz softened cream cheese until smooth. Add 1/2 cup powdered sugar and continue beating until light and fluffy. This creates a velvety base that will sit beneath the pudding. If you want a tangier note, add a teaspoon of lemon zest at this stage.
- Assemble the lasagna. Spread the cream cheese mixture evenly over the chilled crust, forming the “first noodle”. Then, pour the pudding mixture over the cream cheese, smoothing it with an offset spatula. The pudding should glide over the cheese like a rich sauce over pasta. Make sure the edges are clean for a professional look.
- Top it off. Arrange the remaining 12 whole Oreos on top, pressing them gently into the pudding. Sprinkle 1/4 cup crushed peppermint candies (or mini M&Ms) over the whole Oreos, followed by a generous dusting of red and green sprinkles if you like. This final flourish adds color, crunch, and that unmistakable holiday sparkle.
- Chill and set. Cover the dish with plastic wrap and refrigerate for at least 2 hours, preferably overnight. The layers will firm up, the flavors will meld, and the crust will become perfectly set. When you finally slice, you’ll see clean, defined layers—just like a classic lasagna.
- Serve and wow. Use a sharp knife warmed in hot water for clean cuts. Serve each slice on a festive plate, maybe with a dollop of whipped cream and a drizzle of melted white chocolate for extra sparkle. Picture yourself pulling this out of the fridge, the whole kitchen smelling incredible, and your guests’ eyes widening in anticipation. That moment? Pure culinary triumph.
- That’s it — you did it. But hold on, I’ve got a few more tricks that’ll take this to another level…
Insider Tricks for Flawless Results
The Temperature Rule Nobody Follows
Never assemble the dessert with a hot crust. Even a warm crust can melt the butter, causing the base to become soggy. Let the crust chill for at least 15 minutes after pressing, then keep it in the fridge while you work on the filling. This small pause ensures each layer stays distinct and the final slice holds its shape.
Why Your Nose Knows Best
When the pudding reaches the right thickness, it will emit a faint, sweet vanilla aroma that fills the kitchen. If you’re still seeing liquid pools, keep cooking a bit longer. Trust your nose—it's a more reliable indicator than a timer.
The 5‑Minute Rest That Changes Everything
After spreading the cream cheese layer, let the dish sit uncovered for five minutes before adding the pudding. This brief rest allows the cream cheese to firm up slightly, preventing it from sliding under the pudding. A friend once skipped this step and ended up with a “soggy bottom”—let’s just say the look on their face was priceless.
Peppermint Power Boost
A pinch (about 1/8 teaspoon) of peppermint extract added to the pudding mix lifts the entire dessert, giving it that festive zing without overwhelming the chocolate‑cream flavor. If you’re not a fan of peppermint, a dash of orange zest works surprisingly well, echoing the classic holiday pairing of orange and chocolate.
The Final Glaze Trick
For a glossy finish, melt 2 tablespoons white chocolate and drizzle it over the top Oreos just before the final chill. The chocolate solidifies into a thin, snow‑like crust that adds visual appeal and a subtle buttery flavor.
Creative Twists and Variations
This recipe is a playground. Here are some of my favorite ways to switch things up:
Chocolate‑Cherry Delight
Swap half of the Oreo crumbs for crushed chocolate wafer cookies and fold in 1/3 cup dried cherries into the pudding layer. The tartness of the cherries balances the chocolate, making it perfect for those who love a sweet‑sour combo.
White‑Chocolate Raspberry
Use white chocolate Oreo cookies for the crust, add a swirl of raspberry puree into the cream cheese layer, and garnish with fresh raspberries. This variation feels like a holiday dessert version of a classic cheesecake.
Nutty Caramel Crunch
Stir 1/4 cup caramel sauce into the pudding and sprinkle toasted chopped pecans into the crust. The caramel adds a buttery richness while the nuts give a satisfying crunch that mimics a caramelized nut topping.
Vegan Holiday Version
Replace the butter with coconut oil, use a plant‑based cream cheese, and swap the heavy cream for coconut cream. Choose vegan Oreo‑style cookies (many brands now offer them) and you’ll have a dairy‑free treat that still looks and tastes festive.
Spiced Autumn Twist
Add 1/2 teaspoon ground cinnamon and a pinch of nutmeg to the pudding mix, and garnish with toasted pumpkin seeds instead of peppermint. This turns the dessert into a cozy, autumn‑inspired treat while keeping the no‑bake convenience.
Storing and Bringing It Back to Life
Fridge Storage
Cover the lasagna tightly with plastic wrap and store in the refrigerator for up to 4 days. The layers will continue to meld, making each subsequent slice even more flavorful. If you notice condensation, gently pat the surface with a paper towel before serving.
Freezer Friendly
Wrap the entire dish in a double layer of foil, then place it in a freezer‑safe bag. It will keep for up to 2 months. To thaw, move it to the fridge overnight; the texture remains creamy, and the crust stays firm.
Best Reheating Method
Because this is a no‑bake dessert, you don’t actually reheat it. However, if you prefer a slightly softer texture before serving, let the slice sit at room temperature for 10‑15 minutes, or add a tiny splash (about a teaspoon) of milk and give it a gentle stir. This revives the pudding’s silkiness without melting the crust.