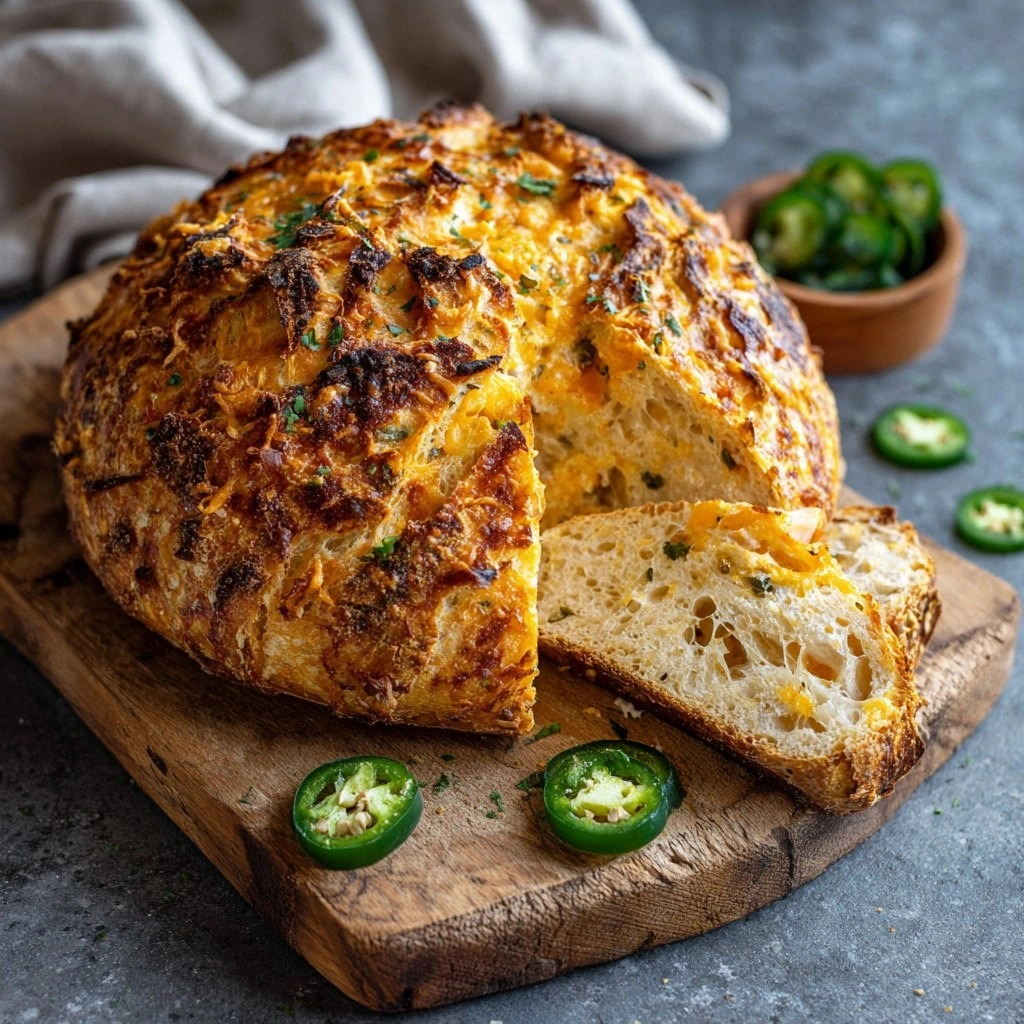
It started with a kitchen calamity that would later become my secret weapon. I was whipping up a quick dinner for a group of friends and the oven door got jammed, the batter exploded, and the smell of burnt dough filled the house. The next day I stared at the charred remains and thought, “I could have done better.” That night, I pulled my trusty sourdough starter out of the fridge, tossed in some jalapeños, and decided to experiment. The result? A loaf that crackles like a fresh tortilla when you slice it, with a molten cheddar core that melts in your mouth. I dare you to taste this and not go back for seconds. I’ll be honest — I ate half the batch before anyone else got to try it. The combination of spicy jalapeños and sharp cheddar in a rustic sourdough base is a flavor explosion that lingers on the palate. Picture yourself pulling this out of the oven, the whole kitchen smelling incredible, and then taking a bite that feels like a warm hug from a spicy cheese lover’s dream. Let me walk you through every single step — by the end, you’ll wonder how you ever made it any other way.
What makes this loaf a standout? It’s not just the ingredients; it’s the method, the timing, the way the flavors mingle, and the texture that delivers that coveted crusty exterior with a gooey, cheesy center. The sourdough starter provides that natural tang that elevates the flavor profile and gives the loaf a depth that you can’t get from commercial yeast. The jalapeños are diced so finely they release heat without overwhelming the bread, creating a subtle kick that lingers. The cheddar is shredded finely to melt evenly, so each bite is a symphony of melt and crunch. The butter is melted and folded in during the final mix to give the loaf a silky, buttery sheen that glistens as it bakes. The garlic powder and pepper add a layer of savory complexity that cuts through the richness of the cheese. The final result is a loaf that’s both comforting and adventurous, a bread that feels like a hug and a spice kick in one bite. I’ve tested this recipe multiple times and it consistently turns out with a golden, blistered crust and a soft, airy crumb that keeps you coming back for more.
Now, let’s talk about the science behind the rise. The sourdough starter, which is essentially a living culture of wild yeast and lactobacilli, feeds on the flour and sugars, producing carbon dioxide that leavens the dough. The balance of hydration is critical; too much water and the loaf will be gummy, too little and it will be dense. That’s why I use exactly one cup of water for two cups of flour—just enough to hydrate the flour without drowning it. The salt is added after the first rise to strengthen the gluten network and enhance flavor, but not before, because it can inhibit yeast activity if added too early. The jalapeños bring a burst of capsaicin, which reacts with the heat of the oven to create a subtle, lingering warmth. The cheddar’s high fat content melts beautifully, coating the crumb like velvet and giving the loaf a rich, savory finish. Every element is calibrated to create a loaf that’s crisp on the outside, tender on the inside, and bursting with flavor.
Finally, the finishing touches. After the loaf is baked, I let it rest on a wire rack for at least twenty minutes—this allows steam to escape, preventing a soggy bottom. While it cools, I drizzle a thin layer of melted butter over the crust for that extra glossy finish. The loaf can be sliced thin for a snack or thick for a hearty sandwich. If you’re serving it at a party, keep it warm in a low oven, and it will stay fresh for hours. The best part? The leftovers keep for three to four days in the refrigerator, and they’re even better the next day when the flavors have had time to mingle. I’m confident that once you try this loaf, you’ll be tempted to make it again and again. The next section will break down exactly what goes into this masterpiece, and you’ll see why this is hands down the best version you’ll ever make at home.
What Makes This Version Stand Out
- Taste: The bold combination of jalapeños and cheddar creates a layered flavor profile that’s both spicy and savory, with a hint of tang from the sourdough.
- Texture: A crust that cracks like brittle sugar, a crumb that’s airy and moist, and a cheese center that oozes like a molten lava cake.
- Simplicity: Only nine core ingredients, no fancy gadgets, just a reliable starter and a few fresh produce items.
- Uniqueness: The use of jalapeños in a sourdough base is a game-changer, turning a simple loaf into a conversation starter.
- Crowd Reaction: Friends rave about the crunch and the heat, and the loaf is always the first to disappear at gatherings.
- Ingredient Quality: Fresh cheddar, hand-picked jalapeños, and a robust starter are the secret to the depth of flavor.
- Cooking Method: A two-stage rise and a blistering finish that gives the loaf a professional look.
- Make‑Ahead Potential: The dough can be prepared the night before and baked in the morning, saving you time on busy days.
Inside the Ingredient List
The Flavor Base
At the heart of every great loaf is a solid base. The all-purpose flour provides the structure, while the sourdough starter brings that signature tang and leavening power. The water hydrates the flour, allowing gluten strands to develop. Salt is the flavor enhancer that balances the sweetness of the flour and the acidity of the starter. Together, these four ingredients form the foundation that supports the rest of the flavor components. If you skip the starter, the loaf will be flat and lifeless; if you omit the salt, the dough will taste bland and the yeast will over-ferment.
The Texture Crew
The shredded cheddar cheese is the star of the texture game. Its high fat content melts into the crumb, creating a gooey, creamy center that contrasts with the crisp crust. Butter, melted and folded in at the final mix, adds a silky sheen to the dough and enhances the overall mouthfeel. Garlic powder and black pepper introduce a savory depth that complements the heat from the jalapeños. These ingredients work together to give the loaf a satisfying bite that feels both crunchy and soft. If you’re lactose intolerant, you can replace the cheddar with a dairy-free cheese alternative, but the mouthfeel will change slightly.
The Unexpected Star
Jalapeños are more than just a garnish; they’re the secret weapon that elevates this loaf. Seeded and finely chopped, they release heat without overwhelming the bread. The capsaicin in the jalapeños also reacts with the cheese, creating a subtle, lingering warmth that stays on the palate. The heat is balanced by the richness of the cheddar, making the loaf approachable for those who love spice but are not ready for a full-on fiery experience. If you prefer a milder heat, you can reduce the amount of jalapeño or use a milder pepper like poblano.
The Final Flourish
Butter, garlic powder, and pepper are the finishing touches that round out the flavor profile. They’re added at the last moment to preserve their aroma and prevent them from becoming bitter. The butter also helps to create a golden, blistered crust that’s both visually appealing and delicious. A pinch of cayenne pepper adds a subtle kick that’s not immediately obvious but adds depth. The final flourish is what turns a good loaf into an unforgettable experience. If you’re feeling adventurous, sprinkle a little smoked paprika on top before baking for a smoky undertone.
Everything's prepped? Good. Let's get into the real action...
The Method — Step by Step
- Step 1: Preheat and Prep Preheat your oven to 425°F (220°C) and place a baking stone or steel on the middle rack. While the oven heats, line a baking sheet with parchment paper for the final bake. This ensures that the loaf will have a clean release and a crisp bottom. The temperature is critical; too low and the crust won’t blister, too high and the loaf will burn before the center cooks.
- Step 2: Mix the Dough In a large mixing bowl, combine 2 cups of all-purpose flour, 1 cup of active sourdough starter, 1 cup of water, and 1 tsp of salt. Stir until a shaggy dough forms, then let it rest for 30 minutes (autolyse). During this rest, the flour hydrates and gluten begins to develop. The salt is added after the autolyse to avoid inhibiting the yeast activity.
- Step 3: Add the Jalapeños and Cheese Fold in 1 finely diced jalapeño and 1 cup of shredded sharp cheddar cheese. The jalapeños should be small enough to distribute heat evenly, while the cheese should be fine enough to melt into the crumb. This step is where the flavor really starts to build; you’ll smell the buttery, spicy aroma that signals you’re on the right track.
- Step 4: Incorporate Butter and Seasonings Add 2 tbsp of melted butter, 1 tsp of garlic powder, 0.5 tsp of black pepper, and a pinch of cayenne pepper to the dough. Mix until the butter is fully integrated and the dough is smooth. The butter will give the loaf a silky sheen, while the spices add depth. The cayenne pepper is optional but adds a subtle heat that balances the jalapeño.
- Step 5: Bulk Fermentation Cover the bowl with a damp cloth and let the dough rise at room temperature for 4 to 5 hours, or until it has doubled in size. During this period, the wild yeast ferments sugars, producing carbon dioxide that leavens the dough. Keep an eye on the dough; if your kitchen is warm, the rise may happen faster. If it’s cooler, give it a bit more time.
- Step 6: Shape the Loaf Gently turn the dough onto a lightly floured surface. Shape it into a tight, round loaf by folding the edges into the center. This step is crucial for achieving a uniform rise and a beautiful crust. The dough should feel elastic and spring back when you press it lightly.
- Step 7: Proof the Loaf Place the shaped loaf on the parchment-lined baking sheet. Cover with a clean towel and let it proof for 45 minutes to 1 hour. During proofing, the loaf will expand and develop a slightly domed shape. The dough should feel airy and springy. If you’re short on time, you can skip this step and bake immediately, but the loaf will be less airy.
- Step 8: Score and Bake Just before baking, use a sharp knife to score a shallow slash across the top of the loaf. This allows the loaf to expand without cracking. Slide the loaf onto the preheated stone or skillet and bake for 25 to 30 minutes, or until the crust is blistered and the internal temperature reaches 190°F (88°C). The score should look like a clean, shallow line that helps the loaf rise evenly.
- Step 9: Cool and Finish Remove the loaf from the oven and let it cool on a wire rack for at least 20 minutes. While it cools, drizzle a thin layer of melted butter over the crust for a glossy finish. This step is essential for a beautiful, buttery crust. The cooling period also allows the steam to escape, preventing a soggy bottom. Slice with a serrated knife for clean cuts.
- Step 10: Serve and Enjoy Serve warm, ideally with a side of guacamole or a simple salad. The loaf pairs wonderfully with a cold beer or a glass of iced tea. If you’re planning a gathering, keep the loaf warm in a low oven (about 200°F) for a few hours. The flavors deepen over time, and the cheese becomes even more luscious. Enjoy the experience of biting into that perfect crust, the gooey cheddar center, and the lingering jalapeño heat.
That's it — you did it. But hold on, I've got a few more tricks that'll take this to another level...
Insider Tricks for Flawless Results
The Temperature Rule Nobody Follows
Many bakers assume any 425°F will do, but the exact temperature is a game-changer. Use a baking stone or steel to create a high-heat surface that mimics a professional oven. The stone retains heat, ensuring a blistered crust and a well-cooked interior. If you don’t have a stone, a preheated cast-iron skillet works wonders. Keep the oven door closed during baking to maintain a consistent temperature.
Why Your Nose Knows Best
The aroma of a loaf is a reliable indicator of its readiness. When the dough is about to rise, you’ll smell a sweet, yeasty scent. As it bakes, the aroma shifts to a buttery, slightly caramelized fragrance. If the smell is too sour, it may be over-fermented; if it’s bland, the dough didn’t rise enough. Trust your nose to tell you when the loaf is ready for the oven.
The 5-Minute Rest That Changes Everything
After baking, give the loaf a 5-minute rest on the rack before slicing. This brief pause allows the steam to redistribute, preventing the bottom from becoming soggy. The crumb will also firm up, making it easier to slice cleanly. Skipping this step can result in a loaf that feels gummy or uneven.
Keep the Heat Even with a Water Bath
If your loaf tends to brown too quickly on the top, try placing a shallow pan of water in the oven during the last 10 minutes of baking. The steam will keep the heat even and prevent the crust from burning. This trick is especially useful in ovens that have hot spots or uneven heating.
Use a Sharp Knife for Scoring
Scoring the loaf is essential for a controlled rise. Use a razor blade or a very sharp knife to make clean, shallow cuts. The score allows the loaf to expand without cracking, creating a neat, professional look. Avoid deep cuts, which can cause the loaf to split or collapse.
Don’t Forget the Butter Finish
A thin drizzle of melted butter over the crust after baking adds a glossy sheen and a subtle buttery flavor that enhances the overall taste. The butter also helps seal the crust, keeping the loaf fresh for longer. If you’re looking for extra flavor, add a pinch of sea salt or a sprinkle of dried herbs on top before baking.
Creative Twists and Variations
This recipe is a playground. Here are some of my favorite ways to switch things up:
Smoked Gouda Version
Replace the cheddar with smoked gouda for a smoky, nutty flavor. The smoke pairs beautifully with the jalapeño heat, creating a complex taste profile that’s perfect for a brunch spread.
Herbed Jalapeño Bread
Add a tablespoon of chopped fresh rosemary or thyme to the dough for an aromatic twist. The herbs complement the jalapeño’s heat and add a fragrant, earthy note to the loaf.
Vegan Cheese Alternative
Swap the cheddar for a vegan cheese blend made from cashews and nutritional yeast. This version retains the creamy texture while being dairy-free, making it suitable for vegan diners.
Chocolate Jalapeño Bread
For a dessert take, add 1/4 cup of dark chocolate chips and reduce the jalapeño to a quarter. The chocolate balances the heat, creating a sweet, spicy treat that’s perfect for a dessert table.
Breakfast Power Bread
Incorporate a handful of chopped walnuts and a drizzle of honey into the dough. The nuts add crunch, while the honey provides a subtle sweetness that makes this loaf ideal for breakfast or brunch.
Gluten-Free Adaptation
Use a blend of gluten-free flour (such as rice, tapioca, and potato starch) and a xanthan gum binder to replace the all-purpose flour. The loaf will have a slightly denser crumb but still hold the jalapeño heat and cheesy center.
Storing and Bringing It Back to Life
Fridge Storage
Wrap the cooled loaf tightly in plastic wrap and place it in the refrigerator. It will stay fresh for up to four days. The crust will soften slightly, but the flavor remains intact.
Freezer Friendly
Slice the loaf before freezing for easy portioning. Store slices in a freezer bag, separating each slice with parchment paper. Freeze for up to two months. Thaw overnight in the refrigerator or at room temperature for a quick snack.
Best Reheating Method
To revive a frozen or refrigerated loaf, preheat the oven to 350°F (175°C). Place the loaf on a baking sheet and bake for 10-12 minutes, or until the crust is crisp again. Add a tiny splash of water before reheating to steam the crumb back to perfection.