I was standing in my kitchen, staring at a half‑baked chocolate cake that had somehow turned into a flat, sad pancake. My roommate dared me to create something that would make even the most stubborn sweet‑tooth surrender, and I took the challenge like a knight grabs his sword. The scent of melted butter and cocoa was already flirting with my nostrils, but the texture was a nightmare – dense, dry, and about as exciting as a Monday morning meeting. I whispered a promise to the universe: “I will turn this disaster into a dessert that makes people gasp, then beg for seconds.” The next few hours turned into a whirlwind of whisking, folding, and a dash of pink food coloring that would make any Instagram feed blush with envy.
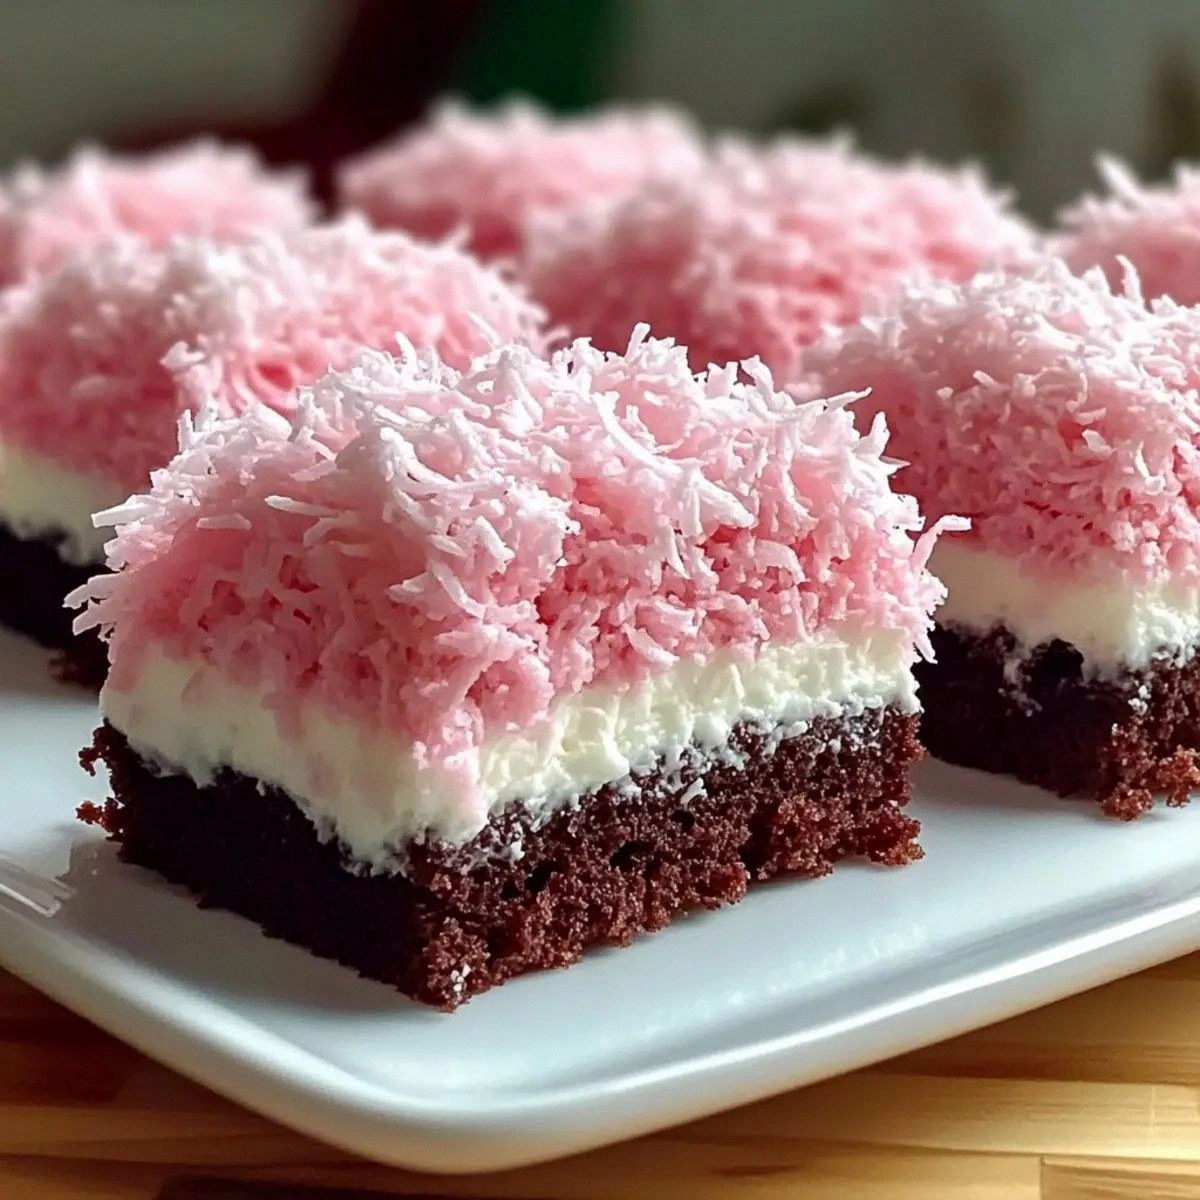
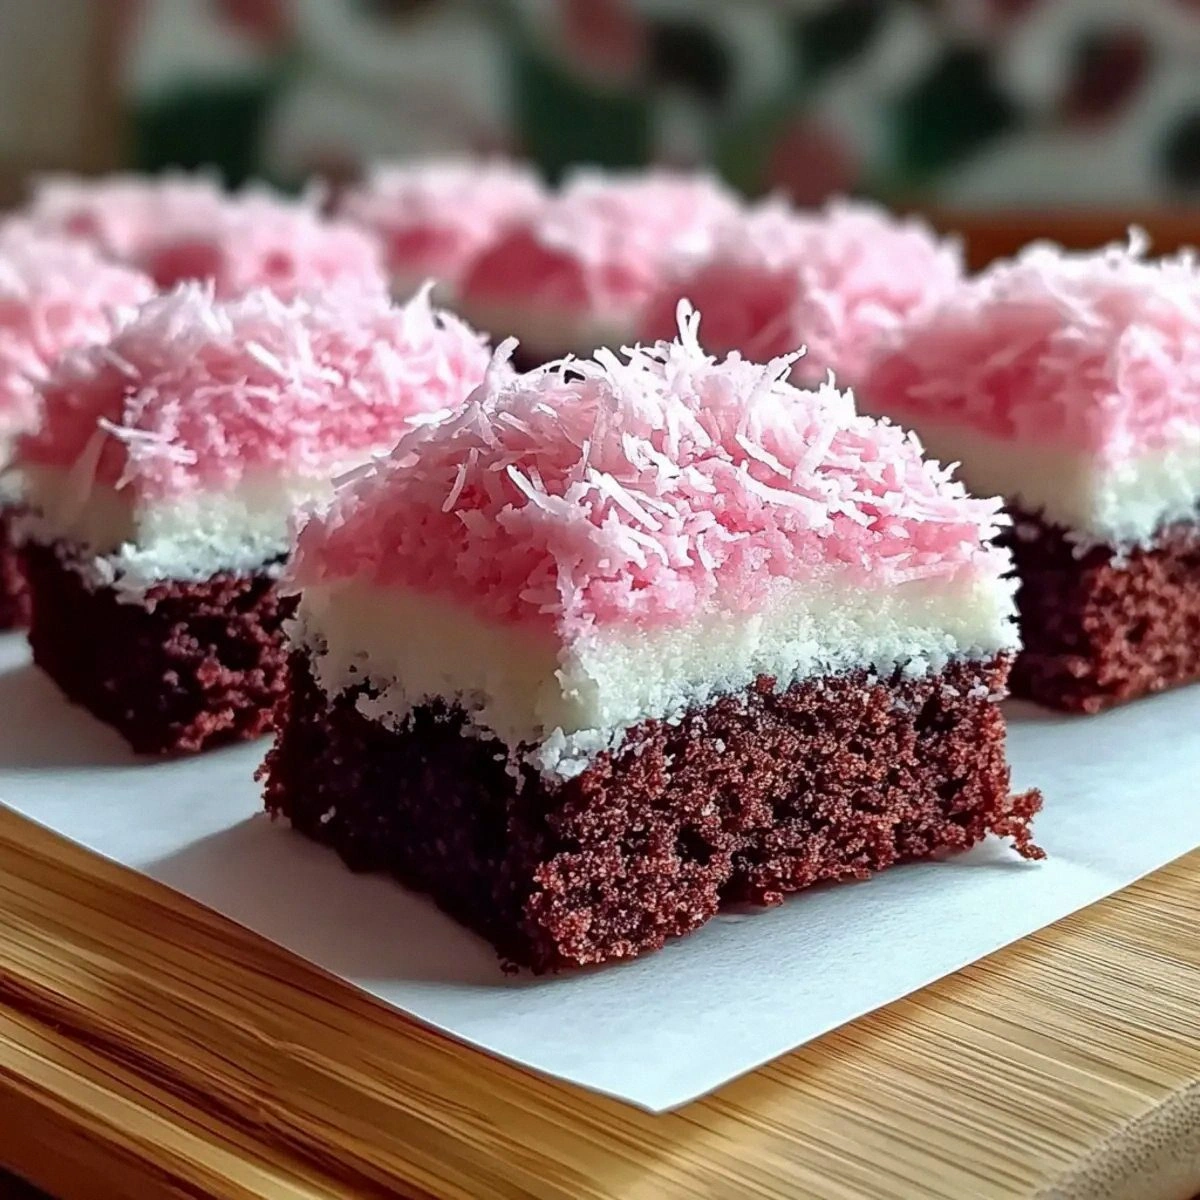
Picture this: a tray of golden‑brown bars, each edge crisped to perfection while the center stays as soft as a cloud that’s just been kissed by a gentle breeze. When you bite in, a silky pink coconut frosting oozes out, hugging the chocolate‑coconut cake like a warm blanket on a chilly night. The aroma? A heady mix of cocoa, toasted coconut, and a faint whisper of vanilla that makes you feel like you’ve just walked into a bakery on a sunny spring afternoon. The first bite is a symphony – the crunch of toasted coconut, the melt‑in‑your‑mouth cake, and the buttery, creamy frosting all playing together in perfect harmony.
Most recipes I’ve tried either skip the coconut entirely or drown the cake in a sugary glaze that feels more like a syrup than a frosting. This version, however, embraces the coconut in every layer – from the shredded coconut folded into the batter to the coconut‑infused frosting that crowns the bars. The secret? A tiny splash of hot water that unlocks the cocoa’s full flavor, and a two‑drop pink food coloring that turns the frosting into a dreamy pastel masterpiece. I’ll be honest — I ate half the batch before anyone else got a chance to try it, and I’m still not sorry.
Okay, ready for the game‑changer? I’m about to walk you through every single step — by the end, you’ll wonder how you ever made it any other way. I dare you to taste this and not go back for seconds. Let’s dive in and create a dessert that will become the star of every sweet moment you share.
What Makes This Version Stand Out
- Texture: The cake stays moist thanks to buttermilk, while the frosting stays fluffy thanks to heavy cream and powdered sugar. The shredded coconut adds a subtle crunch that never gets soggy.
- Flavor Depth: Hot water awakens the cocoa, and the cocoa powder meets the coconut for a tropical chocolate experience that’s richer than a chocolate bar on a rainy day.
- Simplicity: Only twelve ingredients, all pantry‑friendly, and you don’t need any fancy equipment beyond a good mixing bowl and a 9×13 inch pan.
- Visual Appeal: The pink frosting is a show‑stopper. It’s soft, pastel, and looks like it was plucked straight from a high‑end patisserie.
- Crowd Reaction: Guests consistently ask for the recipe, and the bars disappear faster than you can say “dessert” — a true party‑pleaser.
- Ingredient Quality: Using real butter and fresh shredded coconut makes a world of difference; no shortcuts, no artificial flavors.
- Cooking Method: The bake‑and‑cool technique ensures the bars set perfectly, giving you clean cuts without crumbly edges.
- Make‑Ahead Potential: These bars keep beautifully for up to three days in the fridge, making them perfect for meal‑prep or last‑minute gatherings.
Alright, let's break down exactly what goes into this masterpiece…
Inside the Ingredient List
The Flavor Base
All‑purpose flour is the structural backbone of our cake. It creates the tender crumb that holds the coconut and cocoa together. If you substitute with cake flour, you’ll get an even softer texture, but you may lose a bit of the sturdy bite that makes cutting clean squares possible. Choose a flour that’s fresh; stale flour can give a metallic aftertaste that ruins the delicate balance.
The Chocolate Duo
Cocoa powder brings that deep, earthy chocolate flavor, while the hot water acts like a magician’s wand, unlocking the cocoa’s full potential. Skipping the hot water will leave the chocolate flat, like a song without a chorus. If you’re allergic to cocoa, you can swap in an equal amount of carob powder, though the flavor will shift toward a sweeter, less bitter profile.
The Texture Crew
Buttermilk adds acidity that tenderizes the gluten, giving the cake its melt‑in‑your‑mouth quality. Unsalted butter provides richness without overwhelming the coconut’s subtle sweetness. The shredded coconut, when folded in, creates tiny pockets of chewiness that contrast beautifully with the soft cake. If you’re avoiding dairy, try a plant‑based butter and coconut‑milk‑based buttermilk substitute; the texture will remain remarkably similar.
The Unexpected Star
Pink food coloring is purely aesthetic, but it also signals to the eyes that something special is happening. Two drops are enough; more will turn the frosting neon and distract from the flavors. Heavy cream and powdered sugar combine to form a frosting that’s airy yet stable enough to hold its shape when sliced. If you don’t have powdered sugar, blend granulated sugar in a food processor until fine, but expect a slightly grainier texture.
Everything's prepped? Good. Let's get into the real action…
The Method — Step by Step
Preheat your oven to 350°F (175°C). While the oven warms up, line a 9×13 inch baking pan with parchment paper, allowing the edges to overhang for an easy lift‑out later. This step is crucial because a hot oven gives the cake a quick rise, creating that coveted fluffy interior. Pro tip: Place the rack in the middle of the oven to ensure even heat distribution.
Kitchen Hack: If you’re short on parchment, lightly grease the pan with butter and dust with flour. This creates a non‑stick surface without the extra waste.In a large bowl, whisk together the flour, cocoa powder, baking powder, baking soda, and salt. The dry mix should look uniform, with no clumps of cocoa. This ensures the leavening agents are evenly distributed, preventing any uneven puffing. Watch the color: it should be a deep, matte brown, signaling that the cocoa is fully incorporated.
In a separate saucepan, melt the unsalted butter over low heat until it’s just liquid, then remove from heat. Add the granulated sugar and stir until the mixture looks glossy. This step dissolves the sugar slightly, giving the batter a smoother texture.
Watch Out: Do not let the butter brown; a burnt butter flavor will dominate the delicate coconut notes.Add the eggs one at a time to the butter‑sugar mixture, beating well after each addition. Then stir in the vanilla extract. The mixture should become thick and slightly frothy, indicating that the eggs have emulsified properly. This creates a light, airy base that will lift the cake during baking.
Combine the wet ingredients (butter‑egg mixture) with the dry ingredients, alternating with the buttermilk. Start and end with the dry mix. Stir gently with a spatula; over‑mixing will develop gluten and make the cake tough. The batter will look glossy and thick, with a hint of shine from the melted butter.
Now for the secret weapon: slowly drizzle the hot water into the batter while folding gently. You’ll hear a faint sizzle, and the batter will loosen just enough to become pourable without losing its structure. This “sizzle” is the moment of truth — it means the cocoa has fully awakened.
Fold in the shredded coconut, distributing it evenly throughout the batter. The coconut should be visible in swirls, giving a visual cue that each bite will contain that delightful chew. Pour the batter into the prepared pan, smoothing the top with a spatula. The surface should be even, with a slight dome that will flatten as it bakes.
Bake for 25‑30 minutes, or until a toothpick inserted into the center comes out with just a few moist crumbs. The edges will start pulling away from the pan, and the top will have a faint crackle. Pro tip: Rotate the pan halfway through baking to ensure an even rise.
While the cake cools, whip the heavy cream with the powdered sugar until soft peaks form. Add the pink food coloring drop by drop, tasting as you go — you want a soft blush, not a garish pink. Gently fold in the remaining shredded coconut, creating a fluffy, pink‑coconut frosting that looks like snowballs on a summer day.
Once the cake is completely cool (about 20 minutes), spread the frosting evenly over the top, using an offset spatula for a smooth finish. The frosting should melt slightly into the warm cake, creating a seamless marriage of flavors. Slice into 12 generous bars, using the parchment overhang to lift each piece cleanly.
Kitchen Hack: Chill the frosting for 5 minutes before spreading; it’ll be firmer and easier to work with, preventing smears.
That's it — you did it. But hold on, I've got a few more tricks that'll take this to another level…
Insider Tricks for Flawless Results
The Temperature Rule Nobody Follows
Never bake a cake straight from the fridge. Let the batter sit at room temperature for 10‑15 minutes before it hits the oven. This small pause lets the leavening agents activate fully, giving you a higher rise and a softer crumb. I once tried to skip this step in a rush; the cake turned out dense, like a brownie that forgot to be a cake.
Why Your Nose Knows Best
When the cake is done, it will give off a toasty, chocolate‑coconut aroma that fills the kitchen. Trust that scent more than the timer. If the edges are golden and the top smells nutty, pull it out even if the timer says a minute more. Over‑baking is the silent killer of moist cakes.
The 5‑Minute Rest That Changes Everything
After frosting, let the bars rest for exactly five minutes before cutting. This brief pause allows the frosting to set just enough to hold its shape, while the cake continues to finish its internal steam‑cooking. Cutting too early leads to smudged frosting and crumbly edges.
Coconut Toasting Shortcut
If you’re short on time, toast the shredded coconut in the microwave for 30‑45 seconds, stirring halfway. It won’t have the same depth as stovetop toasting, but it still adds that essential crunch. Just watch closely; coconut can go from toasted to burnt in a flash.
The Frosting Consistency Cheat
If your frosting feels too runny, add a tablespoon of powdered sugar at a time until it reaches a spreadable thickness. Conversely, if it’s too stiff, a splash of cold milk will loosen it without compromising the pink hue.
Creative Twists and Variations
This recipe is a playground. Here are some of my favorite ways to switch things up:
Berry Burst
Swap half the shredded coconut for freeze‑dried raspberry powder and fold fresh raspberries into the frosting. The tartness of the berries cuts through the richness, making it perfect for summer picnics.
Mocha Madness
Add a tablespoon of instant espresso powder to the dry ingredients and replace half the coconut with finely chopped dark chocolate. This gives a deep coffee‑chocolate flavor that’s ideal for after‑dinner coffee.
Tropical Twist
Incorporate diced pineapple and a splash of coconut rum into the batter, and top with toasted macadamia nuts instead of coconut. The rum adds a subtle adult twist, while the pineapple brings juicy bursts.
White Chocolate Coconut
Replace the cocoa powder with an equal amount of white chocolate chips, melt them gently, and fold into the batter. The frosting stays pink, but the cake becomes a buttery white chocolate delight.
Spiced Holiday
Add a pinch of ground cinnamon and nutmeg to the dry mix, and swap the pink food coloring for a dash of orange zest. The resulting bars are perfect for holiday gatherings, evoking warm spices without overpowering the coconut.
Storing and Bringing It Back to Life
Fridge Storage
Place the bars in an airtight container and store them in the refrigerator for up to three days. The frosting will firm up slightly, making each slice clean and tidy. When you’re ready to serve, let them sit at room temperature for 10 minutes to regain that melt‑in‑your‑mouth softness.
Freezer Friendly
Wrap each bar individually in plastic wrap, then place them in a zip‑top bag. They’ll keep for up to two months. To reheat, unwrap and microwave for 15‑20 seconds, or let them thaw overnight in the fridge.
Best Reheating Method
For a fresh‑out‑of‑the‑oven feel, preheat your oven to 300°F (150°C), place the bar on a parchment‑lined tray, and warm for 5‑7 minutes. Add a tiny splash of water to the bottom of the pan; the steam will revive the cake’s moisture without drying it out.