I was standing in my kitchen, surrounded by a mountain of half‑baked cookies, a burnt batch of brownies, and a lingering sense that something was missing from my dessert arsenal. My friend had dared me to create a chocolate tart that could survive a blind taste‑test against a professional patissier, and I laughed so hard I almost dropped the whisk. That night, I dreamed of a silky ganache that clung to a buttery crust like a midnight kiss, and the next morning I was rummaging through my pantry like a detective on a high‑stakes case. The smell of cocoa filled the air, the sound of the oven humming was a comforting bass line, and the sight of glossy dark chocolate melting in a saucepan was pure visual poetry. I was determined: this would be the tart that made even the most skeptical sweet‑tooth say, “I dare you to taste this and not go back for seconds.”
Fast forward a few hours of trial, error, and a few secret snack breaks (I’ll be honest — I ate half the batch before anyone else got to try it), and I finally nailed the perfect balance of crunch, cream, and that subtle salty snap that makes your taste buds do a happy dance. Most recipes get this completely wrong: they either over‑sweeten the ganache, under‑bake the crust, or forget the magical finish of flaky sea salt that turns a simple dessert into a conversation starter. My version uses a chocolate wafer crust that’s both sturdy enough to hold a generous pour of ganache and delicate enough to crumble at the slightest touch, and a ganache that’s so glossy it looks like it was poured straight from a jeweler’s shop. The secret? A splash of heavy whipping cream that adds body without heaviness, and a whisper of vanilla bean paste that adds depth without overwhelming the chocolate.
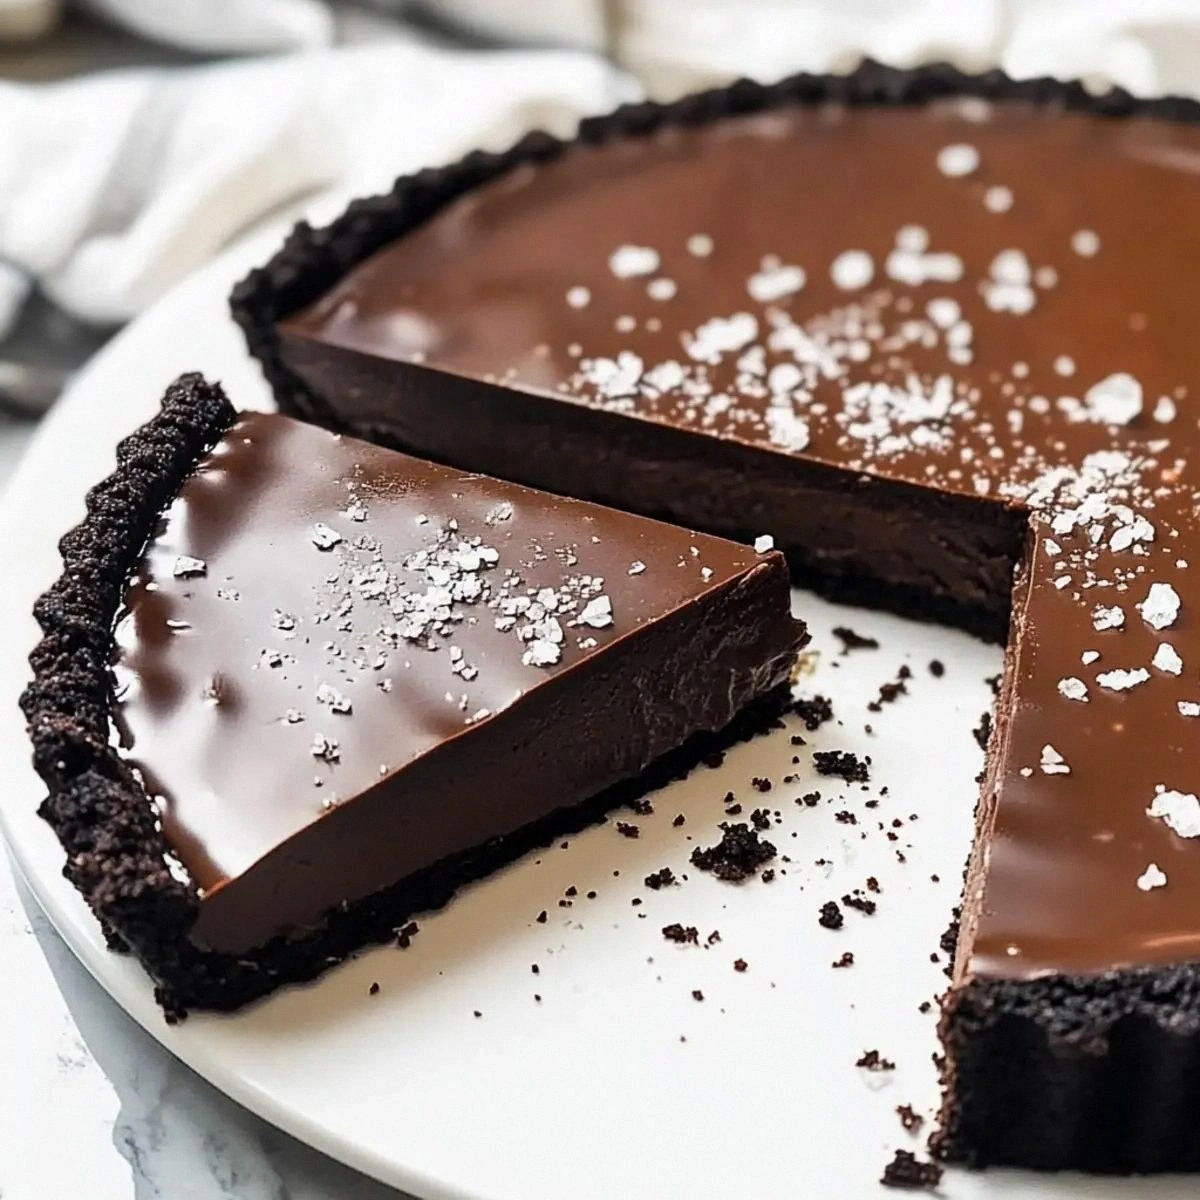
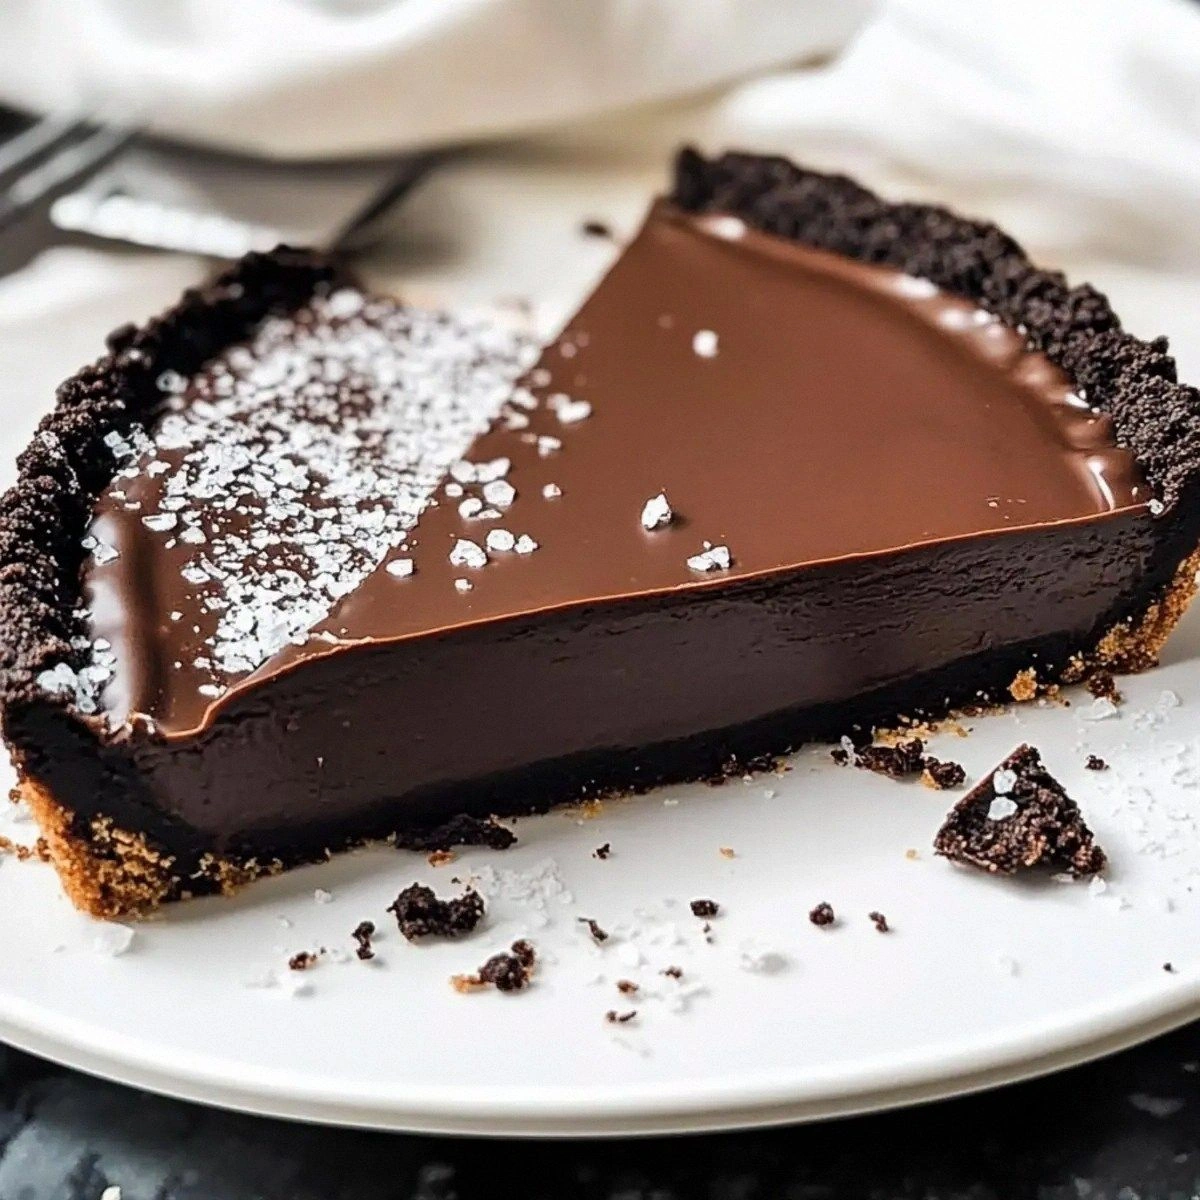
Picture yourself pulling this out of the oven, the whole kitchen smelling incredible, the crust golden and the ganache set to a perfect matte sheen. The first bite is a symphony: the wafer crust gives a faint crunch, the ganache melts like velvet on your tongue, and the flaky sea salt pops like fireworks, leaving a lingering, luxurious aftertaste. This is hands down the best version you’ll ever make at home, and I’m not exaggerating — I’ve tried countless variations and none have come close. If you’ve ever struggled with a soggy base or a grainy ganache, you’re not alone — and I’ve got the fix right here, down to the last gram.
Okay, ready for the game‑changer? I’m about to walk you through every single step — from crushing those chocolate wafers into a perfect crumb to mastering the glossy ganache that will make your guests swoon. By the end, you’ll wonder how you ever made it any other way, and you’ll have a go‑to dessert that works for birthdays, holidays, or just a random Tuesday when you need a reason to celebrate. Let’s dive in and turn that kitchen chaos into pure, irresistible chocolate bliss.
What Makes This Version Stand Out
- Texture: The wafer crust provides a buttery crunch that holds up under a generous layer of ganache, preventing sogginess and delivering a satisfying bite contrast.
- Flavor Depth: Dark chocolate paired with vanilla bean paste creates a layered flavor profile that evolves with each forkful, from bitter to sweet to salty.
- Simplicity: Only eight core ingredients are needed, yet each plays a pivotal role, making the recipe approachable for both beginners and seasoned bakers.
- Uniqueness: The addition of flaky sea salt on top adds a gourmet touch that most home recipes overlook, turning a simple tart into a restaurant‑level masterpiece.
- Crowd Reaction: This tart consistently earns the “wow” factor at parties, with guests lining up for seconds and begging for the recipe.
- Ingredient Quality: Using high‑percentage dark chocolate (70%+ cacao) ensures a rich, complex taste without needing extra flavorings.
- Cooking Method: The blind‑bake technique locks in the crust’s structure, while a gentle simmer for the ganache guarantees a silky finish.
- Make‑Ahead Potential: The tart can be assembled up to two days ahead and stored in the fridge, making it perfect for last‑minute celebrations.
Inside the Ingredient List
The Flavor Base
12 oz Dark Chocolate: This is the heart of the ganache. Choose a chocolate with at least 70% cacao for a deep, slightly bitter backbone that balances the sweetness of the cream. Skipping this for a lower‑cocoa bar will result in a bland, overly sweet ganache that lacks that satisfying snap. If you can’t find a bar, a high‑quality chocolate chips work, but melt them gently to avoid a grainy texture.
1.5 cups Heavy Cream: The fat content in heavy cream creates that luxurious, glossy sheen you see in a professional patisserie. Using half‑and‑half will make the ganache thin and prone to separating. For a dairy‑free twist, substitute with coconut cream, but expect a subtle coconut note that can be delightful if you’re feeling adventurous.
The Texture Crew
1 cup Chocolate Wafer Crumbs: These wafers provide a sweet, buttery crunch that pairs perfectly with the smooth ganache. If you substitute with graham crackers, you’ll lose the chocolatey depth and the crust will taste more like a classic cheesecake base. Look for wafers with a high cocoa content for the best flavor alignment.
4 tbsp Butter (crust) & 4 tbsp Butter (ganache): Butter is the glue that holds the wafer crumbs together, creating a cohesive crust that won’t crumble when sliced. In the ganache, the second batch of butter adds shine and a buttery mouthfeel that makes each bite melt instantly. Using margarine will compromise both texture and flavor, resulting in a greasy crust and a dull ganache.
The Unexpected Star
1 tbsp Flaky Sea Salt: This isn’t just a garnish; it amplifies the chocolate’s bitterness and creates a delightful pop that awakens the palate. A pinch of regular table salt won’t give the same crystalline crunch, and too much will overwhelm the delicate balance. Sprinkle it just before serving for maximum impact.
1 tsp Vanilla Bean Paste: Vanilla bean paste provides a concentrated vanilla flavor without the watery dilution you get from extract. It also adds specks of vanilla seeds that look gorgeous against the dark ganache. If you only have extract, use double the amount, but expect a slightly less complex aroma.
The Final Flourish
1 cup Heavy Whipping Cream: Added at the very end, this cream lightens the ganache just enough to give it a silk‑like texture without compromising its richness. Skipping this step will leave the ganache dense and heavy, making it difficult to spread. Whip it just until soft peaks form, then fold it gently into the ganache.
Sugar: A modest amount of sugar balances the bitterness of the dark chocolate. If you prefer a less sweet tart, reduce the sugar by a quarter; if you love a dessert that leans toward candy, add an extra tablespoon. Always taste the ganache before it sets; you can adjust sweetness at this stage.
Everything's prepped? Good. Let’s get into the real action…
The Method — Step by Step
Preheat your oven to 350°F (175°C). While the oven warms, line a 9‑inch tart pan with parchment paper and lightly grease the sides. This ensures the crust releases cleanly later, preventing that dreaded “stuck‑to‑the‑pan” drama. The kitchen will start to fill with the faint aroma of butter as you melt it, a signal that you’re on the right track.
Kitchen Hack: If you don’t have a tart pan, a springform pan works fine; just press the crust firmly against the sides to mimic the fluted edge.Combine the chocolate wafer crumbs and 4 tbsp butter (crust) in a bowl. Use your fingertips to rub the butter into the crumbs until the mixture resembles wet sand. This tactile step is crucial – the crumbs should clump together when pressed, not crumble apart. Once it feels right, press the mixture evenly into the bottom and up the sides of the pan, creating a uniform layer about ¼‑inch thick.
Place the crust in the preheated oven and blind‑bake for 12‑15 minutes, or until it turns a light golden hue and feels firm to the touch. Keep an eye on the edges; they should start to pull away from the parchment, a visual cue that the crust is set. Remove the pan and let it cool on a wire rack while you prepare the ganache.
In a saucepan, bring 1.5 cups heavy cream to a gentle simmer – you’ll see tiny bubbles forming around the edges, but the cream should not boil. This is the moment of truth: a rolling boil will scorch the cream, resulting in a bitter ganache. Once simmering, remove the pan from heat and immediately pour in the 12 oz dark chocolate, letting it sit for 2 minutes to melt.
Stir the chocolate‑cream mixture with a silicone spatula until you achieve a glossy, homogenous ganache. Add the second 4 tbsp butter (ganache) and the vanilla bean paste, whisking until the butter is fully incorporated. The ganache should become even shinier, a sign that the emulsion is perfect. Taste now and add sugar if you prefer a sweeter profile.
Watch Out: If the ganache looks grainy, you’ve either overheated the cream or added cold butter; gently re‑heat over a bain‑marie while whisking to smooth it out.Let the ganache cool for about 5‑7 minutes until it thickens slightly but is still pourable. Then, pour it over the pre‑baked crust, starting from the center and using a spatula to guide the flow toward the edges. The ganache should spread evenly, creating a smooth surface that glistens under the kitchen light. If any bubbles appear, give the tart a gentle tap on the counter to release them.
Re‑enter the tart into the oven, this time at 300°F (150°C), and bake for an additional 10‑12 minutes. This low‑heat finish sets the ganache without over‑cooking it, preserving that melt‑in‑your‑mouth texture. You’ll notice the edges of the ganache pulling away from the crust by a millimeter – that’s your cue it’s done.
Kitchen Hack: For an ultra‑smooth top, run a hot, damp pastry brush quickly over the surface right after pouring the ganache; the heat smooths out any tiny imperfections.Remove the tart from the oven and allow it to cool completely on a wire rack; this can take 30‑45 minutes. While it cools, whip the 1 cup heavy whipping cream to soft peaks and fold it gently into the cooled ganache for an airy lift. This step is optional but adds a cloud‑like lightness that makes the tart feel less dense.
Once the tart is fully set, sprinkle the flaky sea salt evenly across the surface. The salt crystals should sit like tiny snowflakes, each one ready to pop as you bite. Transfer the tart to a serving plate, slice with a hot knife (dip the blade in hot water and wipe dry between cuts), and admire the glossy sheen. That sizzle when the knife meets the ganache? Absolute perfection.
That's it — you did it. But hold on, I've got a few more tricks that'll take this to another level, because why settle for good when you can have legendary?
Insider Tricks for Flawless Results
The Temperature Rule Nobody Follows
Never, ever pour a hot ganache over a cold crust. The temperature shock can cause the crust to crack, ruining the visual appeal and texture. Warm the crust slightly (about 110°F) before pouring; you’ll hear a faint “sizzle” that signals perfect adhesion. A friend once skipped this step and ended up with a shattered base that looked like a chocolate crime scene — not pretty.
Why Your Nose Knows Best
Your sense of smell is a more reliable indicator of doneness than a timer when it comes to the ganache. When the mixture releases a deep, roasted chocolate aroma and the butter scent becomes buttery‑sweet, you know it’s ready. If you rely solely on the clock, you risk over‑cooking, which leads to a dull, matte finish. Trust your nose; it’s the secret weapon of every pastry chef.
The 5‑Minute Rest That Changes Everything
After the ganache sets, give it a 5‑minute rest before adding any toppings. This brief pause allows the fats to re‑align, giving the surface a natural shine without the need for a glaze. Skipping this rest often results in a dull top that looks like it’s been microwaved. I’ve seen this happen on a live stream once – the audience gasped when the tart looked “sad.”
Whisk‑Free Ganache
Instead of a whisk, use a silicone spatula to stir the ganache. The spatula’s gentle motion prevents air bubbles from forming, which can cause unsightly speckles once the ganache sets. If you must whisk, do it slowly and stop as soon as the mixture is smooth. The result is a flawless, mirror‑like surface that shines under any light.
Salt Timing Mastery
Add the flaky sea salt just before serving, not during baking. Salt loses its crunch when exposed to heat, turning into a flat, salty dust. By sprinkling it at the last moment, each bite delivers a burst of salty contrast that elevates the chocolate. This tiny timing tweak separates a good tart from a show‑stopping one.
Creative Twists and Variations
This recipe is a playground. Here are some of my favorite ways to switch things up:
Spicy Chili Chocolate
Add a pinch of cayenne pepper or a dash of chipotle powder to the ganache for a subtle heat that awakens the palate. The spice pairs beautifully with the deep cocoa, making it a hit at adult gatherings. Serve with a dollop of whipped cream to mellow the heat.
Nutty Crunch
Fold in toasted almond slivers or hazelnut pieces into the crust before baking. The nutty aroma adds complexity, while the crunch contrasts with the silky ganache. This version is perfect for brunches where you want a bit of protein in the dessert.
Citrus Zest Burst
Stir in one tablespoon of finely grated orange zest into the ganache. The citrus lifts the richness and adds a fresh, fragrant note that makes the tart feel lighter. It’s a summer favorite, especially when paired with a glass of chilled Prosecco.
White Chocolate Dream
Swap the dark chocolate for high‑quality white chocolate and replace the sea salt with a sprinkle of crushed pink peppercorns. The result is a sweet, buttery tart with a peppery finish that’s unexpected yet delightful. Ideal for a wedding dessert table.
Coffee Infusion
Dissolve a tablespoon of instant espresso powder in the heavy cream before adding the chocolate. The coffee deepens the chocolate flavor, giving it an espresso‑kissed nuance that coffee lovers adore. Top with a dusting of cocoa powder for an elegant finish.
Storing and Bringing It Back to Life
Fridge Storage
Cover the tart loosely with plastic wrap and store it in the refrigerator for up to 3 days. The ganache will firm up, but it remains creamy enough to slice cleanly. When ready to serve, let it sit at room temperature for 20 minutes to regain its silky texture.
Freezer Friendly
Wrap the tart tightly in foil, then place it in an airtight container before freezing. It will keep for up to 1 month. To revive, thaw overnight in the fridge, then let it sit at room temperature for 30 minutes. A tiny splash of heavy cream (about a tablespoon) whisked in will bring back that glossy sheen.
Best Reheating Method
If you prefer a warm serving, preheat the oven to 300°F (150°C), place the tart on a baking sheet, and heat for 5‑7 minutes. Add a teaspoon of water to the edge of the tart before reheating; the steam helps the ganache melt back to its original luster without drying out.