The kitchen had turned into a disaster zone the night I tried to make a simple teriyaki chicken. The pan was smoking, the sauce was stuck to the bottom like a stubborn stain, and my confidence was evaporating faster than the steam. I stared at the charred mess, wondering how a recipe that promised silky sweetness could turn into a culinary crime scene. That moment was the spark that ignited my quest for the ultimate teriyaki experience. I swore to myself that the next time I would turn a batch of chicken into a masterpiece, not a mess.
The air was thick with the scent of caramelized sugar and soy, a smell that made my stomach growl even before I tasted the first bite. The sizzling sound of the chicken hitting the hot grill sent a shiver down my spine, a cue that something delicious was about to happen. The sight of the sauce bubbling and thickening into a glossy glaze was like watching a sunrise in a saucepan. The first bite was a burst of umami, sweet, and smoky flavors that danced on my tongue, leaving a lingering warmth that made my eyes water. That moment felt less like a meal and more like a small celebration.
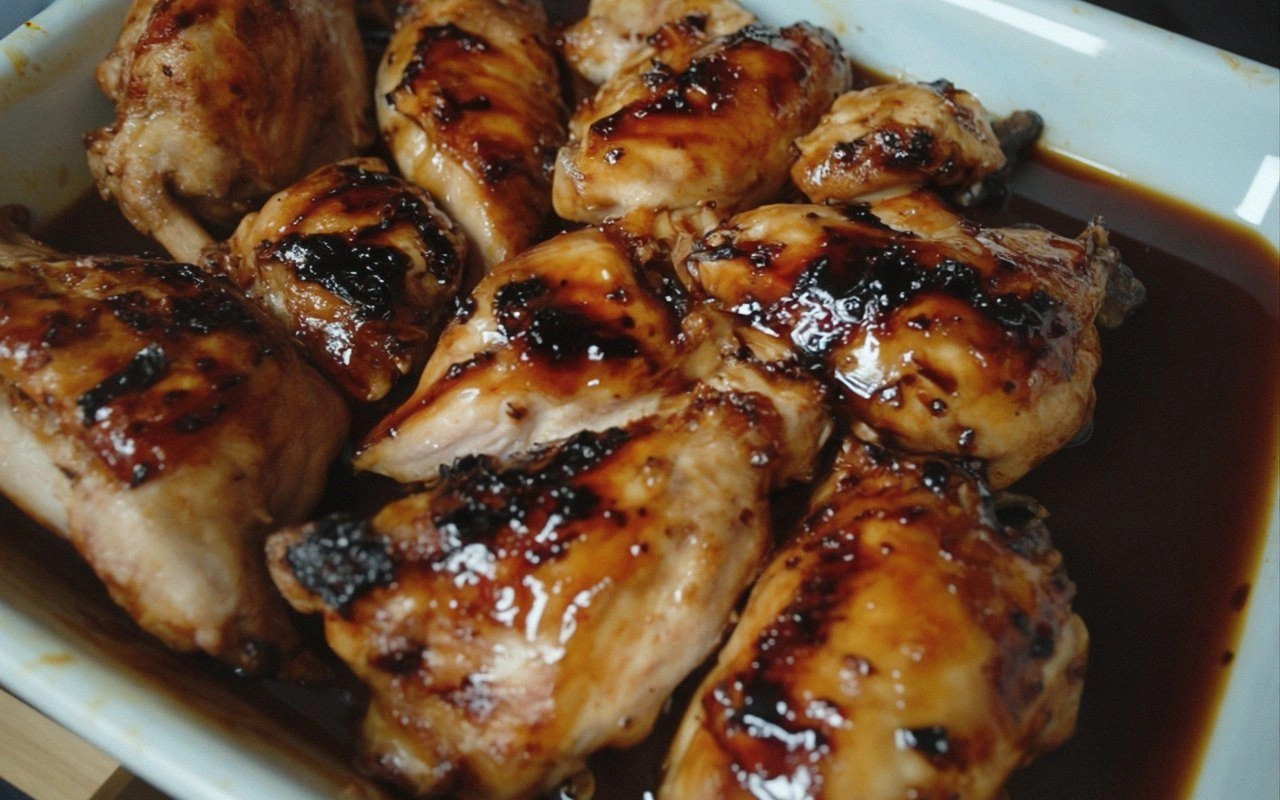
What makes this version a game‑changer is the meticulous balance of sweet and savory, the use of mirin for a subtle depth that most copy‑cat recipes lack, and the final grill char that gives the thighs a smoky kiss. The sauce isn’t just a glaze; it’s a flavor passport that transports you straight to a Hawaiian beach. The chicken stays moist and tender because the cornstarch coating locks in juices while the glaze coats like velvet. The recipe is simple enough for a novice but sophisticated enough to impress a foodie at dinner. Every bite is a revelation, and that’s why I call it the best teriyaki chicken you’ll ever make at home.
A secret ingredient that sets this apart is the double‑sugar technique—white sugar for sweetness and brown sugar for that deep, caramelized note—combined with a splash of mirin that adds a subtle acidity and a hint of sweetness. The sauce’s viscosity is achieved by reducing it to a perfect thickness, which means it sticks to the spoon like a glossy ribbon. The final step of grilling the chicken after simmering the sauce gives it a charred edge that cracks like thin ice when you bite into it. The result is a dish that’s simultaneously comforting and adventurous. Trust me, I dare you to taste this and not go back for seconds.
Okay, ready for the game‑changer? This next part is pure magic. The trick is to let the sauce reduce until it coats the spoon like a glossy ribbon. Then, when you grill the thighs, you’ll notice the edges pulling away from the meat, creating a crispy, caramelized crust. That sizzle when it hits the pan? Absolute perfection. Let me walk you through every single step—by the end, you’ll wonder how you ever made it any other way.
What Makes This Version Stand Out
- Flavor Fusion: The sauce marries sweet, savory, and a hint of acidity in a way that lingers on the palate. The combination of soy, mirin, and dual sugars creates a depth that most teriyaki recipes miss. The result is a glaze that coats the chicken like velvet.
- Texture Mastery: A light coat of cornstarch turns the surface into a silky barrier, preserving juices while allowing the grill to char the edges. The char creates a crisp, caramelized crust that snaps like thin ice. The inside remains tender and juicy.
- Simplicity Meets Sophistication: With just a handful of pantry staples and fresh ginger, you can deliver a dish worthy of a five‑star restaurant. The method requires no fancy equipment—just a skillet and a grill. The outcome is effortlessly impressive.
- Make‑Ahead Friendly: The glaze can be prepared a day ahead, refrigerated, and reheated without losing flavor. The chicken can also be marinated overnight for deeper flavor infusion. This flexibility makes it perfect for busy weeknights or weekend gatherings.
- Audience Magnet: Friends and family rave about the sweet‑savory crunch and the smoky finish. It’s the kind of dish that turns a casual dinner into a memorable event. The aroma alone will have guests lining up at the door.
- Ingredient Integrity: Using fresh ginger, garlic, and real soy sauce ensures authenticity, while the mirin adds a subtle sweetness that’s hard to replicate. The combination of white and brown sugar gives a balanced sweetness profile. No artificial flavors or excessive salt.
- Visual Appeal: The glossy glaze, green onion garnish, and sesame seeds create a plate that looks as good as it tastes. The golden char lines on the thighs add contrast. The dish is Instagram‑ready.
Alright, let's break down exactly what goes into this masterpiece...
Inside the Ingredient List
The Flavor Base
Soy sauce or tamari is the backbone of any teriyaki, delivering that umami punch that anchors the sweetness. Opt for a low‑sodium version if you’re watching your salt intake, but remember that the sauce will still need a pinch of pepper to balance the sweetness. Fresh garlic and ginger bring a bright, aromatic kick that cuts through the richness of the glaze. If you’re in a rush, pre‑minced garlic or grated ginger can save time, but the fresh versions will give you the best flavor.
Mirin adds a subtle sweetness and a hint of acidity that lifts the sauce. It’s a Japanese rice wine that is slightly sweet and slightly tangy, and it’s the secret to that glossy sheen. If you can’t find mirin, you can substitute with a mix of rice vinegar and a splash of honey, but the flavor profile will shift slightly. The pepper is a subtle counterpoint that keeps the sauce from feeling too flat.
The Sweet Symphony
White sugar is the primary sweetener that gives the glaze its quick dissolving quality. It caramelizes quickly, forming a glossy coating that clings to the chicken. Brown sugar, on the other hand, brings depth and a subtle molasses flavor that prevents the sauce from becoming too one‑dimensional. The ratio of white to brown sugar in this recipe is 2:1, a sweet spot that balances brightness and richness.
If you’re looking for a low‑carb version, you can swap the white sugar for a sugar substitute like erythritol, but keep in mind that the caramelization will be reduced. For a more intense flavor, add a pinch of sea salt to the sauce; the salt will bring out the sweetness and deepen the umami. The sugars also help create the perfect glaze viscosity, so don’t skip them.
The Texture Crew
Cornstarch is the unsung hero that gives the glaze its silky body. When it’s mixed with a little cold water, it forms a slurry that thickens the sauce without adding heaviness. Tossing the chicken in cornstarch before grilling creates a light crust that locks in juices and gives a satisfying snap when you bite. If you’re allergic to cornstarch, arrowroot powder works as a suitable substitute.
The cornstarch also helps the glaze adhere to the chicken, preventing it from sliding off. It’s especially useful when you’re grilling because the heat can cause the sauce to separate. A light dusting of cornstarch is enough; too much will make the coating gummy.
The Final Flourish
Green onions add a fresh, peppery note that cuts through the sweetness of the glaze. They also provide a bright pop of color that makes the dish visually appealing. Slice them thinly so they distribute evenly across the chicken. If you prefer a milder flavor, replace them with scallions or chives.
Sesame seeds add a nutty crunch that complements the glossy glaze and the charred edges. Toast them lightly in a dry pan before sprinkling them on top to release their aroma. The seeds also add a subtle earthiness that balances the sweet, savory sauce. If you’re vegan, you can use pumpkin seeds as a crunchy alternative.
Everything's prepped? Good. Let's get into the real action...
The Method — Step by Step
- Pat the chicken thighs dry with paper towels, then lightly season both sides with a pinch of black pepper. The pepper adds a subtle heat that balances the sweetness of the glaze. A dry surface ensures the cornstarch adheres better and the chicken grills evenly. Let the chicken sit at room temperature for about 10 minutes before cooking; this helps it cook more uniformly.
- In a shallow dish, toss the chicken thighs in cornstarch until they’re lightly coated. Shake off any excess; a thin layer is all you need. The cornstarch will create a delicate crust that locks in juices and gives a satisfying snap when you bite. The coating also helps the glaze stick to the meat.
- In a medium saucepan, combine soy sauce, mirin, white sugar, brown sugar, minced garlic, grated ginger, and black pepper. Stir over medium heat until the sugars dissolve completely. The mixture should be smooth and glossy; if it looks lumpy, give it another stir. This is the heart of the dish, so take your time.
- Bring the sauce to a gentle simmer and let it reduce for 10–12 minutes, or until it reaches a thick, syrupy consistency. You’ll know it’s ready when a small amount coats the back of a spoon without dripping. Reduce the heat if it starts to burn at the bottom; a low simmer keeps the sugars from caramelizing too quickly.
- Preheat a grill or grill pan to medium‑high heat. Lightly oil the grates with a paper towel dipped in oil to prevent sticking. Place the chicken thighs skin side down and grill for 5–6 minutes, then flip and grill the other side for another 5–6 minutes. The chicken should reach an internal temperature of 165°F and develop a charred edge.
- While the chicken is grilling, pour the remaining sauce into a small saucepan and bring it to a low simmer. This will serve as a finishing glaze. The sauce should be warm enough to coat the chicken but not so hot that it burns your fingers.
- Once the chicken is done, remove it from the grill and let it rest for 5 minutes. This allows the juices to redistribute and the glaze to set. While it rests, drizzle the warm glaze over the thighs and sprinkle with sliced green onions and toasted sesame seeds.
- Serve the chicken immediately over steamed jasmine rice or a fresh green salad. Garnish with extra green onions and sesame seeds for a burst of color and crunch. The dish is best enjoyed hot, so grab a fork and dive in right away.
That's it — you did it. But hold on, I've got a few more tricks that'll take this to another level...
Insider Tricks for Flawless Results
The Temperature Rule Nobody Follows
Many cooks rely on timing alone, but the key to juicy thighs is the internal temperature. Use a meat thermometer to check for 165°F; this ensures safety without overcooking. A thermometer gives you confidence and eliminates guesswork. If you don’t have one, feel the center of the thigh; it should feel firm yet give slightly to the touch.
Why Your Nose Knows Best
Your sense of smell is your secret ally. As the sauce reduces, a sweet, caramelized aroma will fill the kitchen. That scent signals that the glaze has reached its peak thickness. Trust your nose and stop the reduction when it smells like toasted sugar; you’re ready to move to the grill.
The 5‑Minute Rest That Changes Everything
Resting the chicken after grilling allows the juices to redistribute, preventing a dry bite. A 5‑minute pause also lets the glaze set into a glossy coating. Skip this step and you’ll end up with a slightly watery surface. I’ve seen even seasoned chefs forget this simple pause, and the results suffer.
The Right Pan for the Job
A cast‑iron skillet or a heavy‑bottomed grill pan distributes heat evenly, preventing hot spots that burn the glaze. If you’re using a regular skillet, preheat it on medium before adding the chicken to avoid sticking. A well‑heated pan gives you that coveted sear and a beautiful char.
The Quick Flip Trick
Flip the chicken only once to avoid breaking the glaze. Hold the thighs with tongs and rotate them gently. A quick flip ensures the glaze adheres to both sides and the chicken cooks evenly. I’ve seen people flip too often and lose that glossy sheen.
Creative Twists and Variations
This recipe is a playground. Here are some of my favorite ways to switch things up:
Spicy Pineapple Kick
Add diced fresh pineapple to the glaze for a tropical sweetness and a hint of acidity. The pineapple’s enzymes help tenderize the chicken, while the fruit’s juice adds a refreshing contrast. Serve over coconut rice for a full island vibe.
Miso‑Infused Depth
Stir in a tablespoon of white miso paste into the sauce for an umami boost. Miso adds a savory complexity that pairs beautifully with the sweetness. This variation is perfect for a more sophisticated palate.
Garlic‑Butter Finish
Finish the chicken with a knob of garlic butter right before serving. The butter melts into the glaze, adding a silky richness that elevates the dish. This is a great option for a dinner party where you want to wow your guests.
Vegan Version
Swap the chicken thighs for firm tofu or tempeh. Marinate the protein in the glaze for 30 minutes before grilling. The tofu will absorb the sauce, delivering a plant‑based version that still feels indulgent.
Citrus Twist
Finish the glaze with a squeeze of fresh lime or yuzu juice. The citrus brightness cuts through the sweetness and adds a bright, zesty note. Garnish with fresh cilantro for an extra layer of flavor.
Storing and Bringing It Back to Life
Fridge Storage
Store leftover chicken in an airtight container in the refrigerator for up to 3 days. The glaze will thicken slightly as it cools, so reheat gently to restore its glossy texture. Avoid reheating on high heat to prevent the sugar from burning.
Freezer Friendly
For longer storage, wrap the chicken and glaze separately in plastic wrap and place them in a freezer‑safe bag. The dish stays good for up to 2 months. Thaw overnight in the refrigerator before reheating.
Best Reheating Method
Reheat the chicken in a skillet over medium heat, adding a splash of water or broth to loosen the glaze. This steaming trick brings back the glaze’s silky sheen and prevents it from drying out. Once heated through, serve immediately for the best texture.