I still remember the Tuesday night I accidentally created the most addictive cookie on the planet. I was supposed to be making a sensible, grown-up cheesecake for book club. You know, the kind you politely nibble while discussing literary themes. Instead, I knocked an entire bag of Reese's cups into the mixer, muttered a word my grandmother wouldn't approve of, and decided to roll the sticky mess into cookie dough because my springform pan had mysteriously vanished. Twenty minutes later, the smell drifting through my apartment was so outrageously good that my neighbor texted me asking if I was running an underground bakery. The first bite was pure chaos—crisp edges shattering like thin ice, revealing a molten peanut-butter-cheesecake center that stretched like edible silk. I burned my tongue, didn't care, and promptly ate three more standing over the sink in complete disbelief.
Picture this: a cookie that tastes like someone stuffed a New York cheesecake bar into a peanut-butter cup, then wrapped it in the softest, brown-butter brown-sugar dough you've ever met. The edges caramelize into that deep, toffee-like flavor that makes you close your eyes involuntarily. The center stays lava-level gooey, thanks to a secret cold-cream-cheese core that refuses to bake up dry. I dare you to taste this and not go back for seconds—actually, I double-dog dare you, because I personally have never witnessed anyone succeed. My roommate, who claims she "doesn't even like sweets," ate six in one evening and then asked if I could hide the rest from her. I didn't hide them. They were gone by morning.
Most recipes get peanut-butter cookies completely wrong. They turn out dense, crumbly, or—worst of all—dry enough to make you reach for a gallon of milk. This version? It's the antidote to every disappointing cookie you've ever had. The dough itself is basically a hug in edible form: brown butter for nutty depth, dark brown sugar for chewy moisture, and a whisper of cornstarch for that bakery-style tender bite. But the game-changer is the frozen cheesecake filling. Stay with me here—this is worth it. You blend cream cheese with powdered sugar and peanut-butter, freeze tiny scoops, then bury them in the center of each dough ball. As the cookie bakes, the outside sets while the inside stays molten, creating that iconic gooey river when you break one open. If you've ever struggled with cookies that spread too thin or puff up cakey, I've got the fix, and it starts with one simple freezer trick.
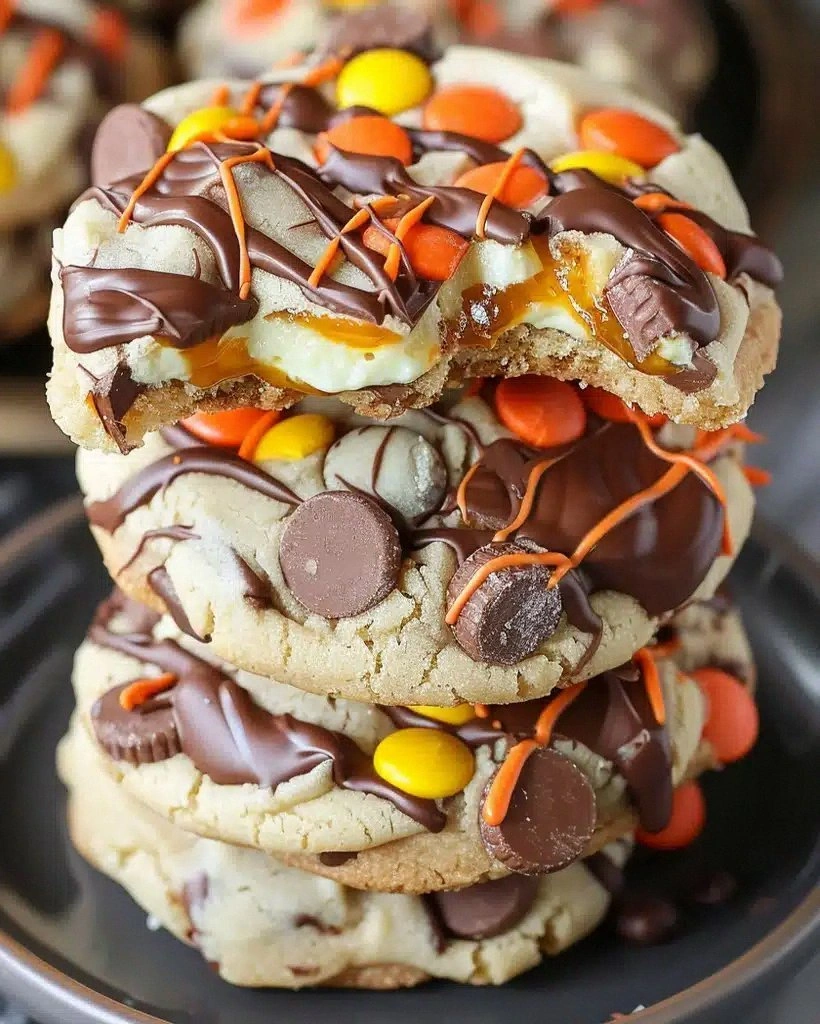
Okay, ready for the game-changer? We're using chopped Reese's cups two ways: half get folded into the dough for melty pockets throughout, and the rest get pressed right on top the moment the cookies come out of the oven. That second addition melts just enough to glue itself on like a glossy chocolate-peanut-butter crown, but still keeps its shape so every bite has texture. Future pacing moment: imagine pulling a tray out of the oven, the whole kitchen smelling like a Willy Wonka fever dream, and watching your friends' eyes widen as they realize these aren't ordinary cookies. Let me walk you through every single step—by the end, you'll wonder how you ever made it any other way.
What Makes This Version Stand Out
Cheesecake Core: While other recipes settle for a plain peanut-butter center, we hide a frozen cheesecake nugget inside. It bakes up molten, giving you that lava-cake vibe without any fancy equipment or scary timing. Break one open and watch people lose their minds over the creamy river that appears.
Brown-Butter Magic: Most doughs rely on plain melted butter for chewiness. We take it to the edge, browning the milk solids until they smell like toasted hazelnuts, then cooling it just enough to keep the cookies thick. The result is a deep, caramel complexity that boxed-mix cookies can only dream about.
Double Reese's Strategy: Chopping half the candy into the dough distributes melty pockets, while reserving the rest for post-bake pressing guarantees Instagram-worthy pools of chocolate-peanut butter on top. Most recipes dump everything in at once and wonder why the candy disappears into brown blobs.
Texture Spectrum: Crispy edges, soft centers, gooey cores—this cookie hits every texture note in one bite. It's like a symphony where every instrument (crunch, chew, ooze) plays at exactly the right moment.
Crowd Reaction: I've brought these to potlucks, office parties, and one wedding shower. Every single time, at least one person asks for the recipe mid-chew, and half the tray vanishes within ten minutes. If you want to be remembered as the person who brings legendary desserts, this is your ticket.
Make-Ahead Superpower: The dough balls freeze beautifully for up to three months. You can keep a bag stashed like edible gold and bake off two or twenty depending on how many best friends you're trying to impress that day. No need to thaw; just add two extra minutes to the bake time.
Inside the Ingredient List
The Flavor Base
Brown butter is the smoky jazz solo that turns a simple cookie into a headliner. Start with unsalted butter so you control the salt level; salted butter varies wildly between brands and can hijack the sweet-salty balance. Melt it slowly over medium heat until the milk solids toast to amber and the aroma hits you with warm hazelnut vibes. Cool the liquid gold to room temp before mixing, or you'll scramble the eggs and create greasy puddles instead of tender dough.
Dark brown sugar is non-negotiable here. The extra molasses keeps the cookies chewy for days (not that they'll last that long) and deepens the caramel notes to complement the peanut butter. Light brown sugar works in a pinch, but expect a paler flavor and slightly crisper texture. If you only have granulated sugar, add a tablespoon of molasses per cup and pretend you planned it that way.
The Texture Crew
Cream cheese does double duty: it tempers the sweetness with tangy richness and, when frozen into nuggets, creates that molten core. Use the full-fat block style; whipped spreads contain extra air and water, which can thin the dough and leave you with sad, flat puddles. Let it soften for the filling, but keep it cold when mixing the dough so the little frozen bombs don't melt prematurely.
Cornstarch is the bakery secret your grandmother never wrote down. Just a teaspoon per cup of flour interferes with gluten formation, yielding that soft, pillowy center you thought only professional kitchens could achieve. Skip it and you'll still get tasty cookies, but they'll lean cakey rather than decadently chewy.
The Unexpected Star
Reese's cups are obviously the headliner, but chopping them instead of using chips changes everything. Chips are coated with stabilizers so they hold shape; candy bars melt into glorious puddles that swirl through the dough. I like the classic milk-chocolate version here, but if you're a dark-chocolate devotee, the Reese's Thins or even mini cups work beautifully. Just promise me you'll freeze them first, or you'll end up with a smeary chocolate crime scene on your cutting board.
The Final Flourish
A whisper of espresso powder won't make your cookies taste like coffee; it simply amplifies the chocolate notes the way vanilla boosts overall sweetness. If you don't have it, substitute an equal amount of instant coffee ground to a powder, or just skip it. The cookies will still vanish, but that subtle mocha undertone is what makes people ask, "Why do these taste more chocolatey than mine?"
Everything's prepped? Good. Let's get into the real action...
The Method — Step by Step
- Start by browning your butter because patience here pays flavor dividends later. Place the sticks in a light-colored saucepan so you can see the color change. Melt over medium heat, swirling occasionally, until the foam subsides and golden flecks appear at the bottom—about 7 minutes. The aroma will shift from buttery to nutty; when it smells like toasted hazelnuts and the solids are caramel-brown, pull it off the heat immediately. Pour into a heat-proof bowl and let it cool until opaque but still liquid, about 30 minutes. Hot butter will cook your eggs on contact, creating scrambled dough no amount of chocolate can mask.
- While the butter cools, make the frozen cheesecake bombs. Beat softened cream cheese with powdered sugar and a spoonful of peanut butter until silky. Scoop teaspoon-sized blobs onto a parchment-lined plate and freeze until solid—15 minutes minimum, but up to an hour if you're a slow prepper. These little nuggets are the molten hearts that separate good cookies from legendary ones, so don't skip the freeze. If they feel soft when you're ready to assemble, pop them back in while you mix the dough.
- In a stand mixer bowl, combine the cooled brown butter with both sugars. Beat on medium for two full minutes; you're dissolving sugar and whipping air into the fat, which gives you those crackly tops that shatter like thin ice. The mixture will lighten in color and look fluffy—this is your visual cue to move on. Add the egg and extra yolk one at a time, letting each fully incorporate before the next. The yolk adds fat for tenderness and emulsifies the dough so the cookies stay thick instead of spreading into frisbees.
- Whisk together the dry ingredients in a separate bowl—flour, cornstarch, baking soda, salt, and that optional espresso powder. Add them to the wet mixture all at once and pulse the mixer on low just until the flour streaks disappear. Over-mixing develops gluten and leads to tough cookies that could double as hockey pucks. The dough should feel soft and slightly tacky, like thick brownie batter. If it's greasy, your butter was too warm; chill the bowl for 10 minutes and proceed.
- Fold in half the chopped Reese's cups with a rubber spatula. Frozen candy stays chunky; room-temperature candy melts into streaks. Both are delicious, but for photo-worthy puddles, reserve the other half for later. Cover the bowl with plastic wrap pressed directly onto the surface and refrigerate at least 30 minutes. This rest hydrates the flour and solidifies the fat so the cookies bake up thick instead of puddling across the pan. I've left it overnight when life happens, and the flavor actually deepens—win-win.
- When you're ready to bake, preheat the oven to 350°F (175°C) and line two baking sheets with parchment. Scoop the chilled dough into 2-tablespoon mounds—I'm partial to a #40 cookie scoop for uniformity. Flatten each mound slightly and press a frozen cheesecake nugget into the center, then fold the dough over and roll gently to seal. If the dough cracks, pinch it back together; these aren't beauty-pageant cookies, but you want the filling fully encased so it doesn't erupt like a sugary volcano in the oven.
- Bake for 11–13 minutes, rotating the pan halfway through. The edges should be set and golden, but the centers will look slightly underdone—that's your cue for maximum gooeyness. They'll continue cooking from residual heat while cooling. If you wait until the centers look fully baked, you'll end up with dry hockey pucks once they cool. Trust the wobble; it's your friend.
- The moment you pull the tray from the oven, press the remaining chopped Reese's cups onto the tops. The residual heat melts the chocolate just enough to glue them on like shiny tiles, but they hold their shape for visual drama. Let the cookies rest on the pan for 5 minutes before transferring to a rack; they're fragile when hot and will break apart like delicious tectonic plates if you rush. Cool completely if you have superhero willpower, or dive in after 10 minutes and risk molten cheesecake lava. I think you know which camp I fall into.
That's it—you did it. But hold on, I've got a few more tricks that'll take this to another level...
Insider Tricks for Flawless Results
The Temperature Rule Nobody Follows
Cookie dough is basically edible Play-Doh, and temperature is the puppet master pulling all the strings. If your kitchen is warmer than 72°F, the dough softens faster than you can scoop, leading to sad, flat discs. I pop the tray of shaped dough into the freezer for 10 minutes while the oven preheats. That quick chill re-solidifies the butter so the cookies rise before they spread, giving you thick, bakery-style centers. A friend tried skipping this step once—let's just say her batch looked like chocolate-chip pancakes and she still hasn't lived it down.
Why Your Nose Knows Best
Forget timers—your nose is the most accurate kitchen gadget you own. When the cookies are close to done, the smell shifts from raw dough to buttery caramel with a hint of toasted peanut. That aroma wave usually hits about 90 seconds before visual doneness. I start hovering by the oven door like a dessert detective the moment I catch that whiff. Pull the tray, count to 30, and press on a Reese's top—if it sticks slightly but doesn't slide off, you've nailed the sweet spot.
The 5-Minute Rest That Changes Everything
I know, I know—waiting for cookies to cool feels like cruel and unusual punishment. But those five minutes on the pan allow the residual heat to finish setting the centers without over-baking the edges. Think of it as a spa moment where the cookie relaxes into its final shape. Skip it and you'll scoop up a puddle that folds like a taco in your spatula. Wait, and you get that perfect balance of crisp edge and gooey heart that makes people close their eyes in public.
Creative Twists and Variations
This recipe is a playground. Here are some of my favorite ways to switch things up:
Dark Chocolate Sea-Salt Edition
Swap the Reese's for chopped dark-chocolate peanut-butter cups and sprinkle flaky sea salt on top right after baking. The bitter chocolate and saline crunch elevate the peanut butter into sophisticated territory. Serve these at a dinner party and watch wine snobs lose their composure.
White Chocolate Raspberry Rave
Replace half the Reese's with freeze-dried raspberries and white-chocolate chips. The tart berries cut through the richness like a splash of citrus, and the white chocolate melts into sweet, creamy pockets. Kids love the pink speckles; adults love the balanced sweetness.
Spicy Mayan Mash-Up
Add ½ teaspoon cayenne and 1 teaspoon cinnamon to the dry ingredients, then use spiced peanut-butter cups. The gentle heat sneaks up after the chocolate melts, leaving a warm tingle that pairs outrageously well with cold milk. If you've ever enjoyed Mexican hot chocolate, this is the cookie equivalent.
Gluten-Free, Not Fun-Free
Substitute a 1:1 gluten-free baking blend for the flour and add an extra egg yolk for structure. The cornstarch already helps tenderize, so you won't miss the gluten one bit. I feed these to my celiac friend and she swears they're better than the original.
Mini Skillet Cookie
Press the entire batch into a 10-inch cast-iron skillet, bury the cheesecake nuggets throughout, and bake for 18–20 minutes. Serve warm with a mountain of vanilla ice cream and two spoons for maximum date-night points. The crispy edges and gooey center scale up beautifully for sharing—if you're into that sort of thing.
Storing and Bringing It Back to Life
Fridge Storage
Baked cookies keep in an airtight container for up to five days, but they'll lose their gooey center after day two. To revive, microwave a cookie on 50% power for 8 seconds—any longer and the cheesecake filling erupts like Mount Vesuvius. Add a tiny splash of water to the plate before zapping; it steams back to perfection and keeps the edges from turning rubbery.
Freezer Friendly
Freeze scooped, unbaked dough on a tray until solid, then transfer to a zip-top bag for up to three months. Bake straight from frozen, adding 2 extra minutes. You can also freeze baked cookies: layer them between parchment in a hard-sided container so the Reese's tops don't get squished. Thaw at room temp for 20 minutes or pop into a 300°F oven for 5 minutes to refresh.
Best Reheating Method
Skip the microwave if you want that fresh-from-the-oven experience. Instead, wrap a cookie in foil and warm it in a 300°F oven for 6 minutes. The gentle heat re-melts the chocolate without turning the cheesecake grainy. Serve immediately with a cold glass of milk and bask in the gooey glory all over again.