I still remember that night when I was scrambling to salvage a dinner that had gone catastrophically wrong. The salmon fillets I had bought were meant for a simple pan sear, but the pan was already slick with last week’s sauce, and my oven was on the fritz. I stared at the fish, feeling the heat of disappointment rise in my chest, and then I thought, “If I could just add a dash of something that would turn this disaster into a masterpiece, I’d be a culinary hero.” That moment sparked the creation of the Furikake Salmon: Quick, Flavor, a dish that turns a kitchen mishap into a celebration of umami.
Picture this: the salmon arrives at the stove, its skin shimmering like a silver coin, the air thick with the scent of soy and seaweed. As it sizzles, a golden crust forms, and the aroma of toasted furikake wafts up, mingling with the subtle sweetness of rice wine vinegar. You hear the satisfying crackle of the pan, feel the heat radiating from the skillet, and taste the first bite—a burst of savory, slightly sweet, and irresistibly crunchy flavor that makes your taste buds do a happy dance. The texture is a symphony of tender flesh, crisp edges, and a whisper of spice that lingers on the tongue. It’s the kind of dish that makes you want to pause, inhale deeply, and savor every moment.
What sets this version apart is not just the boldness of its flavors but the sheer simplicity that lets the salmon shine. I’m talking about a sauce that coats the fish like velvet, a seasoning blend that delivers a punch without overwhelming, and a cooking method that’s so quick you could have dinner on the table before you finish reading this paragraph. Most recipes get this completely wrong by overcomplicating the sauce or overcooking the fish. Here, the balance is spot‑on, the technique is straightforward, and the result is a plate that feels like a gourmet experience but requires only a fraction of the time and effort.
And there’s a twist you won’t expect—an unexpected ingredient that elevates the dish from simple to sensational. It’s the subtle, earthy sweetness of Kewpie mayonnaise, which brings a silky richness that counters the sharpness of the soy and vinegar. I dare you to taste this and not go back for seconds, because once you experience that harmony, you’ll never settle for bland salmon again. Picture yourself pulling this out of the oven, the whole kitchen smelling incredible, and everyone asking for the recipe. Let me walk you through every single step—by the end, you’ll wonder how you ever made it any other way.
What Makes This Version Stand Out
- Taste: The combination of soy, vinegar, and Kewpie mayo creates a layered flavor profile that is both savory and subtly sweet, with a hint of umami that lingers on the palate.
- Texture: The salmon develops a crisp exterior while staying moist inside, thanks to the quick searing and the protective coating of the sauce.
- Ingredient Quality: Using fresh fillets and high‑quality furikake ensures that every bite is packed with authentic Japanese flavor.
- Ease: No complicated marinades or lengthy prep—just a handful of ingredients and a few minutes of cooking.
- Time: From prep to plate, you’re looking at less than 30 minutes, making it ideal for busy weeknights.
- Crowd‑Pleaser: Even the pickiest eaters will love the subtle crunch and the rich, comforting taste.
- Make‑Ahead Potential: The sauce can be prepared in advance, and the salmon can be cooked in batches, making it a great option for meal‑prep lovers.
- Versatility: Pair it with rice, quinoa, or a fresh salad—each combination brings a different dimension to the dish.
Alright, let’s break down exactly what goes into this masterpiece…
Inside the Ingredient List
The Flavor Base
Kewpie mayonnaise is the unsung hero that brings a creamy, slightly tangy backdrop to the dish. Its rich, buttery texture coats the salmon, creating a smooth canvas that prevents the fish from drying out. If you skip it, you’ll lose that silky mouthfeel and the subtle sweetness that balances the saltiness of soy sauce. A good alternative is using a light Japanese mayo or even a blend of regular mayo with a splash of rice vinegar, but Kewpie’s unique flavor profile is hard to replicate.
Rice wine vinegar is the bright, acidic counterpoint that cuts through the richness of the mayo. It adds a gentle zing that awakens the palate and keeps the dish from feeling heavy. If you’re out of rice wine vinegar, you can use apple cider vinegar or a splash of white wine vinegar, but be mindful that the flavor will shift slightly. The key is to keep the acidity balanced—too much will overpower the salmon, too little will leave the dish flat.
The Texture Crew
Low sodium soy sauce is the backbone of the umami punch. It lends depth and a savory undertone that is unmistakably Japanese. A higher‑sodium version will make the dish too salty, especially when paired with the natural saltiness of the furikake. If you prefer a lighter taste, try tamari or a low‑sodium soy alternative, but remember to adjust the salt accordingly.
Garlic powder adds a subtle, aromatic warmth that ties all the flavors together. It’s a convenient shortcut that still delivers the depth you’d get from fresh garlic. If you’re a fan of raw garlic, feel free to mince a clove and stir it into the sauce—just be aware it will give a sharper bite. The powder keeps the sauce smooth and prevents clumps.
The Unexpected Star
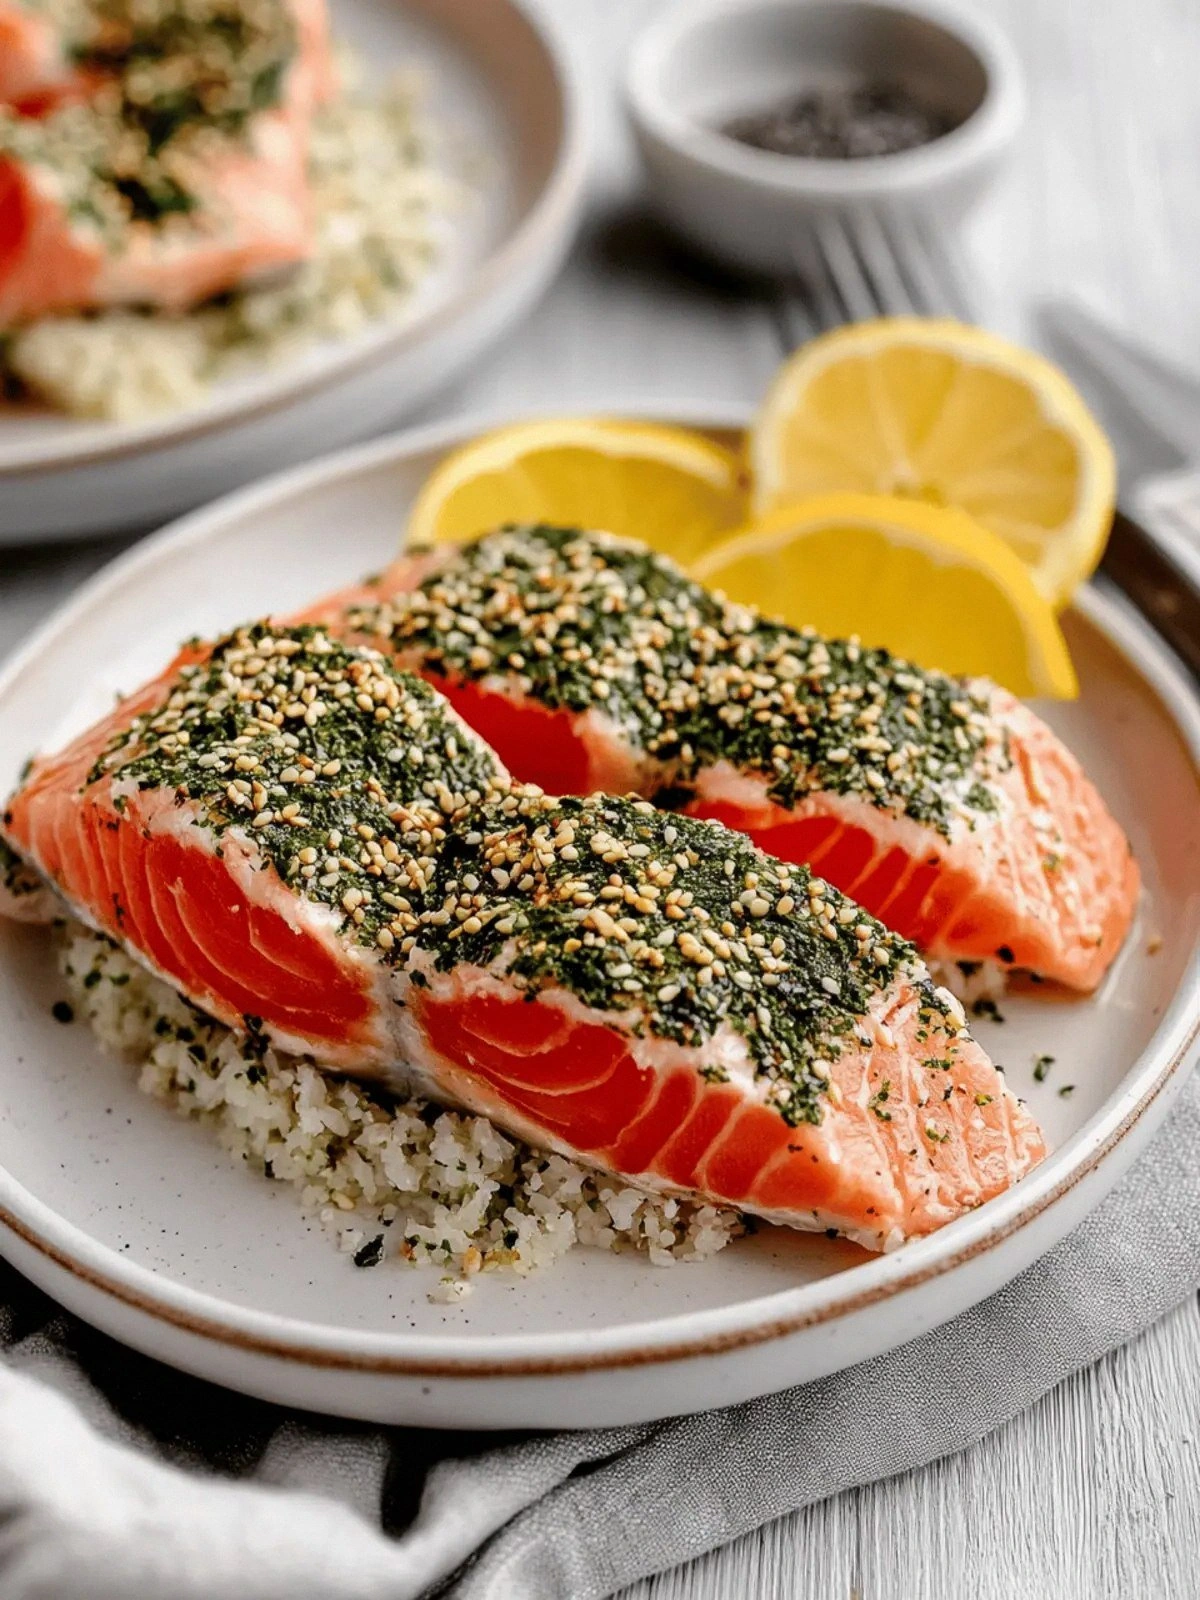
Furikake is the secret weapon that turns this dish from good to unforgettable. This seasoned rice salt brings a burst of umami, a hint of seaweed, and a satisfying crunch. It’s the kind of ingredient that elevates a simple salmon fillet into a gourmet experience with minimal effort. If you’re in a pinch, a sprinkle of sesame seeds or toasted nori flakes can mimic the crunch, but the flavor profile will be slightly different.
The Final Flourish
Salt and pepper are the finishing touches that bring the entire dish together. They’re not just seasoning—they’re the final layer that brings out the flavors in the sauce and the salmon. A pinch of sea salt will amplify the umami, while freshly cracked pepper adds a subtle heat that cuts through the richness. If you’re watching sodium, use a low‑sodium salt blend and a light hand with pepper.
Everything’s prepped? Good. Let’s get into the real action…
The Method — Step by Step
- Step 1: Prepare the Sauce. In a small bowl, whisk together the Kewpie mayonnaise, rice wine vinegar, low sodium soy sauce, garlic powder, and a pinch of salt and pepper. The mixture should be smooth and slightly glossy. This is the moment the flavors begin to mingle—feel the anticipation build as the sauce comes together. Don’t rush; a few seconds of whisking ensures the ingredients are fully incorporated and ready to coat the salmon perfectly.
- Step 2: Pat Dry the Fillets. Use paper towels to blot the salmon fillets until they’re almost dry. Removing excess moisture is key to achieving a crisp skin. If you leave the fillets damp, the pan will steam rather than sear, and you won’t get that desirable golden crust. While you’re drying, you can sprinkle a light dusting of sea salt on each fillet for a subtle seasoning boost.
- Step 3: Preheat the Skillet. Place a heavy‑bottom skillet over medium‑high heat and let it get hot—about 2 minutes. A hot pan is essential for a quick sear that locks in juices. When the pan is ready, add a splash of neutral oil (like grapeseed or canola) and swirl to coat the surface. Watch for a faint shimmer; that’s the signal that the oil is hot enough.
- Step 4: Sear the Salmon. Lay the fillets skin‑side down into the pan, pressing gently to ensure even contact. You should hear a satisfying sizzle that says the pan is hot enough. Let them cook for 3–4 minutes, until the skin turns a deep golden brown and releases easily from the pan. Avoid flipping too early; patience pays off with a crisp, crackling skin.
- Step 5: Flip and Coat. Flip each fillet carefully using a spatula. Brush the prepared sauce generously over the flesh side, making sure to coat every nook. The sauce will start to caramelize, forming a glossy glaze that locks in moisture. This is the moment of truth—if the glaze is too thin, it won’t adhere; if it’s too thick, it may burn. Adjust as needed.
- Step 6: Sprinkle Furikake. While the salmon is still in the pan, sprinkle the furikake evenly over the sauced side. The seaweed, sesame, and salt will create a delightful crunch that contrasts the tender flesh. As the furikake cooks, it releases a subtle aroma that will fill the kitchen. Keep an eye on the edges; they’ll start to pull away from the pan when the salmon is nearly done.
- Step 7: Finish Cooking. Reduce the heat to medium and let the salmon finish cooking for an additional 2–3 minutes. The sauce should thicken slightly, and the furikake will develop a light golden hue. The internal temperature should reach 145°F (63°C) for a perfectly cooked fillet. This step ensures the fish remains juicy while the flavors meld together.
- Step 8: Rest and Plate. Transfer the fillets to a plate and let them rest for a minute. This allows the juices to redistribute, ensuring every bite is moist. While resting, you can drizzle a little extra sauce or add a squeeze of fresh lemon to brighten the dish. Serve immediately with a side of steamed rice or a crisp salad, and watch as your guests marvel at the flavor explosion.
That’s it — you did it. But hold on, I’ve got a few more tricks that will take this to another level…
Insider Tricks for Flawless Results
The Temperature Rule Nobody Follows
Many cooks believe that high heat is the only way to sear salmon. In reality, a moderate medium‑high heat allows the skin to crisp without burning the flesh. Keep the pan at a steady temperature; a quick dip in the oil will help you gauge if it’s hot enough. If the oil starts to smoke, lower the heat slightly to prevent a bitter taste.
Why Your Nose Knows Best
As the salmon cooks, the aroma will change from raw fish to a rich, savory scent. Trust your nose—when the smell is nutty and slightly sweet, the fish is nearly done. This sensory checkpoint saves you from overcooking and ensures the perfect texture.
The 5‑Minute Rest That Changes Everything
Resting the fillets for five minutes after cooking allows the juices to redistribute, resulting in a more succulent bite. If you skip this step, you’ll end up with a dry, unevenly cooked fish. Think of it as a brief encore that lets the flavors settle.
Use a Thermometer for Precision
If you’re serious about perfect salmon, invest in a quick‑read digital thermometer. Aim for an internal temperature of 145°F (63°C). This ensures safety and guarantees that the fish is cooked through without overdoing it.
Serve with a Citrus Twist
A squeeze of fresh lemon or a splash of lime juice just before serving brightens the dish and cuts through the richness. The acidity also accentuates the umami from the soy and furikake, creating a balanced flavor profile that’s both refreshing and indulgent.
Creative Twists and Variations
This recipe is a playground. Here are some of my favorite ways to switch things up:
Spicy Sriracha Furikake
Add a teaspoon of sriracha to the sauce for a fiery kick. The heat contrasts the sweetness of the mayo, creating a dynamic flavor profile that’s perfect for spice lovers. Serve with a cooling cucumber salad to balance the heat.
Herb‑Infused Mayo
Stir chopped fresh dill or chives into the Kewpie mayo before mixing with the other sauce ingredients. The herbs add a fresh, aromatic layer that brightens the dish. This variation works great with a side of roasted asparagus.
Citrus‑Glazed Salmon
Replace the rice wine vinegar with a mixture of orange juice and a splash of soy. The citrus sweetness pairs beautifully with the savory sauce, creating a glaze that’s both sweet and tangy. A sprinkle of toasted sesame seeds adds a nutty crunch.
Mediterranean Twist
Swap the furikake for a blend of dried oregano, crushed red pepper flakes, and a pinch of sea salt. The result is a Mediterranean‑inspired salmon that’s full of herbs and a hint of heat. Pair it with a Greek salad for a complete meal.
Umami‑Rich Mushroom Glaze
Sauté sliced shiitake mushrooms in the pan before adding the salmon. The mushrooms release a deep umami flavor that complements the sauce. Finish with a drizzle of miso‑infused soy for an extra depth of flavor.
Storing and Bringing It Back to Life
Fridge Storage
Store cooked fillets in an airtight container for up to 3 days in the refrigerator. Keep the sauce separate if you want to maintain its freshness. When reheating, gently warm the salmon in a skillet over low heat, adding a splash of water to keep it moist.
Freezer Friendly
Wrap each fillet individually in parchment paper, then place them in a freezer bag. They’ll keep well for up to 2 months. Thaw overnight in the refrigerator before reheating. Reheat gently to avoid overcooking.
Best Reheating Method
The secret to reheating is low and slow. Use a skillet over low heat, adding a tiny splash of water or broth to create steam. This technique restores the moisture and keeps the salmon tender. A quick microwave burst can dry out the fish, so avoid that if you want to preserve the texture.