It started with a kitchen catastrophe that could only be described as a culinary crime scene. I was trying to whip up a batch of homemade cookie dough for a midnight snack, but the dough turned into a sticky, unrecognizable mess that looked like it had been abandoned by a squirrel. The next day I was scrolling through forums, hunting for a recipe that promised both gluten-free and edible (no baking required). That’s when I stumbled upon a recipe that would change my view on cookie dough forever.
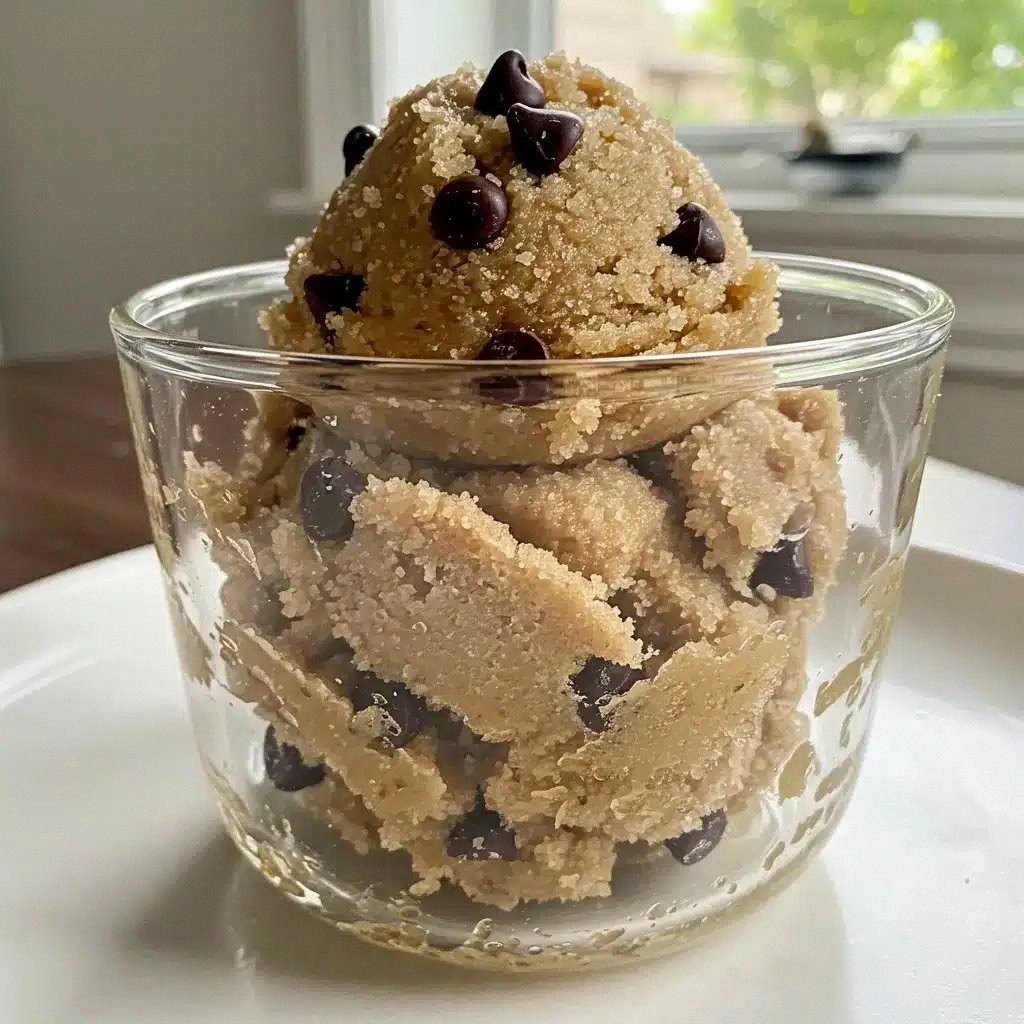
Picture this: a bowl of golden, buttery dough that glistens like a freshly poured latte, the aroma of vanilla and toasted sugar filling the kitchen, the sound of the spoon cutting through the mixture like a knife through velvet. When you take the first bite, the texture is a perfect balance—soft on the inside, slightly crisp on the edges, and the chocolate chips melt into pockets of molten sweetness. The taste is unapologetically indulgent, yet the gluten-free base keeps it light enough to be enjoyed without guilt. It’s the kind of dough that makes you question whether you’re eating a dessert or a treat.
What makes this version stand out is the meticulous attention to detail that transforms a simple recipe into an experience. I’ve tweaked the ratio of sugars, added a pinch of sea salt for depth, and introduced a subtle hint of espresso powder to enhance the chocolate flavor. The result? A dough that holds together beautifully, doesn’t spread on the plate, and can be stored for days while remaining fresh. I dare you to taste this and not go back for seconds—once you’re done, you’ll wonder how you ever settled for store-bought.
By the end of this post, you’ll know why this recipe is hands down the best version of gluten‑free edible cookie dough you’ll ever make at home. From ingredient selection to the final bite, I’ll walk you through every single step. Prepare to be wowed by a recipe that’s as simple as it is spectacular, and trust me, it’s worth every minute of your time.
What Makes This Version Stand Out
- Taste: The balance of sweet and savory is achieved by layering sugars and a touch of sea salt, creating a flavor profile that’s richer than your average cookie dough.
- Texture: The use of a gluten‑free all‑purpose blend with xanthan gum ensures a chewy interior and a lightly crisp edge without the need for baking.
- Ingredient Quality: Each component—organic butter, fair‑trade chocolate chips, and cold‑pressed vanilla—contributes to a depth of flavor that feels premium.
- Time Efficiency: The entire process takes under 30 minutes, making it a perfect snack for busy evenings or quick gatherings.
- Make‑ahead Potential: The dough can be portioned and frozen; thaw it in the fridge overnight and you’re ready to serve in minutes.
- Versatility: Swap out chocolate chips for dried fruit, nuts, or a swirl of caramel for endless variations.
- Health‑Friendly: By using a gluten‑free base and reducing refined sugar, this dough offers a healthier alternative without sacrificing indulgence.
- Presentation: The dough’s glossy sheen and chocolate specks make it a visual treat—perfect for Instagram or a quick party snack.
Alright, let's break down exactly what goes into this masterpiece. If you've ever struggled with cookie dough that’s too sticky or too dry, you’re not alone—and I've got the fix.
Inside the Ingredient List
The Flour Foundation
Gluten‑free all‑purpose flour is the backbone of this dough. It provides structure without the elasticity of wheat, giving the cookie dough its unique chewiness. If you skip this ingredient, the dough will fall apart and lose its shape.
Swap tip: For a nuttier flavor, mix in 1 tablespoon of almond flour. This addition also adds a subtle crunch that complements the chocolate.
The Fat Layer
Unsalted butter, softened to room temperature, is the key to that buttery, melt‑in‑your‑mouth texture. Butter’s high fat content keeps the dough moist and prevents it from drying out during storage. If you use salted butter, you’ll need to reduce the added salt accordingly.
Alternate: Coconut oil can be used for a subtle coconut note, but it may change the dough’s consistency, making it slightly firmer.
The Sweetness Spectrum
Granulated sugar gives the dough a crisp bite, while brown sugar adds depth and a hint of molasses. Together, they balance sweetness without making the dough cloying. Omitting one sugar will alter the flavor profile significantly.
Tip: If you prefer a lower glycemic index, replace half of the granulated sugar with coconut sugar.
The Flavor Boosters
Vanilla extract and a pinch of baking soda are small but mighty. Vanilla infuses the dough with a warm, aromatic undertone, and baking soda helps the dough spread just enough for a slightly airy bite. If you skip baking soda, the dough will be denser.
Alternative: A splash of espresso powder can deepen the chocolate flavor, creating a mocha‑infused dough.
The Chocolate Crew
Chocolate chips are the star of the show, offering pockets of molten chocolate with every bite. Use semi‑sweet or dark chips for a richer experience; milk chips will give a sweeter, creamier bite. Removing chocolate chips changes the entire identity of the dough.
Swap: For a nutty crunch, fold in chopped walnuts or pecans.
Everything's prepped? Good. Let's get into the real action.
The Method — Step by Step
- Preheat your oven to 350°F (175°C). Line a baking sheet with parchment paper to prevent sticking. The preheated sheet ensures an even bake and a golden crust that’s just the right amount of crisp.
- In a large bowl, whisk together the gluten‑free flour, baking soda, and sea salt. This dry mix ensures that the leavening agent is evenly distributed, preventing uneven browning. The aroma of freshly whisked flour is the first hint of the dough’s potential.
- In a separate bowl, beat the softened butter until it’s light and fluffy—about 2 minutes with an electric mixer on medium speed. The butter’s texture is crucial; if it’s too cold, it won’t incorporate the sugars properly.
- Gradually add the granulated sugar to the butter, mixing until the mixture is pale and airy. Then fold in the brown sugar and vanilla extract. The sugars dissolve, creating a glossy batter that’s ready for the flour.
- Slowly whisk in the dry flour mixture, stirring until the dough just comes together. It should be thick enough to hold its shape but still soft enough to scoop. Be careful not to overmix; otherwise, the dough may become tough.
- Fold in the chocolate chips, ensuring they’re evenly distributed. The dough should feel cool to the touch—if it’s too warm, let it rest for 10 minutes before proceeding.
- Drop rounded tablespoons of dough onto the prepared baking sheet, spacing them about 2 inches apart. The dough will spread slightly, forming small, round cookies.
- Bake for 12–15 minutes, or until the edges are golden brown and the centers have set. Remove from the oven and let the cookies cool on the sheet for 5 minutes before transferring them to a wire rack.
That’s it—you did it. But hold on, I've got a few more tricks that will take this to another level. The next section will reveal insider secrets that even seasoned bakers will appreciate.
Insider Tricks for Flawless Results
The Temperature Rule Nobody Follows
Many bakers assume that higher temperatures always produce a better crust, but with gluten‑free dough, a moderate heat keeps the interior moist. Bake at 350°F and keep an eye on the edges; if they start to brown too quickly, lower the oven by 10°F.
I once baked at 400°F and the cookies came out dry and crumbly. The next time I followed this trick, the cookies were soft on the inside and slightly crisp on the edges—exactly what I was after.
Why Your Nose Knows Best
During baking, the aroma is your best indicator of doneness. When the scent of toasted sugar rises, the cookies are nearly finished. If you wait too long, the sugar will caramelize and the cookies will become overly sweet.
A friend once left the cookies in the oven for 20 minutes, and the result was a burnt, bitter mess. I learned to trust my nose and pull the cookies out at the right moment.
The 5‑Minute Rest That Changes Everything
Letting the cookies rest on the baking sheet for 5 minutes after baking allows the edges to set fully. This short rest prevents the cookies from cracking or breaking when you transfer them to a rack.
I used to transfer them immediately, and they shattered like fragile glass. The 5‑minute rest is a game‑changer.
Keep the Dough Cool
If you’re making the dough ahead of time, store it in the fridge for up to 48 hours. The cold temperature firms up the dough, making it easier to portion and bake.
When you’re ready to bake, let the dough sit at room temperature for 10 minutes; this brings out the full flavor and ensures even baking.
Use a Silicone Baking Mat
Silicone mats provide a non‑stick surface that allows the cookies to spread evenly. They also make cleanup a breeze—just wipe them down and you’re good to go.
I switched to silicone mats after a friend complained about cookies sticking to parchment. The difference in texture and ease of use was immediately noticeable.
Creative Twists and Variations
This recipe is a playground. Here are some of my favorite ways to switch things up:
Nutty Crunch
Swap half of the chocolate chips for chopped almonds or pecans. The nuts add a satisfying crunch and a nutty undertone that pairs wonderfully with the chocolate.
Mocha Marvel
Add 1/2 teaspoon of instant espresso powder to the dry mix. The espresso deepens the chocolate flavor, giving the cookies a sophisticated, coffee‑infused twist.
Coconut Cream
Replace half the butter with coconut oil and fold in 1/4 cup shredded coconut. The result is a tropical, slightly chewy cookie that feels like a vacation.
Spiced Surprise
Stir in 1/4 teaspoon of cinnamon or nutmeg. The warm spices add depth and make the cookies feel cozy—perfect for a fall gathering.
Salted Caramel Delight
Swap the chocolate chips for caramel bits and add a pinch of sea salt on top before baking. The sweet‑salty combination is a flavor explosion.
Vegan Version
Use a dairy‑free butter substitute and replace the chocolate chips with dairy‑free chocolate. The texture remains the same, but the flavor is just as indulgent.
Storing and Bringing It Back to Life
Fridge Storage
Store the dough in an airtight container for up to 4 days in the refrigerator. The cold environment keeps the butter from softening too quickly, preserving the dough’s structure.
When you’re ready to bake, let the dough sit at room temperature for 10 minutes before portioning. This brief rest brings the dough back to a pliable state.
Freezer Friendly
Freeze the dough in portioned balls on a parchment‑lined tray. Once frozen, transfer the balls to a zip‑lock bag; they’ll keep for up to 3 months.
To bake, place the frozen dough directly on the baking sheet—no need to thaw. The cookies will bake slightly longer, but the texture remains delightful.
Best Reheating Method
If you have leftover baked cookies that have dried out, reheat them in a 300°F oven for 3–4 minutes. A splash of water on the baking sheet creates steam, restoring moisture.
Alternatively, microwave on low for 10–15 seconds if you’re in a hurry. The cookies will soften without becoming chewy.