Picture this: It's December 23rd, your in-laws just texted that they're bringing "a few extra guests" to Christmas dinner, and you're staring at a half-eaten box of store-bought chocolates wondering how you'll pull off a dessert that looks like you planned it for weeks. Been there? That's exactly how these Christmas Chocolate Caramel Cups were born — out of pure panic, a bag of forgotten chocolate chips, and the desperate need to create something that screams "I totally have my life together" while secretly being easier than finding matching socks in your laundry pile.
Here's the thing about most chocolate caramel recipes floating around the internet: they either require a candy thermometer (which, let's be honest, is probably buried somewhere with your high school yearbooks) or they produce those sad, grainy caramels that taste like they were made in a factory that forgot sugar existed. But these cups? They're what happens when a professional chocolatier has a secret love affair with your grandmother's butterscotch pudding and decides to make beautiful, portable babies together.
I discovered this method by accident when my traditional caramel seized up faster than my credit card on Black Friday, and in desperation, I started playing with the ratios like a mad scientist. The result was this glossy, slow-flowing caramel that stays put in its chocolate shell but melts like liquid gold the moment it hits your tongue. And the best part? You don't need any fancy equipment — just a muffin tin, some parchment paper, and the willpower not to eat all the chocolate while you're "testing" the quality.
What makes these little gems absolutely irresistible is the contrast: crisp chocolate shells that snap like thin ice, revealing that buttery caramel that stretches like taffy when you pull them apart. They're the kind of treat that makes grown adults close their eyes and make embarrassing happy noises. Trust me, I watched my usually stoic father-in-law do exactly that last year, and now he requests them instead of birthday cake.
What Makes This Version Stand Out
Velvet-Smooth Caramel: Most recipes leave you with caramel that either oozes out like a chocolate crime scene or sets up harder than your dentist's waiting room chair. This version creates that perfect middle ground — soft enough to bite through without losing a filling, but firm enough to stack in a tin without becoming a chocolate blob family.
No Thermometer Needed: Listen, I'm not saying candy thermometers don't have their place — they absolutely do, somewhere between your bread machine and that juicer you swore you'd use. But this recipe uses the "cold water test" method that your great-grandmother probably used, and it's foolproof once you know what to look for.
Make-Ahead Magic: These little beauties actually taste better after a day or two when the flavors have a chance to meld together like old friends at a reunion. Make them this weekend, and you'll have instant hostess gifts, emergency dessert, or bribe material for the rest of the month.
Customizable Canvas: The basic recipe is perfect as-is, but it's also your starting point for endless variations. Add a whisper of sea salt, a hint of espresso, or a touch of peppermint — each creates a completely different personality while maintaining that same luxurious texture.
Professional Results: These look like they came from one of those fancy chocolate shops where everything costs more than your monthly coffee budget. The secret is in the tempering technique I'll share — it sounds intimidating, but it's actually just knowing when to stir and when to walk away.
Crowd-Pleasing Power: I've never met anyone who could eat just one. They're rich enough to feel indulgent but small enough to justify having "just one more" approximately seven times in a row.
Year-Round Versatility: While they're perfect for Christmas with their little gold wrappers and festive shape, swap the toppings and you've got Valentine's treats, Easter indulgences, or Tuesday night therapy sessions.
Inside the Ingredient List
The Chocolate Foundation
Let's talk chocolate because this isn't the moment for that baking chip stuff that's been sitting in your pantry since the Clinton administration. You want real chocolate — the kind that makes you understand why people write poetry about food. I use a blend of semisweet and bittersweet because life's too short for one-dimensional chocolate, and the combination creates this complex flavor that develops as it melts on your tongue like a slow sunset.
The quality of your chocolate determines whether these cups taste like they came from a European chocolatier or from that gas station where you buy emergency lottery tickets. Splurge on the good stuff — your taste buds will throw a party, and honestly, you're still saving money compared to buying similar treats from a fancy chocolate shop. Look for chocolate with cocoa butter as the first ingredient, not palm oil or weird chemicals that sound like they belong in a science experiment.
Here's what nobody tells you: chocolate chips are designed to hold their shape, which means they contain stabilizers that prevent that silky melt you want in these cups. Use a chopped chocolate bar instead, and you'll get that gorgeous snap when you bite into it, followed by that luxurious melt that coats your mouth like liquid velvet. The difference is so dramatic that my neighbor thought I'd switched to some exotic European recipe when really I'd just stopped using chips.
The Caramel Core
Butter is the backbone of any decent caramel, but not all butter is created equal. Use the European-style butter with higher fat content — it creates caramel that's smoother than a politician's apology and richer than your lottery-winning daydreams. The higher fat content means less water, which translates to caramel that doesn't seize up or separate like a bad relationship.
Heavy cream isn't just for making things creamy — it's your insurance policy against grainy, separated caramel. The fat in the cream helps stabilize the sugar syrup, creating that gorgeous amber sauce that flows like warm honey. Don't even think about substituting milk or half-and-half unless you enjoy the taste of disappointment and broken dreams.
Granulated sugar might seem straightforward, but here's the insider tip: use pure cane sugar, not beet sugar. Beet sugar can sometimes create caramel with a slightly earthy aftertaste that tastes like someone whispered "vegetable" into your dessert. Cane sugar gives you that clean, sweet flavor that lets the vanilla and butter shine like the stars they are.
The Flavor Enhancers
Vanilla extract isn't just vanilla extract — use the real stuff, not the imitation that tastes like it was made in a lab by someone who's never tasted actual vanilla. Real vanilla has over 200 flavor compounds that create this warm, complex background note that makes people say "what IS that?" in the best possible way. It's the difference between a chocolate caramel cup that's merely good and one that makes people close their eyes and sway slightly while eating it.
Sea salt isn't just for sprinkling on top — a pinch in the caramel actually enhances the sweetness and brings out the butter notes like a really good backup singer. Use a flaky sea salt like Maldon or fleur de sel because they dissolve quickly and don't leave you with salty surprises. The salt should whisper, not shout, creating that perfect balance that keeps people reaching for "just one more."
Light corn syrup gets a bad rap, but here's where it earns its keep: it prevents crystallization, which is the enemy of smooth caramel. You only need a tablespoon, and it ensures your caramel stays silky instead of turning into a gritty mess that feels like eating sand mixed with sugar. If you're anti-corn-syrup, you can substitute with golden syrup or honey, but the flavor will be slightly different — still delicious, just more complex.
The Optional But Worth It
Espresso powder might seem like an odd addition to chocolate caramel cups, but here's the secret: it doesn't make them taste like coffee — it makes the chocolate taste more chocolatey. It's like turning up the volume on all the chocolate notes while adding this subtle depth that makes people wonder what exactly makes these so addictive. Use just a pinch; too much and you'll have mocha cups, which are delicious but not what we're after here.
Gold leaf sounds ridiculously fancy, and okay, it kind of is, but a few flakes on top transform these from homemade treats to Instagram-worthy masterpieces that look like they cost five dollars each. Plus, eating gold makes you feel like royalty, even if you're wearing pajama pants and eating these over the kitchen sink at midnight. A little goes a long way — one sheet will decorate dozens of cups.
Decorative wrappers aren't just about looks — they actually serve a purpose beyond making you feel like you have your life together. They prevent the chocolate from developing that white "bloom" that happens when chocolate is exposed to temperature changes, plus they make these portable enough to sneak into movie theaters or important meetings. I won't judge either way.
Everything's prepped? Good. Let's get into the real action...
The Method — Step by Step
- Start by creating your chocolate shells because these need time to set while you make the caramel. Chop your chocolate into small, uniform pieces — think the size of your thumbnail — because this helps it melt evenly without scorching. Set up a double boiler by placing a heatproof bowl over a pot of barely simmering water, making sure the bowl doesn't touch the water. Add two-thirds of your chopped chocolate and stir gently with a rubber spatula, watching as it transforms from solid chunks into glossy liquid gold. This should take about 5-7 minutes, and you'll want to stir occasionally, not constantly, because chocolate likes a gentle hand, not an aggressive beating.
- While your chocolate melts, prepare your muffin tin by lining each cup with a paper or foil wrapper — this isn't just for pretty presentation, it's your insurance policy against chocolate that refuses to release. Once your chocolate is melted and smooth, remove it from heat and add the remaining third of chopped chocolate, stirring until it's completely melted. This is called "seeding" and it's how we temper chocolate without any fancy equipment. The temperature should feel warm but not hot when you touch a drop to your lip — think baby bottle temperature, not coffee temperature.
- Spoon about 2 teaspoons of melted chocolate into each cup, then use the back of your spoon to paint the chocolate up the sides, creating a chocolate bowl that goes about three-quarters of the way up. This is therapeutic work — the chocolate should coat evenly without any thin spots that will leak caramel later. Tap the tin gently on the counter to release any air bubbles and smooth the surface. Pop this into the freezer for 15 minutes while you start the caramel, because cold chocolate sets faster and creates that satisfying snap when you bite into it later.
- Now for the caramel — this is where the magic happens, so don't wander off to check your phone or start a new episode of whatever you're binging. In a heavy-bottomed saucepan, combine sugar, corn syrup, and water, stirring just until the sugar is moistened like beach sand after the tide goes out. Place this over medium heat and resist the urge to stir — seriously, step away from the spoon. Let the sugar dissolve and start bubbling, brushing down the sides with a wet pastry brush if you see crystals forming like sugar frost on the pan walls.
- When the mixture turns a light amber color — think the color of honey that's been sitting in the back of your cupboard for a while — remove it from heat immediately. This happens fast, like "blink and you'll miss it" fast, so stay vigilant. Slowly pour in the warm cream while stirring with a heatproof spatula or wooden spoon. The mixture will bubble up like an angry volcano, but keep stirring until it settles down into a smooth, glossy caramel. Add the butter, vanilla, and salt, stirring until everything is incorporated and the caramel looks like liquid velvet.
- Let the caramel cool for about 5 minutes — it should still be warm and pourable but not hot enough to melt your chocolate shells. Remove your chocolate cups from the freezer and spoon caramel into each one, filling them about three-quarters full. Leave a little space at the top for your chocolate seal. The caramel should settle into a smooth layer, but if it mounds up, gently tap the tin on the counter to level it out.
- Spoon the remaining melted chocolate over the caramel, spreading it to seal the edges and create a smooth top. This is your chocolate lid that keeps all that caramel goodness contained. Use an offset spatula or the back of a spoon to smooth the tops, then refrigerate the whole pan for at least 30 minutes to set everything firmly. If you're impatient (and who isn't when chocolate is involved?), you can speed this up in the freezer for 10 minutes.
- Once set, remove the cups from the tin by lifting the paper wrappers. If you used foil, they should pop right out. If any chocolate has seeped between the wrapper and the tin, run a thin knife around the edge to release them cleanly. They should have clean edges and a professional appearance that makes you look like you've been doing this for years instead of following a recipe from the internet.
- Peel away the wrappers gently — this is the moment of truth where you see if your chocolate shell is thick enough to hold everything together. If you see any caramel trying to escape, those are your "testers" that you get to eat immediately. Quality control is important, after all. The remaining cups can be stored in an airtight container in the fridge for up to two weeks, though good luck having them last that long.
- If you're feeling fancy (or want to impress someone), melt a little white chocolate and drizzle it over the tops in a zigzag pattern. Add a few flakes of gold leaf or a sprinkle of sea salt on top, and suddenly these look like they came from one of those boutique chocolate shops where everything costs more than your car payment. Package them in a pretty box with tissue paper, and you've got a gift that looks like you spent way more time and money than you actually did.
That's it — you did it. But hold on, I've got a few more tricks that'll take this to another level...
Insider Tricks for Flawless Results
The Temperature Rule Nobody Follows
Here's the thing about working with chocolate and caramel — they're like that friend who seems chill but gets dramatic if the temperature isn't just right. Your chocolate should be melted but not hot, your caramel warm but not scalding, and your kitchen shouldn't feel like a sauna. If your kitchen is too warm, the chocolate won't set properly and you'll end up with chocolate caramel puddles instead of cups. Too cold, and your chocolate might bloom and look chalky.
I learned this the hard way during a July heatwave when my air conditioning decided to take a vacation. Three hours of work resulted in a tray of chocolate soup that tasted amazing but looked like abstract art. Now I plan my chocolate projects like military operations, checking the weather and cranking up the AC if needed. The ideal temperature is around 68-70°F — cool enough for chocolate to behave, warm enough that your fingers don't go numb while you're working.
Why Your Nose Knows Best
When making caramel, your nose is actually a better timer than any clock. The moment you smell that deep, buttery, slightly nutty aroma, you're about 30 seconds away from perfect caramel. It's like your kitchen is sending you a text message saying "get ready, things are about to get delicious." This smell happens right before the sugar starts to darken, and it's your cue to have everything else measured and ready to go.
My grandmother taught me that caramel has three distinct aroma phases: first it smells sweet like cotton candy, then it gets deeper and more complex like toasted nuts, and finally it hits this perfect middle ground that makes you want to bottle the scent and wear it as perfume. That third phase is your green light to add the cream. Miss it, and you'll either have pale, sweet caramel or dark, bitter caramel that tastes like regret.
The 5-Minute Rest That Changes Everything
After you fill your chocolate shells with caramel, don't rush to seal them with the top chocolate layer. Let them rest for exactly 5 minutes — set a timer because this isn't negotiable. During this time, the caramel slightly cools and thickens, creating this perfect layer that doesn't mix with your top chocolate but also doesn't create a hard lump in the center. It's like the caramel and chocolate have a chance to introduce themselves before becoming permanent roommates.
This rest also lets any air bubbles rise to the surface, so when you add the top chocolate layer, you get these perfectly smooth, professional-looking tops instead of Swiss cheese chocolate. I discovered this by accident when my doorbell rang mid-process, and those five minutes of forced patience resulted in the best-looking batch I'd ever made. Now it's part of my routine, like a chocolate meditation.
The Storage Secret That Changes Everything
Here's what the fancy chocolate shops don't want you to know: these actually improve with age, like a fine wine or George Clooney. After 24 hours in the fridge, something magical happens — the flavors meld together, the chocolate develops this deeper complexity, and the caramel takes on this buttery smoothness that makes the fresh version seem amateur. It's like they go to finishing school overnight and come back as sophisticated adults.
But here's the key: they need to be stored properly. Wrap each cup individually in wax paper, then store them in an airtight container with a sheet of wax paper between layers. This prevents them from absorbing any funky fridge flavors (because nobody wants chocolate that tastes like last week's leftover garlic pasta) and keeps the chocolate from developing that white bloom that makes them look like they're covered in chalk dust.
Creative Twists and Variations
This recipe is a playground. Here are some of my favorite ways to switch things up:
Salted Bourbon Caramel Cups
Replace the water in the caramel with good bourbon — not the cheap stuff that tastes like paint thinner, but something you'd actually drink. Add an extra pinch of flaky sea salt on top, and you've got these sophisticated little numbers that taste like they should be served in a leather armchair while discussing fine literature. The alcohol cooks off, leaving behind this smoky depth that plays beautifully with the chocolate. They're adult enough to serve at dinner parties but delicious enough that kids will still devour them.
Peppermint Bark Cups
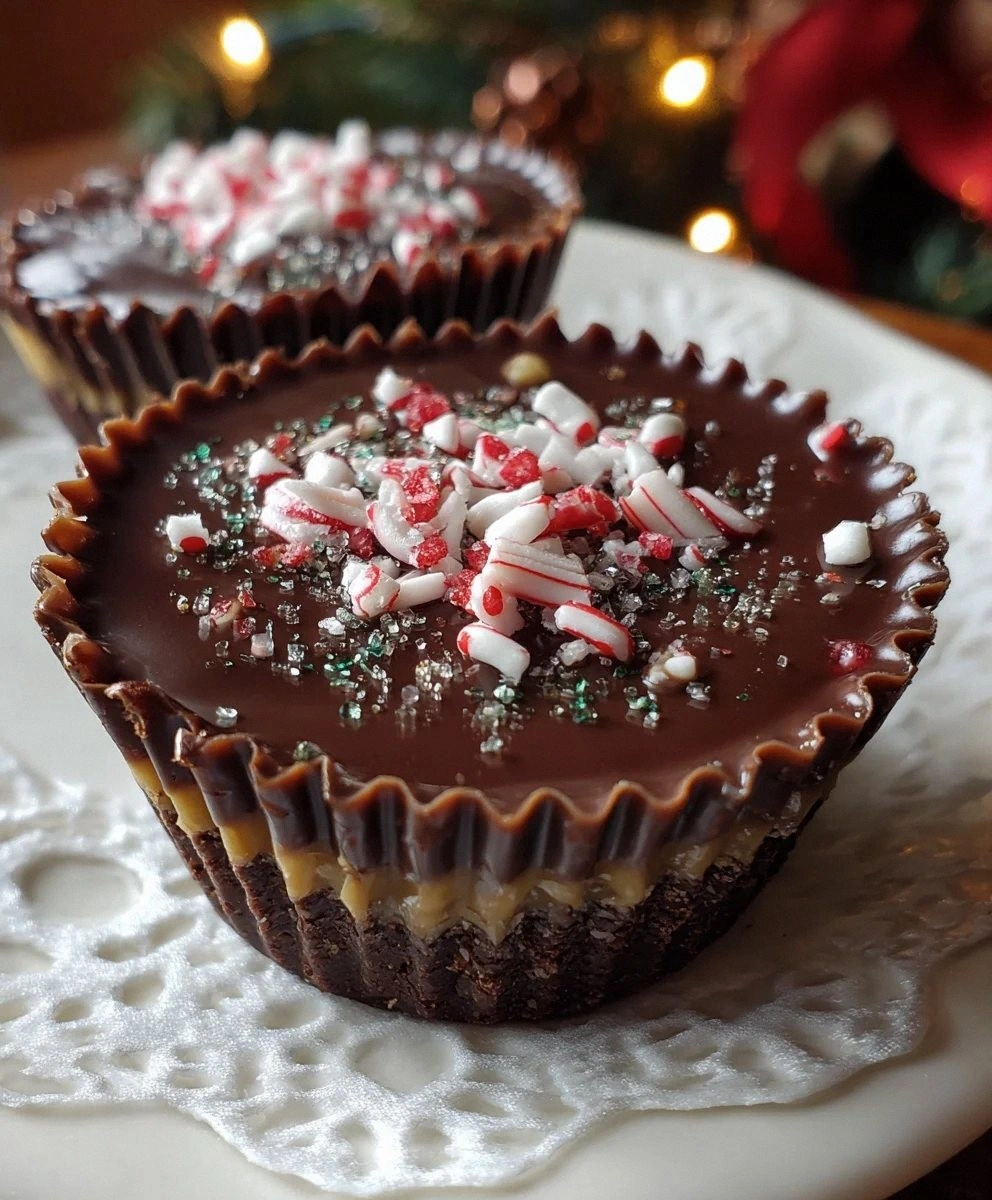
Add a drop of peppermint oil to your chocolate (not extract — oil is stronger and won't seize your chocolate), then sprinkle crushed candy canes on top before the chocolate sets. These taste like Christmas exploded in your mouth in the best possible way. The cool mint against the rich caramel creates this flavor profile that somehow feels both refreshing and indulgent, like eating a York Peppermint Pattie that got a luxury upgrade.
Spiced Mexican Chocolate Cups
Add a pinch of cinnamon and cayenne to your chocolate — just enough warmth to make your tongue tingle but not enough to make you reach for a glass of milk. The spice builds slowly, hitting you after the chocolate melts and the caramel flows, creating this experience that unfolds like a good story. They're mysteriously addictive, and people will keep eating them trying to figure out what makes them so different.
White Chocolate Raspberry Cups
Use white chocolate for the shells (though be warned, it's trickier to work with) and add a teaspoon of raspberry powder or a few drops of raspberry oil to the caramel. The result is these pretty pink-tinted cups that taste like summer and look like they belong in a French patisserie. They're lighter than the original but still rich enough to satisfy that chocolate craving.
Almond Joy Meets Caramel
Place a toasted almond in the bottom of each cup before adding the caramel, then mix some shredded coconut into your chocolate. It's like an Almond Joy and a caramel had a beautiful baby together. The almond adds crunch, the coconut adds texture, and suddenly you've got a candy bar that's been elevated to gourmet status.
Espresso Crunch Cups
Add a teaspoon of instant espresso powder to your chocolate and sprinkle chocolate-covered espresso beans on top. These are dangerous — they taste like dessert but pack enough caffeine to power you through an all-nighter. Perfect for holiday gatherings when you need to stay awake for family game night but want to feel like you're indulging in something special.
Storing and Bringing It Back to Life
Fridge Storage
These little beauties will keep in the fridge for up to two weeks if stored properly, though I've never actually tested this limit because they disappear faster than free pizza at a college party. The key is wrapping each cup individually in wax paper, then storing them in an airtight container with layers separated by more wax paper. This prevents them from absorbing any refrigerator odors and keeps the chocolate from developing that white bloom that makes them look like they've been dusted with powdered sugar.
If your fridge tends to run cold, let the cups sit at room temperature for about 10 minutes before serving. This takes the chill off just enough for the caramel to flow properly and the chocolate to snap rather than shatter. It's the difference between a good chocolate experience and a great one — like the difference between listening to music through your phone speaker versus a good sound system.
Freezer Friendly
These freeze beautifully for up to three months, making them perfect for holiday prep or emergency chocolate needs. Wrap each cup in plastic wrap, then aluminum foil, and store in a freezer bag with as much air removed as possible. When you're ready to enjoy them, transfer to the fridge overnight to thaw slowly. Don't rush this process by leaving them on the counter, because rapid temperature changes can cause the chocolate to bloom and the caramel to weep like it's watching a sad movie.
The texture might be slightly firmer after freezing, but the flavor is completely preserved. In fact, some people prefer them slightly frozen, when the chocolate has this extra snap and the caramel becomes this cool, chewy center that's incredibly satisfying on a hot day. It's like having a chocolate caramel ice cream sandwich without the mess.
Best Reheating Method
Here's the thing — you don't actually reheat these cups because that would create a melted mess that would make you cry. But if they've been stored in a very cold fridge and the caramel seems too firm, let them sit at room temperature for 10-15 minutes before serving. The chocolate should snap cleanly when you bite into it, and the caramel should flow slowly like lava, not pour out like soup.
If your chocolate has bloomed (turned white and chalky-looking), you can actually fix this by placing the cups in a barely warm oven (around 100°F) for just a few minutes, then letting them cool again. The cocoa butter will reabsorb, and they'll look almost as good as new. It's like chocolate Botox — nobody needs to know they weren't perfect to begin with.