Picture this: I was standing in my kitchen, eyes glued to the pantry, when a single jar of creamy peanut butter stared back at me like a mischievous dare. The air was thick with the scent of old chocolate chips and the faint hum of the refrigerator, a soundtrack that promised something sweet yet simple. I laughed, because I’d just tried to whip up a fancy mousse that collapsed like a house of cards, and my culinary confidence was on a shaky cliff. The moment the peanut butter jar opened, a wave of nutty aroma hit me, and I could almost taste the future. That instant, I knew I was about to discover the ultimate version of a dessert that would become my new obsession.
I was craving something that could satisfy a midnight craving, yet still be a treat that could be shared at a gathering without the need for a kitchen brigade. The idea of a no-bake, chocolate‑laden peanut butter confection that melts in your mouth like velvet on a summer afternoon was too good to ignore. I had seen countless chocolate peanut butter recipes on social media, but none of them made the taste buds sing or the texture feel like a dream. I could hear the clink of spoons, the hiss of butter melting, and the faint crackle of sugar crystals forming a perfect coating. My kitchen became a laboratory, and I was the scientist ready to test the limits of flavor.
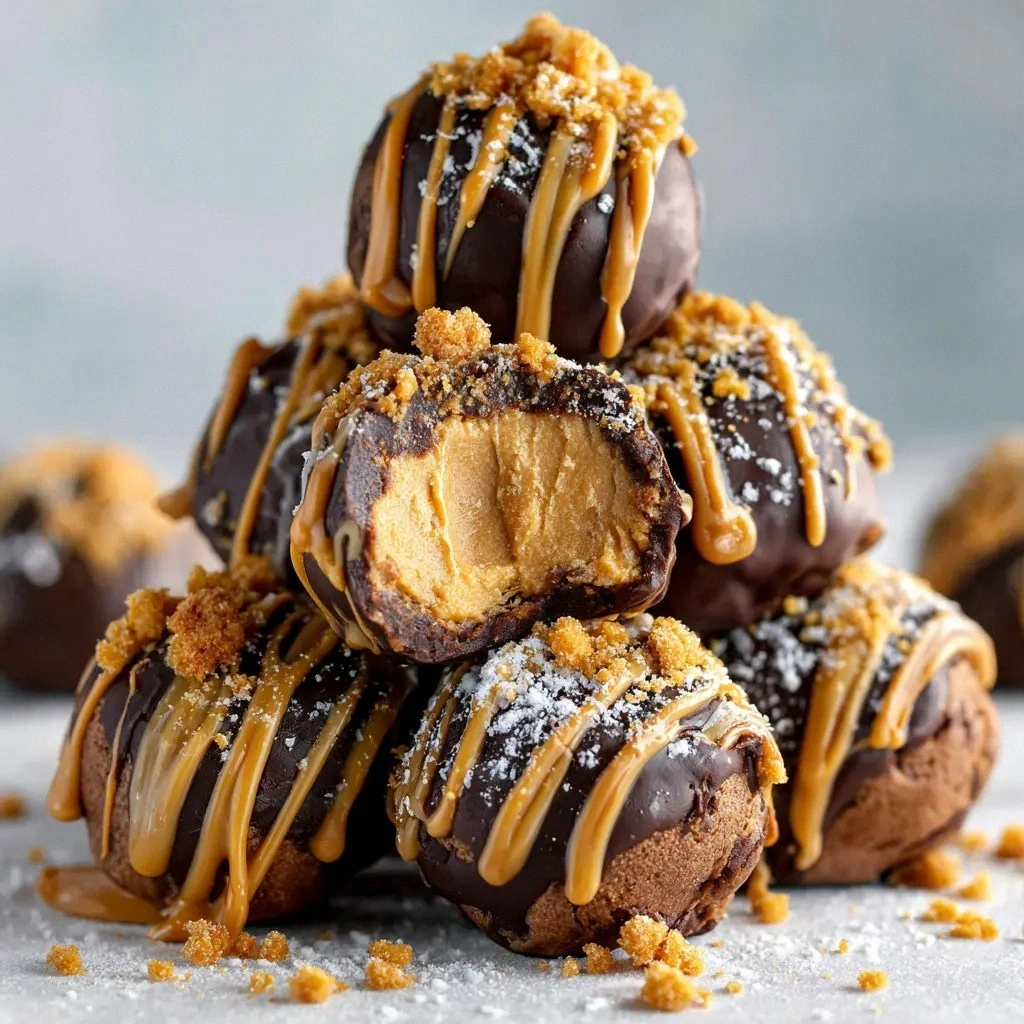
After a few experimental batches that resulted in sticky, unevenly coated treats, I finally hit the sweet spot. The mixture was glossy, the peanut butter and chocolate intertwined like best friends, and the powdered sugar gave it that delicate, airy crunch that made each bite feel like a snowfall. I dared my friends to taste this and not go back for seconds, and they all agreed, eyes wide, mouths open, and a chorus of “Wow!” echoing through the kitchen. That’s the magic I’m about to share with you—a version that’s hands down the best you’ll ever make at home. The secret? A simple technique that uses a splash of coconut oil to give the snowballs a silky finish and a hint of tropical warmth.
Picture yourself pulling this out of the fridge, the whole kitchen smelling incredible, and seeing the snowballs glistening like tiny chocolate snowflakes on parchment paper. The texture is light yet firm, the flavor is a balanced duet of peanut butter richness and chocolate depth, and the finish is a subtle caramelized sheen. Most recipes get this completely wrong, but here’s what actually works: melt everything together, fold in sugar, let it set, and roll into bite‑size spheres. I’ll be honest—I ate half the batch before anyone else got a chance to try it, but that’s the proof that this is the kind of dessert that demands a second, third, and fourth scoop. If you’ve ever struggled with the perfect chocolate peanut butter treat, you’re not alone, and I’ve got the fix.
What Makes This Version Stand Out
- Taste: The marriage of creamy peanut butter and semi‑sweet chocolate creates a flavor profile that is both comforting and sophisticated, unlike the overly sweet versions you find on Pinterest.
- Texture: The inclusion of coconut oil gives the mixture a silky mouthfeel that melts in your mouth while maintaining a firm bite, unlike the hard, brittle results of many no‑bake recipes.
- Ingredient Quality: Using 1.5 cups of real, creamy peanut butter instead of powdered peanut butter ensures a richer, more authentic taste that carries through each bite.
- Simplicity: With only six ingredients and a single stovetop step, this recipe is a breeze even for those who consider themselves kitchen novices.
- Make‑Ahead Potential: The mixture can be prepared up to 24 hours in advance and chilled, making it a perfect party trick or last‑minute dessert.
- Visual Appeal: The snowball shape and glossy finish give an Instagram‑ready look that will have your followers asking for the recipe.
- Versatility: It can be served on its own, drizzled over ice cream, or tossed into a bowl of fresh berries for a layered dessert.
- Quick Fix: The entire process takes less than 30 minutes from start to finish, which is rare for a dessert that tastes like a gourmet creation.
Alright, let's break down exactly what goes into this masterpiece. The next section will guide you through the ingredient groups and why each one matters.
Inside the Ingredient List
The Flavor Base
The creamy peanut butter is the star of this recipe, providing not only a nutty depth but also a natural sweetness that balances the chocolate. Its high oil content gives the snowballs a luscious mouthfeel that melts like butter on a hot day. If you skip it, you’ll end up with a bland, chocolate‑only treat that lacks that comforting, familiar kick. For a dairy‑free twist, look for a peanut butter that’s unsweetened and unflavored; this keeps the flavor profile pure and lets the chocolate shine. When selecting peanut butter, choose one with no added sugars or hydrogenated oils to preserve the natural oils that give the snowballs their silky finish.
The Texture Crew
Unsalted butter is essential for binding the mixture together and adding a subtle buttery richness that complements the peanut butter. It also helps the powdered sugar dissolve smoothly, preventing gritty patches. If you’re allergic to dairy, a plant‑based butter that melts at the same temperature is a viable alternative. The powdered sugar is the sweetening agent that coats the mixture, giving each bite a light, airy crunch. If you prefer a low‑carb version, you can replace powdered sugar with a sugar substitute that behaves similarly, though the texture may change slightly. The vanilla extract is a flavor enhancer that lifts the overall taste, making each snowball taste like a handcrafted confection.
The Unexpected Star
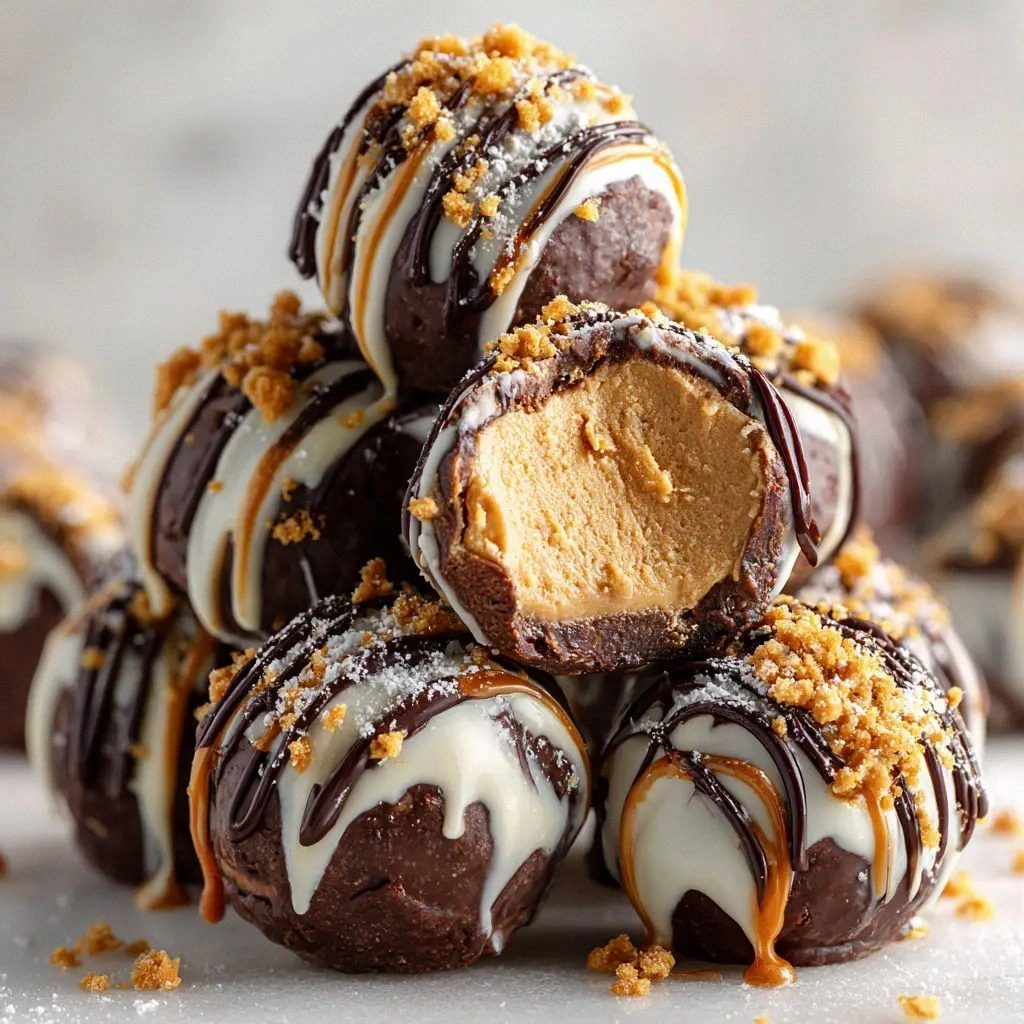
Semi‑sweet chocolate chips bring a rich, bittersweet contrast to the creamy peanut butter. Their melt point is low enough to soften quickly, allowing the chocolate to fuse with the peanut butter into a smooth, glossy coating. If you’re a fan of extra chocolate, you can add a handful of dark chocolate chips for a deeper flavor. Alternatively, white chocolate chips offer a sweeter, creamier finish that pairs well with the peanut butter. The coconut oil (or shortening) is the secret weapon that keeps the mixture from drying out and gives the snowballs a silky, glossy sheen. It also helps the mixture set faster, reducing the chill time needed.
The Final Flourish
Together, these ingredients create a balance of sweet, salty, and chocolatey notes that dance on the palate. Each component plays a specific role, from the binding butter to the glossy coconut oil, ensuring the snowballs hold their shape and taste. If you skip the coconut oil, the mixture may become too stiff or dry, making it difficult to roll into perfect spheres. The final product is a dessert that feels indulgent yet is surprisingly light, making it the perfect treat for any occasion. Remember, the key to success is in the proportions; don’t deviate from the measurements unless you’re experimenting with a new flavor profile.
Everything's prepped? Good. Let's get into the real action. The next section will walk you through each step, from melting to rolling.
The Method — Step by Step
- Begin by melting the unsalted butter and 1 teaspoon of coconut oil in a medium saucepan over low heat, stirring constantly until the butter is fully liquefied. The mixture should bubble gently, not scorch. Once melted, remove the pan from heat to avoid over‑cooking the butter, which could alter the flavor profile. This step is the foundation that binds all the flavors together.
- Add the 1.5 cups of creamy peanut butter to the warm butter mixture, whisking until the two are completely blended. The mixture should become silky and glossy, a sign that the oils are properly emulsified. If the mixture appears lumpy, continue whisking until smooth; this ensures an even coating on the snowballs. This is the moment where the peanut butter’s natural oils start to shine.
- Stir in the 1 teaspoon of vanilla extract, letting the aroma fill the kitchen. Vanilla lifts the entire flavor profile, adding depth and complexity to the chocolate. It also balances the sweetness, preventing the final product from tasting too sugary. A few drops of vanilla concentrate can intensify the flavor if you’re feeling adventurous.
- Gradually fold in the 3 cups of powdered sugar, mixing until the mixture is thick and glossy. The powdered sugar should dissolve fully, creating a smooth base that will hold the chocolate chips. If you see any lumps, let the mixture rest for a minute and whisk again. This step is critical for achieving that perfect, airy crunch.
- Now add the 2 cups of semi‑sweet chocolate chips to the mixture. Stir until the chocolate is completely melted and the mixture is a rich, dark brown. The chocolate should coat the peanut butter evenly, creating a glossy surface that will set into a firm shell. This is the step that gives the snowballs their signature chocolatey sheen.
- Let the mixture cool to room temperature; it should still be soft enough to shape but firm enough to hold its form. If the mixture cools too quickly, it may become too hard to roll. A good rule of thumb is to wait until the mixture is warm but not hot. This cooling period is where the flavors meld together beautifully.
- Using a small cookie scoop or spoon, portion the mixture onto parchment paper, forming small, even balls. The parchment will prevent sticking and make the next step easier. Once you have about 24 snowballs, place them in the refrigerator for 15–20 minutes to set. The cold will firm up the mixture into a bite‑size treat.
- After the chilling period, remove the snowballs from the fridge and let them sit at room temperature for about 5 minutes. This will make them easier to roll if you’re aiming for a perfect sphere. If you prefer a firmer texture, let them chill for an additional 10 minutes. The final product should be firm yet slightly pliable, ready to be enjoyed.
- Serve immediately, or store in an airtight container in the refrigerator for up to a week. If you’re planning to serve them at a party, keep them chilled until the last moment to maintain their shape. The snowballs will keep their glossy finish and firm texture, making them a crowd‑pleaser.
- Enjoy the experience of biting into a creamy, chocolatey, peanut‑butter‑laden snowball that melts in your mouth and leaves you craving more. This is the moment of truth, and it’s worth every second of preparation. Remember, the secret to a perfect snowball is in the balance of flavors and the right consistency.
That's it—you did it. But hold on, I've got a few more tricks that'll take this to another level. The next section will dive into insider tips that will ensure flawless results every time.
Insider Tricks for Flawless Results
The Temperature Rule Nobody Follows
Many home bakers think that simply letting the mixture cool is enough, but the temperature of the mixture is what determines its final texture. Aim for a temperature between 90°F and 95°F before chilling; this range gives you a firm yet pliable snowball that doesn’t crumble. Use a candy thermometer for accuracy, or test by dipping a spoon into the mixture—it should leave a thin, smooth film that doesn’t stick to the spoon. If it’s too hot, the chocolate will be runny and the peanut butter will separate; if it’s too cold, the mixture will harden too quickly. This small tweak can make the difference between a mediocre treat and a show‑stopping dessert.
Why Your Nose Knows Best
The aroma of chocolate melting is an early indicator of whether the mixture is on the right track. A faint, buttery scent with a hint of vanilla suggests everything is balanced. If you detect a sharp, burnt smell, it means the butter has overheated. If the scent is too sweet, you might have over‑added powdered sugar. Your nose is a reliable guide; trust it to tell you when you’re close to perfection.
The 5‑Minute Rest That Changes Everything
After the final chilling step, let the snowballs rest at room temperature for 5 minutes before serving. This short rest allows the mixture to relax, making the snowballs easier to bite into without cracking. It also gives the chocolate coating time to set fully, ensuring a glossy finish. Skipping this step can result in a slightly uneven surface or a texture that feels too firm. The 5‑minute rest is a simple ritual that pays off with a flawless bite.
A Pinch of Salt for Depth
Adding a pinch of sea salt to the powdered sugar before mixing can elevate the flavor profile by balancing the sweetness. The salt enhances the chocolate’s bitterness, giving the snowballs a more complex taste that satisfies the palate. Sprinkle a tiny amount onto the final product for an extra burst of flavor, but be careful not to overdo it. A little goes a long way, so start with a pinch and adjust to taste.
Use a Silicone Baking Mat
While parchment paper works well, a silicone baking mat provides a non‑stick surface that’s easy to clean and reusable. It also helps the snowballs release more gently, preserving their shape. If you’re making large batches, a silicone mat can save time and reduce cleanup. The mat’s heat‑resistant properties mean you don’t have to worry about the mixture sticking or burning.
These tricks are the secret sauce that turns an ordinary dessert into a culinary masterpiece. Keep them in mind, and you’ll always have a crowd‑pleasing treat ready to impress.
Creative Twists and Variations
This recipe is a playground. Here are some of my favorite ways to switch things up:
Dark Chocolate Drizzle
Drizzle melted dark chocolate over the finished snowballs for a richer, bittersweet finish. The dark chocolate adds depth and a slightly bitter note that contrasts the creamy peanut butter. Use a fine‑mesh strainer to achieve a smooth drizzle, and let it set before serving. This variation is perfect for those who love a more sophisticated chocolate flavor.
Coconut Crumble Topping
Sprinkle toasted shredded coconut over the snowballs for a tropical twist. The coconut adds a crunchy texture and a subtle, sweet aroma that pairs beautifully with the peanut butter. Toast the coconut in a dry skillet for 2–3 minutes until golden, then let it cool before adding. This topping gives the dessert an extra layer of flavor and visual appeal.
Minty Peppermint Swirl
Add a few drops of peppermint extract to the mixture for a refreshing minty finish. The peppermint enhances the chocolate’s richness and provides a cooling sensation that’s perfect for hot days. Be careful not to over‑add; a little goes a long way. This variation is ideal for holiday parties or a summer gathering.
Spiced Cinnamon Crunch
Stir in ½ teaspoon of ground cinnamon into the powdered sugar before mixing. The cinnamon adds warmth and a subtle spice that complements the chocolate and peanut butter. The crunchy texture from the cinnamon grains creates a pleasant contrast to the smooth snowball. This version is especially comforting during cooler weather.
Almond Butter Swap
Replace the peanut butter with almond butter for a nutty twist that’s slightly sweeter and less oily. Almond butter’s lighter texture makes the snowballs a bit firmer, but the flavor remains indulgent. Adjust the amount of powdered sugar slightly to compensate for the different moisture content. This variation is great for those who want a different nut profile.
Sea Salt Caramel Drizzle
Create a caramel drizzle by melting sugar with a splash of water and a pinch of sea salt. Drizzle it over the snowballs for a sweet‑salty contrast that elevates the flavor. The caramel adds a glossy sheen and a slightly crunchy texture when it hardens. This twist is a crowd‑pleaser for both kids and adults alike.
Feel free to experiment with these variations or combine them for a multi‑layered dessert experience. The possibilities are endless, and each tweak brings a new dimension to the classic chocolate peanut butter snowball.
Storing and Bringing It Back to Life
Fridge Storage
Keep the snowballs in an airtight container in the refrigerator for up to one week. The cold environment preserves the texture and prevents the mixture from softening. Before serving, let them sit at room temperature for 5 minutes to soften slightly, ensuring a perfect bite. Store them on parchment paper to avoid sticking and to maintain their shape.
Freezer Friendly
For longer storage, place the snowballs on a parchment sheet and freeze for up to three months. Once frozen, transfer them to a freezer bag, removing as much air as possible. When ready to eat, let them thaw at room temperature for 15–20 minutes. This method keeps the texture intact while allowing you to enjoy them anytime.
Best Reheating Method
To revive a slightly stale snowball, wrap it in a damp paper towel and microwave on low for 10–15 seconds. This gentle heat restores the silky mouthfeel without melting the chocolate coating. Alternatively, place the snowball on a plate in a preheated oven at 300°F for 2–3 minutes; this method preserves the texture and adds a slight crispness to the exterior. A tiny splash of water before reheating steams back to perfection, giving the snowball a fresh, glossy finish.