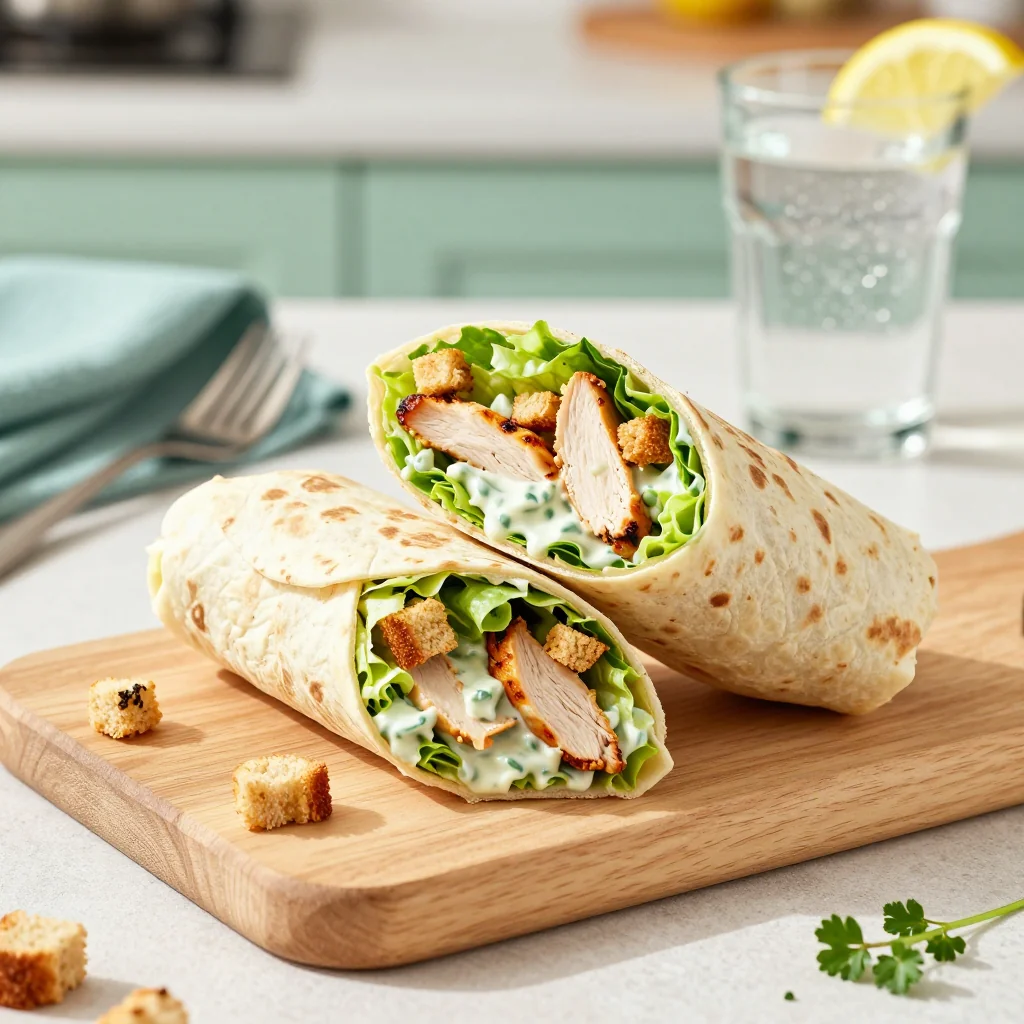
A fresh, handheld twist on the classic Caesar salad, perfect for a quick and satisfying lunch.
I still remember the first time I tasted a perfectly balanced Caesar salad on a bustling New York rooftop; the crisp romaine, the sharp Parmesan, and that unmistakable tang of lemon made my taste buds dance. A few weeks later, while juggling a hectic schedule, I craved the same bright flavors but needed something portable. That moment sparked the idea of wrapping that classic salad in a soft tortilla, giving it the convenience of a handheld snack without sacrificing the iconic taste.
The Chicken Caesar Wrap traces its roots to the iconic Caesar salad, invented in Tijuana in the 1920s, and later adapted by chefs worldwide seeking quick, nutritious meals. By incorporating tender grilled chicken and a creamy Caesar dressing, the wrap transforms a traditional salad into a satisfying, portable lunch that works perfectly for office desks, picnics, or a quick bite between meetings.
In this guide, I’ll walk you through every step—from seasoning the chicken to assembling the perfect wrap—ensuring you get a balanced bite of protein, crunch, and zest every time. You’ll also discover why this recipe is foolproof, how to customize it for different dietary needs, and the secrets that make each bite burst with flavor.
Ready to roll up some deliciousness? Let’s dive in and create a lunch that’s both nutritious and indulgent!
🌟 Why This Recipe Will Captivate You
This Chicken Caesar Wrap blends classic flavors with modern convenience, making it an ideal go‑to for busy weekdays.
- ✨ Quick & Easy Preparation: With just fifteen minutes of prep and ten minutes of cooking, you can have a wholesome lunch ready in under half an hour.
- ✨ Balanced Nutrition: Each wrap delivers lean protein, fresh greens, and a modest amount of healthy fats, keeping you energized without the afternoon slump.
- ✨ Portable Perfection: Wrapped in a soft tortilla, the salad stays together, making it perfect for on‑the‑go meals without sacrificing texture.
- ✨ Customizable Core: Swap chicken for tofu, add extra veggies, or adjust the dressing to suit your taste preferences.
- ✨ Crowd‑Pleaser: The familiar Caesar flavor appeals to both traditionalists and adventurous eaters alike.
- ✨ Minimal Cleanup: One pan for the chicken and a single bowl for assembly means less time washing dishes and more time enjoying your meal.
🥗 Ingredients
📝 Complete Ingredient List
For the Chicken:
For the Wrap Assembly:
For the Dressing (Optional Boost):
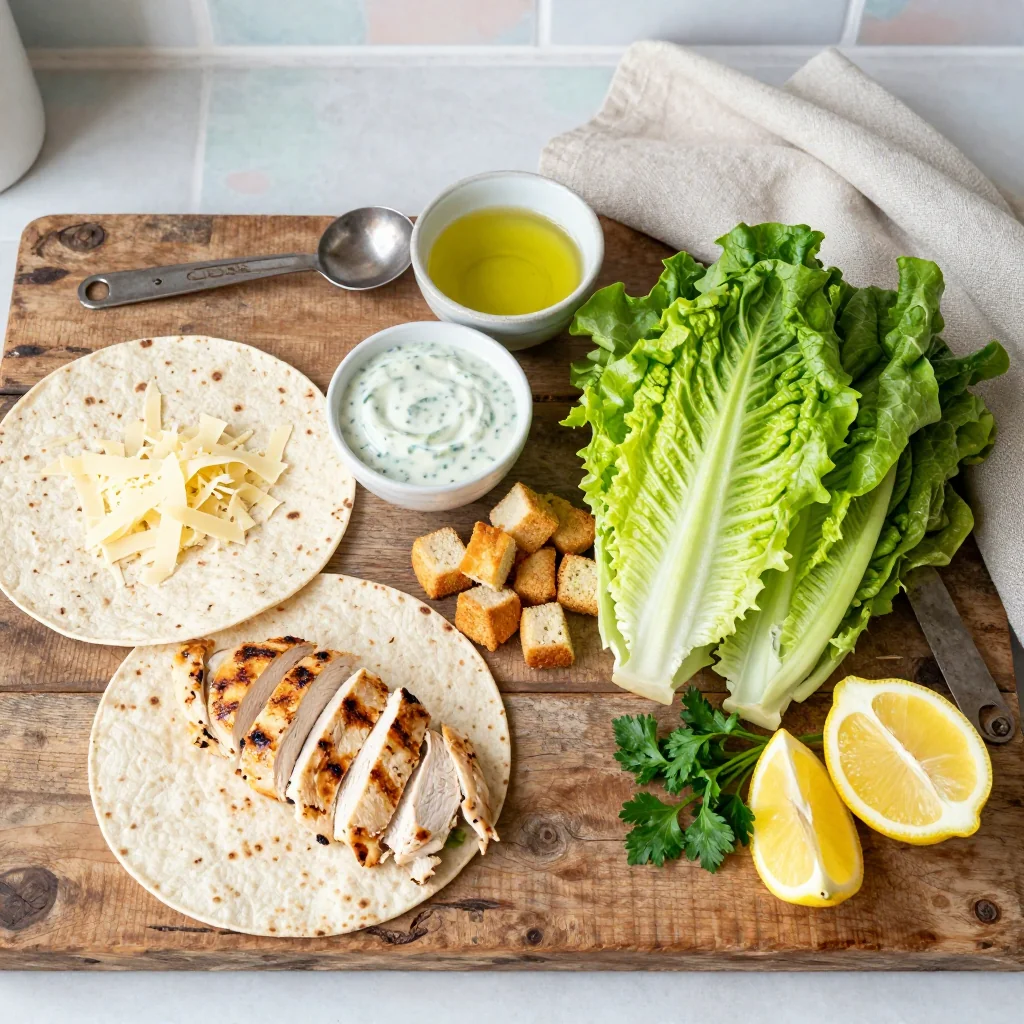
🔍 Focus on Key Ingredients
Chicken Breast
Chicken breast provides lean protein that keeps you feeling full without weighing you down. Look for breasts that are firm, pinkish‑white, and free from any discoloration. If possible, choose organic or free‑range options for a richer taste and better texture. Pat the chicken dry before seasoning to ensure a crisp sear.
Romaine Lettuce
Romaine offers a satisfying crunch and a slightly bitter undertone that balances the creamy dressing. Fresh romaine should have crisp, dark green leaves with no wilted edges. When chopping, keep the pieces bite‑size so they fit comfortably inside the tortilla without tearing.
Caesar Dressing
A classic Caesar dressing brings together garlic, anchovies (optional), lemon, and Parmesan for a savory, tangy profile. For a healthier twist, use a light version or make your own with Greek yogurt as a base. The dressing acts as a glue, holding the lettuce and chicken together while adding a luxurious mouthfeel.
🔄 Quick Substitutions
| If you don’t have... | Use instead... |
|---|---|
| Chicken breast | Turkey breast strips |
| Flour tortillas | Whole‑wheat wraps |
| Parmesan cheese | Pecorino Romano |
👨🍳 Step‑by‑Step Instructions
Follow these detailed steps to create a perfectly balanced Chicken Caesar Wrap that’s both flavorful and satisfying.
📋 Phase 1: Preparation & Mise en Place
First, we’ll get all components ready before cooking.
Season the Chicken
Pat the chicken breasts dry with paper towels, then drizzle with olive oil and rub both sides with sea salt and freshly ground black pepper. Let the seasoned chicken rest for five minutes; this allows the salt to penetrate the meat, ensuring a juicy interior. While the chicken rests, preheat a non‑stick skillet over medium‑high heat. The oil will create a golden crust while keeping the interior moist.
Prepare the Dressing Base
In a small bowl, whisk together the Caesar dressing, fresh lemon juice, Dijon mustard, Worcestershire sauce, and minced garlic. The acidity from the lemon brightens the dressing, while the mustard adds depth. Let the mixture sit for a couple of minutes so the flavors meld. This will be the secret weapon that brings all the ingredients together.
🔥 Phase 2: Cooking & Assembly
Now we’ll cook the chicken and assemble the wraps.
Cook the Chicken
Place the chicken breasts in the hot skillet and cook for 5‑6 minutes on each side, or until the internal temperature reaches 165°F (74°C). You’ll hear a gentle sizzle; this indicates a perfect sear. Once cooked, remove the chicken from the pan and let it rest for three minutes before slicing it into thin strips. Resting prevents the juices from spilling out, keeping the meat tender.
Toast the Tortillas
While the chicken rests, warm each tortilla in a dry skillet for about 30 seconds per side, just until lightly golden and pliable. This step prevents tearing when you roll the wrap and adds a subtle toasted flavor.
Layer the Fillings
Lay each tortilla flat and spread a generous tablespoon of the prepared dressing across the surface. Add a handful of chopped romaine, then sprinkle the grated Parmesan and crushed croutons for texture. Finally, place the sliced chicken strips on top, ensuring an even distribution.
✨ Phase 3: Finishing Touches & Serving
The final stage brings everything together.
Roll the Wrap
Fold the sides of the tortilla inward, then roll tightly from the bottom up, keeping the fillings snug. A tight roll ensures the wrap stays together when you bite into it.
Slice and Plate
Cut each wrap diagonally in half for a beautiful presentation. Arrange the halves on a serving plate, drizzle a little extra dressing on the side for dipping, and garnish with a sprinkle of Parmesan.
Serve and Enjoy
Serve the wraps immediately while the tortillas are still warm. Pair with a crisp side salad or a light fruit cup for a balanced meal.
💡 Expert Tips & Tricks
🛒 Choosing the Right Ingredients
When selecting chicken breasts, aim for ones that are uniformly sized; this ensures even cooking. For the romaine, choose heads that feel heavy for their size and have deep green leaves—signs of freshness. If you can, buy a small block of Parmesan and grate it yourself; fresh cheese melts better and offers a more vibrant flavor than pre‑grated. Opt for whole‑grain tortillas when you want extra fiber, or try low‑carb alternatives for a lighter version. Finally, pick croutons that are lightly seasoned rather than overly salty to keep the overall flavor balanced.
🔪 Preparation Techniques
Pat the chicken dry before seasoning; moisture on the surface can prevent a good sear. Slice the chicken against the grain to maximize tenderness. When chopping lettuce, use a sharp chef’s knife to avoid bruising the leaves, which can cause them to wilt faster. Crumble the croutons by hand for a more irregular texture that adds surprise crunch in every bite. Finally, whisk the dressing thoroughly to emulsify the oil and lemon juice, preventing separation.
🌡️ Mastering the Cooking Process
Preheat the skillet to medium‑high before adding the chicken; a hot pan creates a caramelized crust while keeping the interior juicy. Use a meat thermometer to confirm the chicken reaches 165°F (74°C) for safety without overcooking. When toasting tortillas, keep the heat moderate; too high will burn them, too low will make them soggy. Let the chicken rest for a few minutes after cooking; this redistributes the juices, making the meat more succulent.
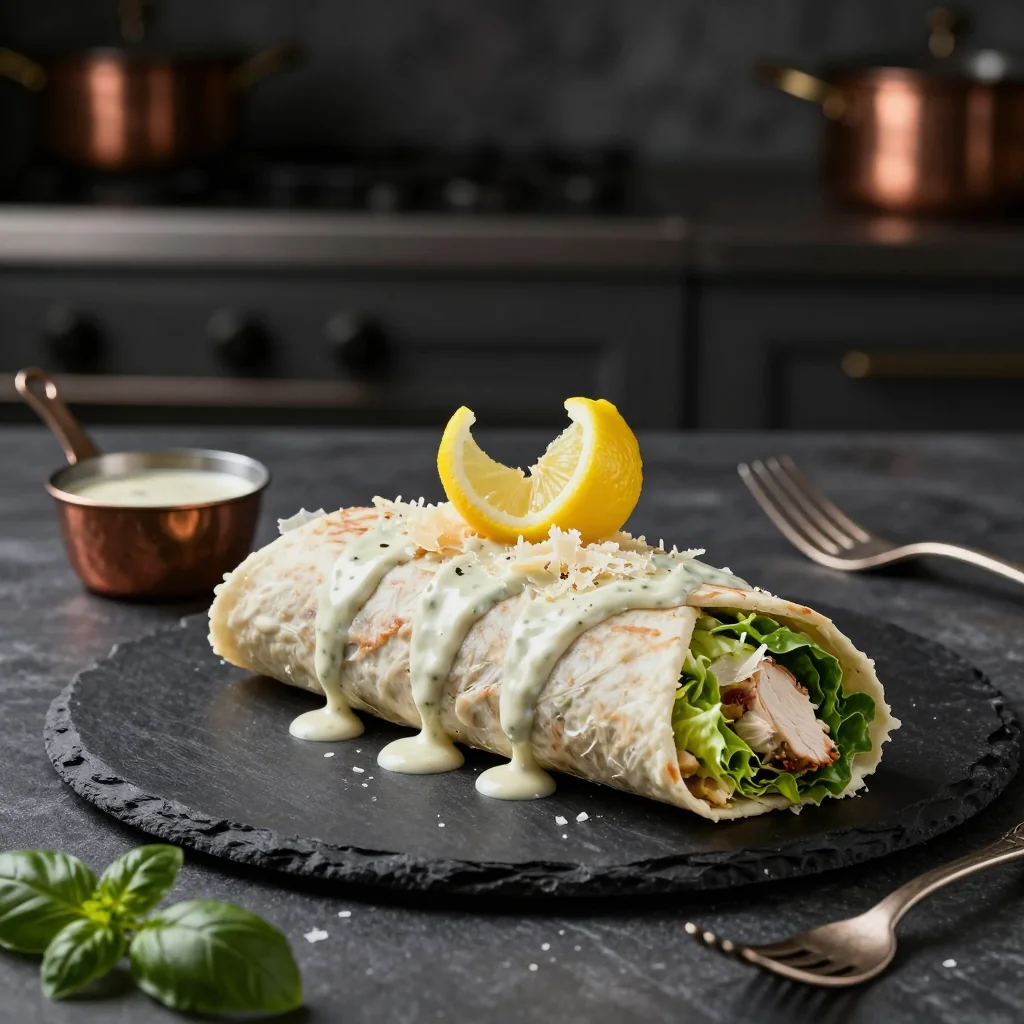
🍽️ Presentation & Service
Slice the wraps diagonally for an elegant look and to reveal the colorful layers inside. Add a drizzle of extra Caesar dressing on the side for dipping, which adds visual appeal and extra flavor. Garnish each plate with a thin lemon wedge and a light dusting of Parmesan to enhance the aroma. Serve on a wooden board for a rustic feel, or a sleek white plate for a modern presentation. Pair with a crisp white wine or a sparkling water with a splash of citrus for a refreshing finish.
🏆 Pro Tips
Elevate your Chicken Caesar Wraps from everyday lunch to a restaurant‑quality masterpiece with these professional insights.
- 🎯 Brine the Chicken: Soaking the chicken in a light saltwater solution for 15 minutes before cooking adds moisture, resulting in a juicier bite. The brine also seasons the meat from within, reducing the need for heavy seasoning later.
- 🎯 Use a Cast‑Iron Skillet: The even heat distribution of cast iron creates a perfect sear, locking in juices and giving a subtle smoky flavor that elevates the wrap.
- 🎯 Make a Homemade Crouton Blend: Toss cubed sourdough with olive oil, garlic powder, and a pinch of sea salt, then bake until golden. The result is a crunchier, more aromatic crouton than store‑bought.
- 🎯 Infuse the Dressing with Anchovies: For an authentic Caesar taste, melt a few anchovy fillets into the dressing. They dissolve completely, adding umami depth without a fishy aftertaste.
- 🎯 Add a Touch of Smoked Paprika: A light sprinkle over the chicken before cooking adds a subtle smoky aroma and a pop of color, making the dish visually striking.
- 🎯 Finish with a Light Citrus Zest: Grate a small amount of lemon zest over the assembled wrap for a burst of freshness that cuts through the richness of the dressing.
"A great wrap is not just about convenience; it's about delivering the same depth of flavor you’d expect from a plated dish." — Chef Thomas Keller
🔄 Variations & Adaptations
The beauty of this recipe lies in its flexibility. Whether you’re catering to dietary preferences, exploring global flavors, or adjusting for family-friendly meals, there’s a version for everyone.
🥬 Vegetarian/Vegan Version
Replace the chicken with grilled marinated tofu or tempeh for a plant‑based protein boost. Use a vegan Caesar dressing made from cashew cream, lemon juice, and nutritional yeast. For a vegan twist, swap Parmesan with a dairy‑free cheese alternative or a sprinkle of toasted pine nuts for a nutty crunch.
- Marinated tofu: Press, slice, and marinate in soy sauce, garlic, and a splash of lemon for 30 minutes, then grill.
- Vegan dressing: Blend soaked cashews, lemon juice, Dijon, capers, and nutritional yeast until smooth.
🌶️ Flavor Variations
Switch up the flavor profile by tweaking the dressing or adding complementary ingredients. A spicy version can incorporate sriracha or chipotle powder. A Mediterranean spin might add sun‑dried tomatoes, olives, and feta cheese. An Asian-inspired twist could replace Caesar dressing with a sesame‑ginger sauce and add shredded carrots.
Spicy Version
Add 1 tsp of sriracha to the dressing and sprinkle a pinch of red pepper flakes over the finished wrap for a gentle heat that awakens the palate.
Mediterranean Version
Toss in chopped sun‑dried tomatoes, Kalamata olives, and crumbled feta. Finish with a drizzle of extra‑virgin olive oil and a sprinkle of oregano.
Asian Version
Swap the Caesar dressing for a soy‑sesame glaze, add shredded carrots, and garnish with toasted sesame seeds for an umami‑rich experience.
⚠️ Dietary Adjustments
Gluten‑Free
Use gluten‑free tortillas or lettuce leaves as a wrap. Ensure the croutons are made from gluten‑free bread or omit them for a lighter bite.
Lactose‑Free
Choose a dairy‑free Caesar dressing or make your own with coconut milk and dairy‑free Parmesan. Replace Parmesan with a lactose‑free cheese alternative.
Low‑Calorie
Cut the dressing in half and use a low‑fat version. Swap regular tortillas for low‑calorie wraps and increase the proportion of lettuce to keep the wrap filling while reducing calories.
👶 Family/Kid‑Friendly Version
For younger palates, reduce the amount of black pepper and use a milder dressing. Add a few slices of avocado for creaminess and a touch of sweetness. Cut the wraps into bite‑size pinwheels that are easier for small hands to manage.
📦 Storage & Reheating
🧊 Storage
Refrigerator
- Duration: 3 days
- Container: Airtight plastic container
- Tip: Store the dressing separately to keep the wraps from getting soggy.
Freezer
- Duration: 1 month
- Method: Wrap each individual wrap tightly in parchment paper, then place in a freezer‑safe zip‑lock bag.
- Defrosting: Transfer to the refrigerator overnight, then reheat.
💡 For best texture, reheat only the chicken and tortillas; add fresh lettuce just before serving.
♨️ Reheating
Oven (Recommended)
- Preheat to 180°C (350°F).
- Wrap each portion in foil to retain moisture.
- Heat for 10‑12 minutes until warmed through.
- Remove foil and heat an additional 2‑3 minutes to crisp the tortilla.
Microwave (Quick)
- Place the wrap on a microwave‑safe plate and cover with a microwave‑safe lid.
- Heat on medium power for 1‑2 minutes.
- Check temperature; if needed, continue in 30‑second bursts.
Stovetop
Heat a non‑stick skillet over medium heat, place the wrap seam‑side down, and press gently for 2‑3 minutes until the tortilla is crisp and the interior is hot.
🍷 Perfect Pairings
🥗 Side Dishes
- Greek Yogurt & Cucumber Salad: Light, tangy, and refreshing—balances the richness of the Caesar dressing.
- Quinoa & Herb Pilaf: Adds a protein‑rich side that complements the wrap’s texture.
- Roasted Sweet Potato Wedges: Offers a sweet contrast to the savory wrap.
🍷 Wine & Beverage Pairings
- Chardonnay (unoaked): Its bright acidity cuts through the creamy dressing and highlights the lemon notes.
- Sauvignon Blanc: Crisp and herbaceous, it mirrors the fresh herbs in the Caesar dressing.
- Non‑Alcoholic Sparkling Water with a Slice of Lemon: Refreshing and palate‑cleansing.
🍰 Dessert Suggestions
Finish the meal with a light lemon tart or a bowl of mixed berries tossed in a splash of orange liqueur. Both options provide a bright, citrusy finish that echoes the lemon in the dressing.
❓ Frequently Asked Questions
Q: Can I use pre‑cooked rotisserie chicken instead of fresh chicken?
Absolutely! Pre‑cooked rotisserie chicken saves time and still provides the necessary protein. Just shred the meat and toss it lightly with a bit of olive oil and seasoning before adding it to the wrap. Keep in mind that rotisserie chicken can be slightly saltier, so you may want to reduce the added salt in the recipe.
Q: How do I keep the lettuce from getting soggy?
The key is to keep the dressing separate until you’re ready to assemble the wrap. Dress the lettuce lightly just before rolling, and avoid over‑mixing. Additionally, pat the lettuce dry with a paper towel after washing to remove excess moisture.
Q: What if I don’t have croutons?
You can substitute croutons with toasted pumpkin seeds, toasted nuts, or even crispy fried onions for a similar crunch. If you prefer a lighter texture, omit the croutons entirely and increase the amount of Parmesan for added flavor.
Q: Can I make this recipe dairy‑free?
Yes! Use a dairy‑free Caesar dressing or create your own using cashew cream, lemon juice, Dijon, and nutritional yeast. Replace Parmesan with a dairy‑free cheese alternative or a sprinkle of toasted nutritional yeast for a cheesy note.
Q: How can I make the wrap gluten‑free?
Swap regular flour tortillas for gluten‑free tortillas, which are widely available in most supermarkets. Ensure the croutons are made from gluten‑free bread or omit them. Also double‑check that your Caesar dressing is labeled gluten‑free.
Q: Is it possible to prepare this recipe ahead of time?
Yes! Cook the chicken and store it in an airtight container in the refrigerator for up to three days. Keep the dressing separate and the lettuce crisp. When you’re ready to eat, simply assemble the wraps and enjoy a fresh, homemade lunch.
🎉 Let’s Get Cooking!
This Chicken Caesar Wrap brings together the classic flavors you love with the convenience of a handheld meal. By following the step‑by‑step instructions, you’ll achieve a perfectly seasoned chicken, a crisp romaine crunch, and a creamy dressing that ties everything together. The result is a satisfying, balanced lunch that’s both nutritious and indulgent.
I can’t wait to see how you make it your own—whether you add a spicy kick, go vegetarian, or keep it classic. Share your results, ask questions, and let the community know how it turned out. Your feedback helps us all become better cooks.
Did you try this recipe?
Leave a comment and rating below! Share your photos on Instagram with #CaesarWrapDelight for a chance to be featured.
Chicken Caesar Wraps for Lunch
A fresh, handheld twist on the classic Caesar salad, perfect for a quick and satisfying lunch.
📝 Ingredients
Chicken
Wrap Assembly
Dressing Boost (Optional)
👨🍳 Instructions
- 1
Season the chicken breasts with olive oil, sea salt, and black pepper, then let rest for five minutes.
- 2
Whisk together Caesar dressing, lemon juice, Dijon mustard, Worcestershire sauce, and garlic to create a smooth dressing.
- 3
Cook the chicken in a hot skillet for 5‑6 minutes per side until internal temperature reaches 165°F (74°C). Let rest, then slice into strips.
- 4
Warm the tortillas in a dry skillet for 30 seconds per side until pliable.
🥗 Nutritional Information (per serving)
*Nutritional values are estimates and may vary.
📚 You Might Also Like
Classic Caesar Salad with Grilled Chicken
Spicy Chicken Quesadilla
Lemon Herb Grilled Chicken
Classic Caesar Salad
💬 Comments & Reviews
[Space for reader comments]


Leave a Comment