I was standing in my kitchen on a Tuesday night, surrounded by the usual suspects: a half‑finished stir‑fry, a wilted salad, and a lingering feeling that something spectacular was missing from my dinner repertoire. I had a rotisserie chicken from the grocery store, a tub of cream cheese that was begging to be used, and a box of crescent roll dough that I had bought on a whim during a weekend binge‑shopping spree. The moment I laid those three heroes side by side, I felt a spark of mischievous inspiration. I dared myself to combine them into one single, buttery, cheesy masterpiece, and I promise you, the result was nothing short of a culinary fireworks show. I dare you to taste this and not go back for seconds – I’ll be honest, I ate half the batch before anyone else got a chance to try it.
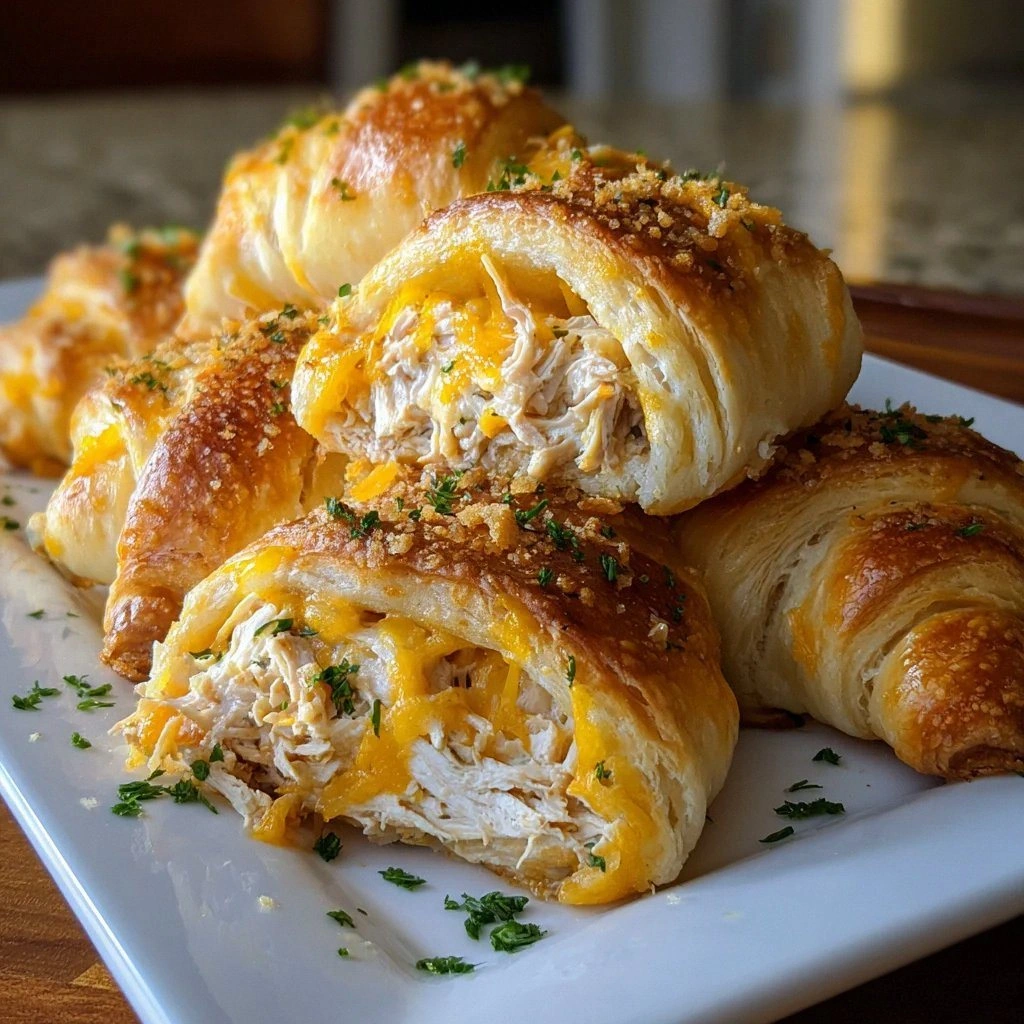
Picture this: the kitchen filled with the buttery scent of golden pastry, a subtle garlic perfume that makes you want to inhale deeply, and the comforting, familiar aroma of melted cheddar that instantly transports you to a cozy childhood memory. The sound? A gentle sizzle as the rolls hit the hot pan, followed by a soft puff as they rise, like a quiet applause for the flavors about to explode. My hands were warm from kneading the dough, the cool cream cheese slipped effortlessly onto the work surface, and the shredded chicken clung to the mixture like a loyal sidekick. The texture was a perfect contrast – a flaky, buttery crust hugging a creamy, cheesy center that was as smooth as silk and as satisfying as a warm hug.
Most recipes for chicken‑and‑cheese rolls either drown you in soggy dough or give you a bland, one‑dimensional bite. This version stands out because it respects each component: the dough stays flaky, the cheese stays gooey, and the chicken stays juicy. I threw in a dash of garlic powder and fresh parsley to give it that extra pop of flavor that most “quick” recipes skip. And here’s the kicker – I’m using a simple technique of lightly pre‑baking the dough before adding the filling, which locks in moisture and prevents a soggy bottom. Most people skip this step and wonder why their rolls turn out mushy. Not us.
Okay, ready for the game‑changer? I’m about to walk you through every single step — by the end, you’ll wonder how you ever made it any other way. Stay with me here — this is worth it. The secret sauce (well, technically a secret cheese blend) is coming up, and trust me, it’s pure magic.
What Makes This Version Stand Out
- Flavor Explosion: The combination of cream cheese and shredded cheddar creates a molten core that’s richer than any single cheese could achieve. The garlic powder adds a subtle heat that wakes up your palate without overpowering the delicate chicken.
- Texture Harmony: A flaky, buttery crust meets a silky, creamy interior, delivering a bite that’s both crunchy and melt‑in‑your‑mouth. The pre‑bake step guarantees the bottom stays crisp, never soggy.
- Simplicity Meets Sophistication: You only need eight ingredients, most of which you probably already have. Yet the result feels like a dish you’d order at a fancy bistro.
- Unexpected Freshness: Fresh parsley isn’t just a garnish; it injects a bright, herbaceous note that cuts through the richness, balancing the overall flavor profile.
- Crowd‑Pleaser Factor: Whether it’s a family dinner, a game‑day snack, or a potluck contribution, these rolls disappear faster than you can say “second helping.”
- Ingredient Quality: Using high‑quality crescent roll dough (or homemade if you’re feeling ambitious) makes the difference between “good” and “mind‑blowing.”
- Cooking Method Mastery: Baking at a high temperature (425°F) ensures the dough puffs up beautifully while the cheese bubbles to perfection.
- Make‑Ahead Potential: You can assemble the rolls ahead of time, freeze them, and bake fresh whenever the craving hits. No compromise on taste.
Inside the Ingredient List
The Flavor Base
Crescent roll dough is the magic ingredient! It provides that delightful flaky crust that cradles the filling like a buttery blanket. Store‑bought dough saves you time, but if you’re adventurous, a homemade version with butter and a touch of honey will elevate the flavor even further. Skipping the dough is not an option – without it, you lose the iconic “crescent” shape and the satisfying crunch.
The Protein Powerhouse
Cooked chicken, preferably shredded, adds a protein punch that makes these rolls a satisfying snack or a light meal. Leftover rotisserie chicken is perfect because it’s already seasoned and juicy. If you use a dry, bland chicken, the rolls will feel flat; a quick toss with a splash of olive oil and a pinch of salt can rescue it.
The Cheese Duo
Cream cheese brings a creamy, dreamy texture that blends beautifully with the other ingredients, while shredded cheddar cheese provides that rich, melty goodness that stretches with every bite. The balance of soft and sharp cheeses is crucial – too much cream cheese and the filling becomes cloying; too much cheddar and it can get oily. If you’re lactose‑intolerant, swap the cream cheese for a dairy‑free alternative and use a sharp cheddar‑style vegan cheese.
The Seasoning Squad
Garlic powder, parsley, salt, and pepper are the unsung heroes that turn a good dish into a great one. A teaspoon of garlic powder elevates the taste of the filling, giving it a lovely aroma and flavor that whispers “comfort food” with every bite. Fresh parsley adds a pop of color and a fresh, herbaceous note that cuts through the richness of the cheese.
The Finishing Touch
A light coat of olive oil or cooking spray on the baking sheet ensures the rolls won’t stick and come out golden brown. This tiny amount of fat also helps the crust develop that coveted crispness. Skipping this step can lead to a soggy bottom and a frustrating cleanup.
Everything's prepped? Good. Let's get into the real action...
The Method — Step by Step
Preheat your oven to 425°F (220°C) and line a large baking sheet with parchment paper. While the oven warms up, unroll the crescent roll dough and separate it into triangles. If you’re using store‑bought dough, you’ll notice the perforated lines that make it easy to pull apart. This is the moment of truth – a well‑preheated oven is what gives the rolls that beautiful puff and golden hue.
In a large mixing bowl, combine the shredded chicken, softened cream cheese, and shredded cheddar cheese. Add the garlic powder, chopped parsley, and a pinch of salt and pepper. Using a spatula, fold everything together until the mixture is evenly combined and looks like a cohesive, cheesy cloud. The texture should be creamy but not runny; if it feels too thick, add a splash of milk.
Place a generous spoonful (about 2 tablespoons) of the chicken‑cheese mixture onto the wide end of each dough triangle. Spread it out a little, but be careful not to overfill – you want the dough to seal nicely without spilling over. The filling should sit just a half‑inch from the edge; this ensures a tight roll that won’t open during baking.
Starting at the wide end, roll each triangle tightly toward the point, forming a crescent shape. Pinch the tip to seal the roll; this is crucial because an unsealed tip will cause the cheese to ooze out and create a mess on your baking sheet. If you’re feeling fancy, you can brush the sealed tip with a little olive oil for extra shine.
Arrange the rolled crescents on the prepared baking sheet, leaving about an inch of space between each. Lightly spray the tops with cooking spray or drizzle a teaspoon of olive oil. This will help the tops turn a gorgeous, buttery gold. The edges should start pulling away from the pan as they bake, a visual cue that they’re crisping up nicely.
Slide the sheet into the oven and bake for 12‑15 minutes, or until the crescents are puffed, golden‑brown, and the cheese is bubbling through the cracks. Halfway through, rotate the sheet for even browning. The scent that fills your kitchen at this point? Absolute perfection – a buttery, cheesy perfume that makes you want to lick the oven door.
Remove the rolls from the oven and let them rest for 2‑3 minutes. This short rest allows the cheese to set slightly, making them easier to handle. Serve them warm, straight from the tray, or let them cool to room temperature for a firmer bite. Either way, the first bite will deliver that melt‑in‑your‑mouth experience that we promised.
Enjoy! I dare you to take just one and not go back for another. If you’re feeling generous, sprinkle a little extra parsley on top for a fresh pop of color. And remember, these rolls keep well – see the storage section for details.
Insider Tricks for Flawless Results
The Temperature Rule Nobody Follows
Baking at a high temperature (425°F) is the secret sauce for that perfect puff. If you lower the heat, the dough will bake slowly, resulting in a denser texture. I once tried 375°F because I thought it would be gentler, and the rolls turned out flat and soggy. Trust the heat – it’s the difference between “meh” and “wow.”
Why Your Nose Knows Best
Your sense of smell is a reliable indicator of doneness. When the buttery aroma intensifies and you can detect a faint nutty scent from the toasted dough, you’re almost there. If the kitchen smells like burnt butter, pull them out immediately – they’ll go from perfect to overcooked in seconds.
The 5‑Minute Rest That Changes Everything
Letting the rolls rest for a few minutes after baking allows the cheese to firm up just enough to prevent a messy bite. Skipping this step means you’ll be fighting a gooey, runaway cheese stream. A brief pause also lets the flavors meld, making each bite more harmonious.
The Secret Butter Brush
A quick brush of melted butter mixed with a pinch of garlic powder right before the final minutes of baking creates a glossy, flavorful crust. This little step adds a depth of flavor that many recipes overlook. My friend tried skipping it once – the rolls were still good, but they lacked that “restaurant‑level” shine.
Freeze‑Then‑Bake for On‑Demand Snacks
If you want a ready‑to‑go snack stash, assemble the rolls, flash‑freeze them on a tray, then transfer to a zip‑top bag. When you’re craving them, bake straight from frozen for 18‑20 minutes. The texture stays crisp, and the cheese melts perfectly. This trick saved my family during a marathon game night.
Creative Twists and Variations
This recipe is a playground. Here are some of my favorite ways to switch things up:
Spicy Jalapeño Kick
Add finely diced jalapeños to the filling and swap the cheddar for pepper jack. The heat pairs beautifully with the cooling cream cheese, creating a balanced bite that’ll make spice lovers swoon.
Mediterranean Delight
Replace the chicken with shredded roasted red pepper and kalamata olives, and use feta cheese instead of cheddar. A sprinkle of oregano and a drizzle of olive oil turn these rolls into a mini Greek feast.
Breakfast Bonanza
Swap the chicken for scrambled eggs and crisped bacon, and use a blend of mozzarella and cheddar. Serve them with a side of maple syrup for a sweet‑savory brunch that will impress even the toughest morning crowd.
Vegan Victory
Use a plant‑based crescent dough, shredded tofu or tempeh marinated in soy sauce, dairy‑free cream cheese, and vegan cheddar. The result is just as indulgent, proving that you don’t need dairy to achieve cheesy bliss.
Herb‑Infused Elegance
Incorporate a mix of fresh thyme, rosemary, and basil into the filling, and add a handful of grated Parmesan for an aromatic twist. This variation feels sophisticated enough for a dinner party.
Storing and Bringing It Back to Life
Fridge Storage
Place cooled rolls in an airtight container or a zip‑top bag. They’ll stay fresh for up to three days. Reheat in a preheated 350°F oven for 8‑10 minutes, or pop them in the microwave for 30 seconds if you’re in a hurry.
Freezer Friendly
Freeze the unbaked rolls on a parchment sheet, then transfer to a freezer bag. They’ll keep for up to two months. When ready, bake from frozen at 425°F for 18‑20 minutes, adding a minute or two if you like extra crispness.
Best Reheating Method
For the ultimate reheated texture, preheat a skillet over medium heat, add a tiny splash of water, and cover the rolls with a lid for 2‑3 minutes. The steam revives the interior while the bottom crisps up again. This trick works wonders for leftovers that have lost their original crunch.