I was in the middle of a Tuesday night that felt more like a disaster movie than a dinner plan. The pantry was looking at me like an empty runway, the fridge had nothing but a sad carton of milk, and my friends had just texted, “You good for a snack?” I stared at a half‑finished biscuit dough that had been rescued from the back of the freezer, and a sudden, ridiculous thought struck me: what if I could turn that bland dough into a crowd‑pleasing, finger‑licking masterpiece that would make even the most stubborn snack‑skeptic beg for more? That’s when the idea for Cheesy Bacon Pull‑Apart Twists was born, and let me tell you, it was love at first bite.
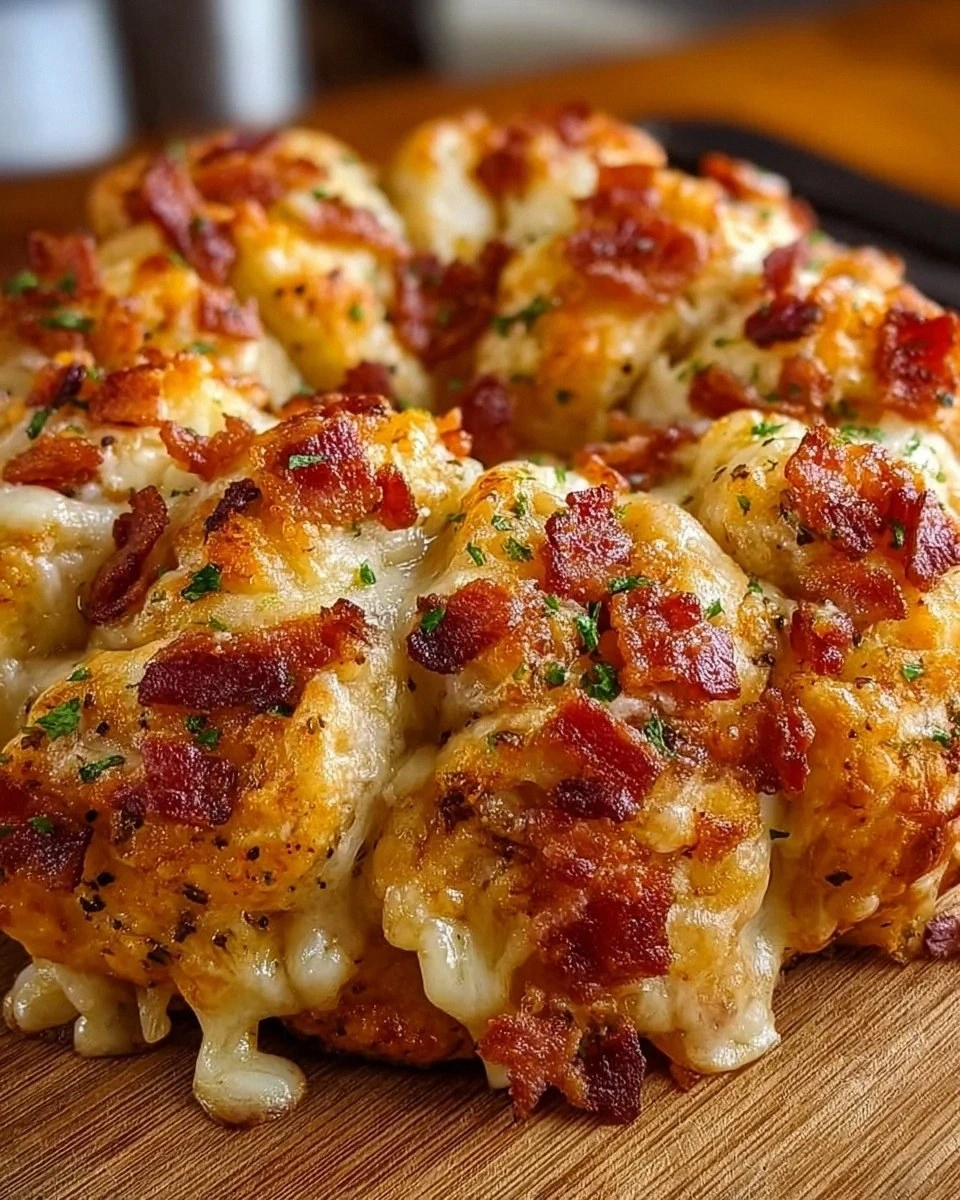
Picture this: the oven door swings open, releasing a cloud of buttery, garlicky aroma that instantly makes the whole house feel like a gourmet bakery. The twists themselves are golden‑brown, with edges that crackle like thin ice under a winter sun, while the interior is a molten river of mozzarella that stretches like a cheesy waterfall. The bacon bits are scattered throughout, adding that satisfying crunch and smoky whisper that makes every bite a tiny celebration. When you pull the twists apart, the cheese stretches, the bacon flares, and the buttery crust shatters in a way that feels almost theatrical. I dare you to taste this and not go back for seconds.
Most recipes I’ve seen either overcomplicate the process or skimp on the flavor. They either tell you to bake a plain biscuit and hope for the best, or they drown the dough in cheese until it’s a soggy mess. This version, however, strikes a perfect balance: a flaky biscuit base, a buttery herb glaze, and a generous shower of cheese and bacon that never overwhelms. I’m being honest — I ate half the batch before anyone else got a chance to try it, and that’s a testament to how addictive these twists are. The secret? A quick butter‑herb mash that locks in flavor before the bake, and a strategic “twist‑and‑fold” technique that creates those perfect pull‑apart layers.
Okay, ready for the game‑changer? I’m about to walk you through every single step — from selecting the perfect biscuit dough to the exact moment you pull those golden twists apart. By the end, you’ll wonder how you ever made a snack this good without a secret weapon. Stay with me here — this is worth it.
What Makes This Version Stand Out
- Flavor Explosion: The combination of smoky bacon, creamy mozzarella, and a buttery garlic‑parsley glaze creates a taste profile that dances on the palate like a well‑choreographed flash mob.
- Texture Symphony: You get a crisp, buttery exterior that gives way to a soft, pillowy interior—think crunchy crust meets cloud‑like center.
- Speedy Simplicity: Using refrigerated biscuit dough slashes prep time in half, so you can go from zero to hero in under an hour.
- Versatile Crowd‑Pleaser: Whether you’re feeding a game‑day crew, a brunch crowd, or a midnight snack craving, these twists fit every occasion.
- Ingredient Quality: Freshly shredded mozzarella and real bacon bits ensure every bite is packed with authentic flavor, not processed nonsense.
- One‑Pan Wonder: No messy stovetop pans, just a single baking sheet that makes cleanup a breeze.
- Make‑Ahead Magic: You can assemble the twists ahead of time and pop them in the oven when you’re ready to serve, perfect for busy hosts.
- Visual Wow Factor: The pull‑apart design looks impressive on a platter, turning a simple snack into a show‑stopping centerpiece.
Inside the Ingredient List
The Flavor Base
The star of the flavor base is shredded mozzarella cheese. This cheese melts like velvet, creating that ooey‑gooey stretch that makes each bite unforgettable. If you skip the mozzarella, you lose the creamy backbone that holds the bacon and butter together. For a little extra kick, blend in a quarter cup of sharp cheddar or pepper jack — it adds a subtle heat without stealing the show. When shopping, look for a mozzarella that’s labeled “whole milk” for the richest melt.
The Texture Crew
Refrigerated biscuit dough is the foundation that gives these twists their fluffy interior and flaky edges. The dough’s high‑fat content creates steam pockets that puff up beautifully in the oven. If you’re using a flaky variety, you’ll notice an extra‑crispy texture that’s pure bliss. Skipping the biscuit dough for a homemade version is possible, but you’ll add at least 20 minutes to prep time — not worth it when you have a busy schedule.
Unsalted butter is the golden glue that binds everything together. Melted butter brushed onto the dough before baking creates a glossy, golden crust that shatters like thin ice when you pull it apart. If you only have salted butter, it’ll still work, but you might want to cut back on any additional salt you add later.
The Unexpected Star
Cooked and crumbled bacon bits bring the smoky, salty crunch that elevates the dish from “nice” to “legendary.” The bacon’s fat renders into the cheese, creating pockets of umami that explode in your mouth. If you’re looking for a healthier spin, turkey bacon or plant‑based bacon works, but the flavor intensity will be slightly milder.
The Final Flourish
Garlic powder and dried parsley are the subtle aromatics that turn a good snack into an unforgettable one. Garlic powder adds a warm, earthy depth without the risk of burning fresh garlic, while parsley injects a pop of green color and a fresh herbaceous note. A pinch of black pepper rounds out the seasoning, providing a gentle heat that makes the flavor linger. If you’re out of parsley, oregano or basil can step in, but expect a slightly different flavor profile.
Everything's prepped? Good. Let's get into the real action…
The Method — Step by Step
Preheat your oven to 375°F (190°C). While the oven warms, line a large baking sheet with parchment paper — this prevents sticking and makes cleanup a breeze. I like to set a timer for 10 minutes; the moment the oven hits temperature, you’ll hear a faint “click” that signals it’s ready for action. This is the moment of truth: a perfectly heated oven guarantees a uniform rise and a golden crust.
Open the cans of refrigerated biscuit dough and separate each biscuit onto a lightly floured surface. Using a rolling pin, gently roll each biscuit into a 4‑inch circle. Don’t over‑roll; you want to keep some air pockets intact so the twists stay light. This step is crucial because a too‑thin dough will become rubbery, while a too‑thick dough stays doughy in the center.
In a small saucepan, melt 4 tablespoons of unsalted butter over low heat. Add 1 teaspoon of garlic powder and 1 teaspoon of dried parsley, stirring until fragrant — you’ll hear a subtle sizzle that says “we’re on the right track.” Once the butter turns a light amber hue, remove it from heat and set aside. This is the flavor‑infused butter that will coat every twist.
Kitchen Hack: Instead of pouring the butter directly onto the dough, use a silicone pastry brush to dab it on. This ensures an even coating and prevents the dough from becoming soggy.Generously sprinkle 2 cups of shredded mozzarella over each rolled biscuit, followed by 1 cup of crumbled bacon bits. The cheese should cover the surface like a soft snow blanket, while the bacon bits are scattered like tiny, crunchy fireworks. If you’re feeling adventurous, add a pinch of black pepper now to let the heat meld with the cheese as it melts.
Now for the twist! Starting at the edge of the biscuit, gently roll the dough toward the center, creating a tight spiral that looks like a cinnamon roll but with a cheesy, bacon‑filled core. The key is to keep the roll tight enough that the layers cling together, but not so tight that the dough tears. Once rolled, place each twist on the prepared baking sheet, seam side down, to prevent unravelling during bake.
Brush the tops of each twist with the garlic‑parsley butter, ensuring every crevice gets a glossy coating. This step is where the magic happens — the butter will caramelize, creating that irresistible golden crust. Sprinkle a final dash of black pepper over the tops for a subtle heat that finishes the flavor profile.
Slide the sheet into the oven and bake for 18‑22 minutes, or until the twists are a deep golden‑brown and the cheese is bubbling fiercely. You’ll know they’re done when the edges start pulling away from the parchment and a fragrant, buttery aroma fills your kitchen. Watch Out: If you bake them longer than 22 minutes, the cheese can start to brown too much, turning a bitter caramel that masks the bacon’s smokiness.
Watch Out: Opening the oven door too early can cause the twists to collapse. Trust the timer, and only peek at the 15‑minute mark to check color.When the timer dings, remove the pan and let the twists rest for 3‑4 minutes. This short rest allows the cheese to set just enough so the pull‑apart action is clean, not a gooey mess. While they’re cooling, the butter glaze continues to set, giving you that glossy finish that looks restaurant‑ready.
Serve the twists warm, straight from the sheet, or transfer them to a serving platter. The moment you pull one apart, the mozzarella stretches like a golden river, and the bacon bits crackle with each bite. Pair them with a cool ranch dip or a spicy sriracha mayo for an extra layer of flavor. And there you have it — a snack that’s both comforting and exhilarating.
Kitchen Hack: For an ultra‑crisp top, switch the oven to broil for the last 2 minutes. Keep a close eye on them; the edges will turn a perfect caramel shade in seconds.
That's it — you did it. But hold on, I've got a few more tricks that'll take this to another level…
Insider Tricks for Flawless Results
The Temperature Rule Nobody Follows
Never bake these twists at a temperature lower than 375°F. Lower temps cause the butter to seep into the dough rather than crisp it, resulting in a soggy bottom. I once tried 350°F because I was “saving energy,” and the result was a sad, limp biscuit that never pulled apart. Keep the heat high, and you’ll get that snap‑crackle‑pop you love.
Why Your Nose Knows Best
The moment the kitchen smells like toasted butter and sizzling bacon is your cue that the twists are almost ready. Trust that nose signal more than the timer. A friend once pulled the tray out at exactly 20 minutes, only to find the cheese still pale. Let the scent guide you; when the aroma deepens and becomes a little nutty, the crust is caramelizing perfectly.
The 5‑Minute Rest That Changes Everything
After baking, let the twists sit for exactly five minutes before serving. This short rest lets the cheese fibers re‑align, preventing a messy string when you pull them apart. I tried serving them hot off the sheet once and the cheese was a gooey mess that clung to my fingers. The five‑minute pause transforms a sloppy snack into a clean, Instagram‑worthy pull‑apart.
Butter Brush Technique
Instead of drizzling butter, use a silicone brush to apply a thin, even coat. This prevents pooling, which can cause uneven browning. My first batch had butter islands that turned dark and bitter. The brush distributes the flavor uniformly, giving each twist that glossy, golden finish.
Bacon Crispness Hack
If you want extra‑crunchy bacon bits, pre‑bake them on a separate sheet at 400°F for 8‑10 minutes before adding to the twists. This renders out excess fat and locks in a satisfying snap. I tried using regular cooked bacon once, and it was a bit chewy. The extra crisp adds a textural contrast that elevates the entire bite.
Creative Twists and Variations
This recipe is a playground. Here are some of my favorite ways to switch things up:
Spicy Jalapeño Kick
Add ¼ cup of finely diced jalapeños to the cheese layer for a subtle heat that pairs beautifully with the bacon. The green specks add a pop of color and a tongue‑tingling surprise that will wow spice lovers.
Herb‑Infused Parmesan
Swap half of the mozzarella for freshly grated Parmesan and sprinkle dried thyme and rosemary into the butter glaze. This creates a nutty, aromatic twist that feels more sophisticated — perfect for a dinner party appetizer.
Sweet & Savory Maple Bacon
Drizzle a tablespoon of maple syrup over the bacon bits before folding them into the dough. The sweet caramel notes balance the salty bacon and buttery cheese, offering a breakfast‑brunch hybrid that’s irresistibly addictive.
Vegan Delight
Replace the mozzarella with a plant‑based cheese that melts well (like Violife or Daiya) and use tempeh bacon or smoked tofu crumbles. The flavor profile changes, but the pull‑apart satisfaction stays the same, making it a crowd‑pleaser for vegans.
Garlic‑Lover’s Dream
Increase the garlic powder to 2 teaspoons and add 1 tablespoon of freshly minced garlic to the butter mixture. The result is an aromatic punch that turns these twists into a garlic‑bread cousin with a bacon twist.
Cheddar‑Bacon Bomb
Swap the mozzarella for sharp cheddar and add a dash of smoked paprika to the butter. The cheddar gives a deeper, tangier flavor, while the smoked paprika amplifies the bacon’s smoky depth.
Storing and Bringing It Back to Life
Fridge Storage
Place cooled twists in an airtight container and store them in the refrigerator for up to three days. A paper towel at the bottom of the container absorbs excess moisture, keeping the crust crisp.
Freezer Friendly
Arrange unbaked twists on a parchment‑lined tray and freeze them individually for 2‑3 hours. Transfer the frozen twists to a zip‑top bag; they’ll keep for up to two months. When you’re ready, bake them straight from the freezer, adding an extra 5 minutes to the bake time.
Best Reheating Method
To revive leftovers, preheat the oven to 350°F, place the twists on a baking sheet, and sprinkle a tiny splash (about 1 teaspoon) of water over each. The steam created restores the interior softness while the oven re‑crispes the exterior. In just 8‑10 minutes, you’ll have a snack that tastes as fresh as the day it was made.