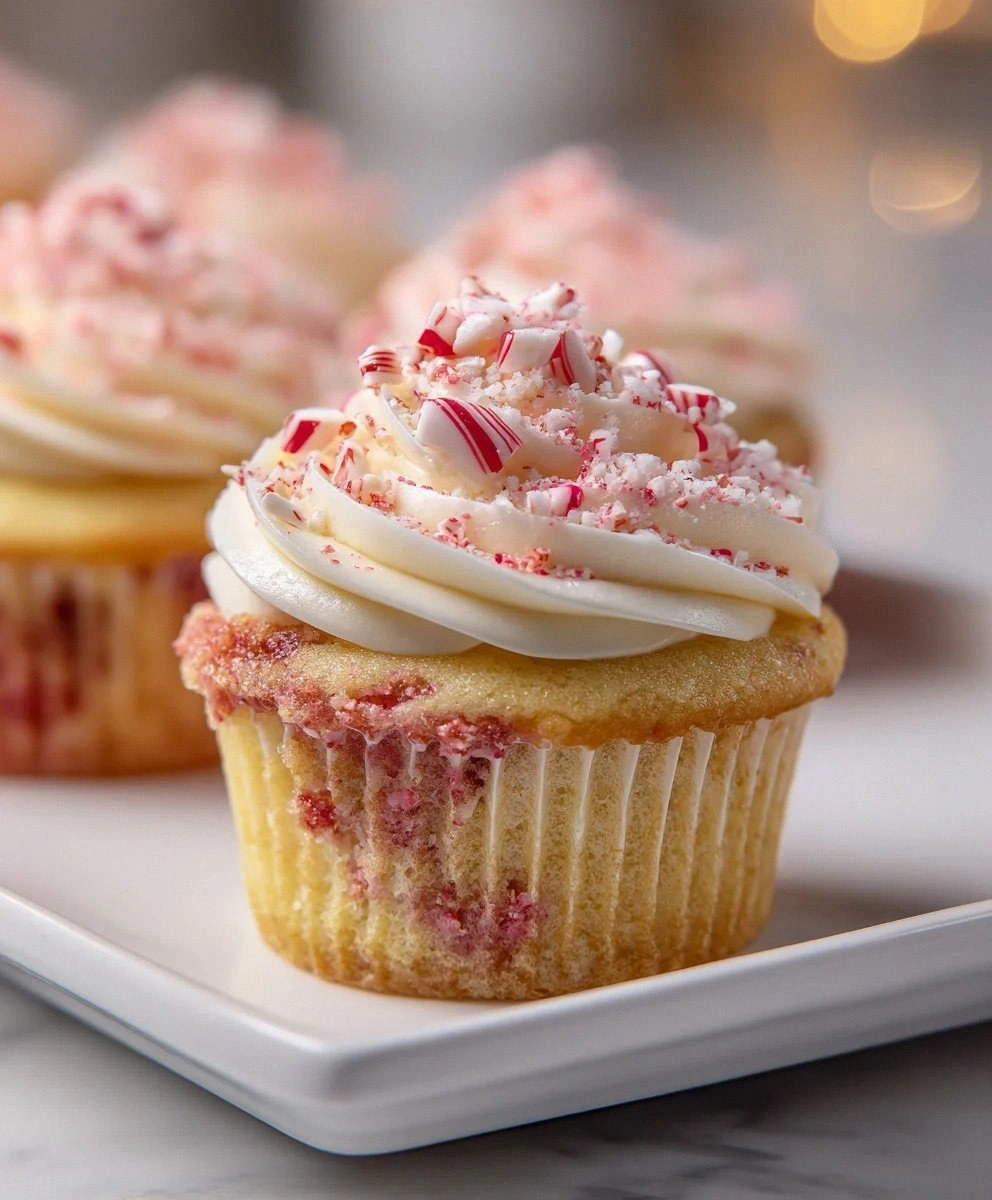
Picture this: it's December twenty-third, you're elbow-deep in flour, the radio croons the same three holiday songs on loop, and you've just promised your cousin's neighbor's book club that you'll bring "something festive" to tomorrow's potluck. You could play it safe with store-bought sugar cookies, but where's the drama in that? Instead, you reach for a box of white cake mix, a bottle of peppermint extract, and the candy canes you swore were for decoration only. Twenty minutes later your kitchen smells like Willy Wonka crashed into the North Pole, and you're holding a cupcake so pretty it could headline a Hallmark movie poster. That, my friend, is the origin story of these Candy Cane Peppermint Cupcakes — a happy accident born from panic, procrastination, and a peppermint addiction I refuse to address in therapy.
I've baked my way through dozens of holiday desserts, but nothing — and I mean nothing — disappears faster than these striped beauties. The cake stays cloud-soft thanks to a little cake-mix shortcut, while the frosting whips up like liquid velvet spiked with just enough peppermint to make your tongue tingle. Crackly mini candy-cane shards on top give you that satisfying crunch, the edible equivalent of stepping on crisp snow at midnight. If you've ever struggled with dry cupcakes or frosting that melts into a sad puddle, you're not alone — and I've got the fool-proof fixes baked right in. Fair warning: I dare you to taste the batter and not go back for thirds. I ate half the batch before anyone else got to try it, and I regret nothing except maybe the brain freeze from licking the beaters too fast.
What makes this version the one you'll bookmark, print, and laminate for future you? We're talking bakery-style domes without a single sinkhole, frosting that pipes into Instagram-worthy swirls on the first try, and a peppermint punch that tastes like December in widescreen. No finicky thermometers, no scary syrup stages, no obscure ingredients that require a pilgrimage to three supermarkets. Just honest holiday magic you can crank out in under an hour while wearing fuzzy socks and singing off-key to Mariah Carey. Let me walk you through every single step — by the end, you'll wonder how you ever made it any other way.
What Makes This Version Stand Out
Peppermint Power: Most recipes timidly whisper mint; this one belts it like a Broadway star. A precise quarter-teaspoon of extract infuses every crumb without veering into toothpaste territory, giving you that cool, clean zing that holiday dreams are made of.
Stripe Swagger: That candy-cane swirl isn't just cute — it's a built-in flavor bomb. Red gel coloring streaks through the batter, creating delicate ribbons that taste like visual music and photograph like a magazine spread.
Fool-Proof Fluff: The cake mix base guarantees a tender crumb every single time, eliminating the guesswork that ruins from-scratch attempts. Think of it as insurance against dry, sad cupcakes at eleven p.m. when the stores are closed and your reputation is on the line.
Frosting That Behaves: Butter, cream, and confectioners' sugar whip into a silky cloud that holds peaks for days, not hours. Pipe rosettes in the morning; they'll still look pristine after the office white-elephant exchange.
Crunch Without Cuts: Crushed mini candy canes deliver that satisfying snap, yet they're small enough to eat gracefully. No one wants to wrestle a jumbo cane while balancing punch and small talk.
Make-Ahead Magic: Bake the cupcakes tonight, frost tomorrow, garnish right before serving. Each component keeps beautifully, so you can actually enjoy your own party instead of manhandling a piping bag in front of guests.
Inside the Ingredient List
The Flavor Base
White cake mix is your shortcut to consistent crumb and structure. Reach for a name-brand mix — the emulsifiers and leavening ratios are dialed in by food scientists with bigger budgets than my entire kitchen. Skimp here and your cupcakes can taste metallic or sink in the middle faster than my willpower at a sample sale. If you're morally opposed to mixes, I'll forgive you, but you'll need cake flour, baking powder, and a prayer.
Pure peppermint extract is the soul of this recipe. Imitation versions taste like you're chewing a candle. Look for a dark glass bottle, store it away from sunlight, and sniff before using — it should smell like a winter forest, not mouthwash. A half-teaspoon too much and your dessert could double as muscle rub.
The Texture Crew
Unsalted butter lets you control salt levels and browns more evenly for nutty depth. Leave it on the counter for exactly one hour before starting; too cold and it won't trap air, too warm and you'll make greasy soup. If you forget (and I always do), cube it and spread on a plate — ten minutes under a gentle lamp works wonders.
Heavy cream with at least 36 percent fat whips into stable peaks that support candy-cane confetti without weeping. Ultra-pasteurized is fine, but avoid anything labeled "whipping cream" that lists skim milk as the first ingredient — that's code for deflated disappointment.
The Unexpected Star
Red gel food coloring is more concentrated than liquid, so you get vivid stripes without thinning the batter. Americolor or Chefmaster brands give true scarlet without the chemical aftertaste of cheaper dyes. Skip natural colorings here; beet powder turns brown when baked and spirulina just looks moldy. If you can't find gel, use half the amount of liquid color and reduce the cream by a teaspoon to compensate.
The Final Flourish
Mini candy canes shatter into jewel-like shards that melt on the tongue, releasing bursts of mint that play against the creamy frosting. Look for thin, brittle canes rather than the thick novelty ones designed for hanging on trees. If you only have full-size canes, snap them in half and pulse in a food processor until pea-sized — but honestly, the minis are worth the scavenger hunt.
The Method — Step by Step
- Preheat your oven to 350°F (175°C) and line a twelve-cup muffin tin with paper liners. Slide the tin onto a heavier baking sheet — this diffuses heat so the bottoms don't over-brown while the tops dome gently. While the oven wakes up, place the white cake mix in a large bowl and take a moment to break up any stubborn clumps with a whisk. Those tiny pebbles can streak your batter with dry pockets that taste like chalk. The kitchen should start smelling faintly sweet as the oven hums, a promise of what's coming.
- In a separate small bowl, whisk together three large eggs, three-quarters cup water, and a third cup neutral oil until the mixture looks like sunshine-yellow paint. Pour this into the cake mix and beat on medium speed for exactly two minutes. Set a timer — over-mixing develops gluten and you'll end up with cupcakes that bounce like rubber balls. The batter will transform from gritty to satiny, thick enough to ribbon off the beaters but loose enough to spread. Scrape the bowl once, making sure no dry streaks lurk at the bottom like shy kids at a dance.
- Now for the magic moment: add a scant quarter-teaspoon peppermint extract. Dip a clean finger and taste — it should feel like breathing Alpine air, not chewing gum. If you're nervous, start with an eighth and build up; you can always stir more into the frosting later. Give the batter one final gentle fold with a spatula, coaxing any hidden flour pockets to join the party. The scent rising from the bowl should make you close your eyes involuntarily, like smelling a memory.
- Scoop out one cup of batter into a smaller bowl and tint it with a toothpick-speck of red gel color. Stir just until you see ripples of Santa-coat red — stop before it turns solid pink. We're aiming for peppermint-stick ribbons, not a solid blob. If the color looks fuchsia, you've gone too far; add a tablespoon of plain batter to dial it back. This is your swirl layer, the surprise that makes people gasp when they peel the wrapper.
- Divide the white batter evenly among the twelve liners, filling each about two-thirds full. Use a small cookie scoop for tidy portions and avoid the urge to eyeball — uneven filling leads to uneven baking, and nobody wants a hockey puck beside a pancake. Tap the tin firmly on the counter once to settle air bubbles; they should burp up like tiny sighs. Now dollop a heaping teaspoon of the red batter onto each cup. Drag a toothpick through once in a figure-eight — over-swirling muddles the colors into sad beige.
- Bake on the center rack for eighteen to twenty minutes, rotating the pan halfway. The cupcakes are done when the centers spring back lightly and a toothpick comes out with a few moist crumbs — no wet batter, but not completely clean either. If the tops start to brown before the centers dome, tent loosely with foil for the final three minutes. Your kitchen will smell like a candy-cane factory collided with a vanilla plantation, which is exactly what happiness smells like.
- Cool the pan on a wire rack for five minutes — no longer or the wrappers peel away like shy wallpaper. Gently lift each cupcake out and set upright on the rack. The bottoms should feel warm, not hot, and the tops will have a gentle dome that invites frosting like a pillow invites a cat. While they cool, start the frosting so the butter has time to come to room temperature.
- For the frosting, beat one cup (two sticks) unsalted butter on medium-high until it turns pale and fluffy, about three minutes. Pause once to scrape the bowl; you want the whole mass to lighten evenly so no yellow streaks remain. Add a pinch of kosher salt — this tiny step amplifies sweetness and balances the peppermint, much like a squeeze of lemon brightens seafood. The butter should look like whipped clouds, the kind you want to nap on.
- Sift in three and a half cups confectioners' sugar one cup at a time, beating on low to avoid a snowstorm in your kitchen. Once incorporated, add three tablespoons heavy cream, one teaspoon vanilla, and a quarter-teaspoon peppermint extract. Bump the speed to high and whip for another minute. The frosting should swell like a balloon, forming stiff peaks that hold their shape when you lift the beaters. Taste cautiously — the mint should arrive fashionably late, not gate-crash the party.
- Transfer the frosting to a piping bag fitted with a large star tip. Starting at the outer edge, pipe a tight spiral toward the center, then release with a quick flick. If you don't own piping bags, snip the corner off a zip-top bag and go freestyle — rustic swirls still look charming. Immediately shower with crushed mini candy canes so they stick before the frosting crusts. The contrast of white fluff and ruby shards should look like fresh snow dotted with holiday confetti.
That's it — you did it. But hold on, I've got a few more tricks that'll take this to another level...
Insider Tricks for Flawless Results
The Temperature Rule Nobody Follows
Room-temperature ingredients marry seamlessly, creating a batter so smooth it practically pours itself. Cold eggs shock the butter into tiny clumps that bake up as greasy tunnels, while fridge-cold cream refuses to whip into billowy peaks. Leave everything on the counter for one hour before starting, or cheat by placing eggs in warm (not hot) water for ten minutes and microwaving cream for eight seconds. Your cupcakes will rise higher and taste lighter than a snowflake on a breeze.
Why Your Nose Knows Best
Peppermint extract loses potency with heat and time, so sniff before adding. If the aroma is faint or medicinal, double the amount and reduce vanilla by a hair to compensate. Conversely, if your extract is fresh and fierce, err on the side of caution — you can always brush cooled cupcakes with a mint-simple-syrup for an extra layer without overdoing. Trust your olfactory instincts; they evolved to keep you from ruining dessert.
The Five-Minute Rest That Changes Everything
After mixing batter, let it sit five minutes before portioning. This hydrates the flour fully, dissolves sugar crystals, and relaxes gluten, yielding a tender crumb that melts on the tongue. Use the pause to crush candy canes, tidy counters, or dance to the chorus of "All I Want for Christmas." The batter will thicken slightly, making swirls cleaner and domes more majestic.
Creative Twists and Variations
This recipe is a playground. Here are some of my favorite ways to switch things up:
Hot Cocoa Mash-Up
Swap peppermint extract for a half-teaspoon of espresso powder dissolved in a teaspoon of hot water; the mocha notes pair with crushed candy canes like sled dogs and snow. Top with mini marshmallows torched to campfire char for extra drama. Kids and grown-ups fight over these at cookie swaps.
Double-Decker Surprise
Core cooled cupcakes and fill with a teaspoon of white-chocolate ganache spiked with a whisper of mint. The molten center oozes when bitten, creating a lava-cake moment nobody sees coming. Garnish with a single shard of candy cane as a polite warning label.
Cocoa Peppermint Crunch
Replace one-third of the white cake mix with Dutch-process cocoa for a striped chocolate-peppermint hybrid. The cocoa's bitterness balances the sugary sweetness, yielding a flavor profile reminiscent of those addictive thin-mint cookies. Crush chocolate-covered mint cookies on top instead of candy canes for thematic cohesion.
Vegan Holiday Miracle
Use a vegan white cake mix, swap butter for coconut-oil-based vegan butter, and whip coconut cream with powdered sugar for frosting. The coconut echoes peppermint like a tropical snowstorm, and nobody guesses the switch unless you brag about it. Pro tip: chill the coconut cream overnight so the fat separates from the water.
Spiked Eggnog Edition
Replace heavy cream with equal parts chilled eggnog and add a tablespoon of dark rum to the frosting. The nutmeg and bourbon notes mingle with peppermint like carolers harmonizing under twinkling lights. Serve only to adults unless you enjoy fielding phone calls from angry parents.
Gluten-Free Glory
Substitute a gluten-free white cake blend that contains xanthan gum; it traps air similarly to wheat gluten, giving you lofty domes instead of sad pancakes. Be sure to let the batter rest ten minutes so the starches hydrate and swell, preventing grittiness. The texture is so close to the original that gluten-eaters won't notice the swap.
Storing and Bringing It Back to Life
Fridge Storage
Place finished cupcakes in an airtight container with a tight-fitting lid and refrigerate for up to four days. Slide a sheet of wax paper between layers to prevent the candy-cane shards from bleeding into neighboring frosting. Bring to room temperature for thirty minutes before serving; cold buttercream firms up like fudge and mutes the minty perfume. If the candy cane garnish has dissolved into sticky spots, simply add a fresh sprinkle right before guests arrive — nobody needs to know about your time-traveling ways.
Freezer Friendly
Freeze unfrosted cupcakes on a baking sheet until solid, then transfer to a zip-top bag with as much air removed as possible. They'll keep for two months without freezer burn, ready to save last-minute invitations. Frost while still frozen; the chill helps the buttercream set quickly and reduces crumbs. Thaw in the fridge overnight, then garnish with fresh candy canes so the crunch reads loud and clear.
Best Reheating Method
While these cupcakes shine at room temp, you can refresh refrigerated ones by placing them in a 300°F oven for five minutes. The gentle heat revives the crumb's softness without melting the frosting into a slide. Alternatively, microwave a single cupcake for eight seconds — any longer and you'll have peppermint-scented lava. Add a fresh dusting of crushed candy canes post-warm-up for that just-piped look.