I remember the night I was trying to impress a group of friends with a dessert that would make them forget the last time I tried to bake a cake and ended up with a charcoal‑black, rubbery mess. The kitchen was a battlefield—flour dusted the ceiling, eggs had exploded across the counter, and the oven was a ticking time bomb. I stared at the chaos, and in that moment I vowed to create a sponge cake that would be the antidote to every baking disaster. Fast forward to today, and I’ve distilled that vow into the Best Sponge Cake Recipe: A Bli, a cake that rises like a cloud, tastes like a sweet sigh, and leaves everyone asking, “What’s your secret?”
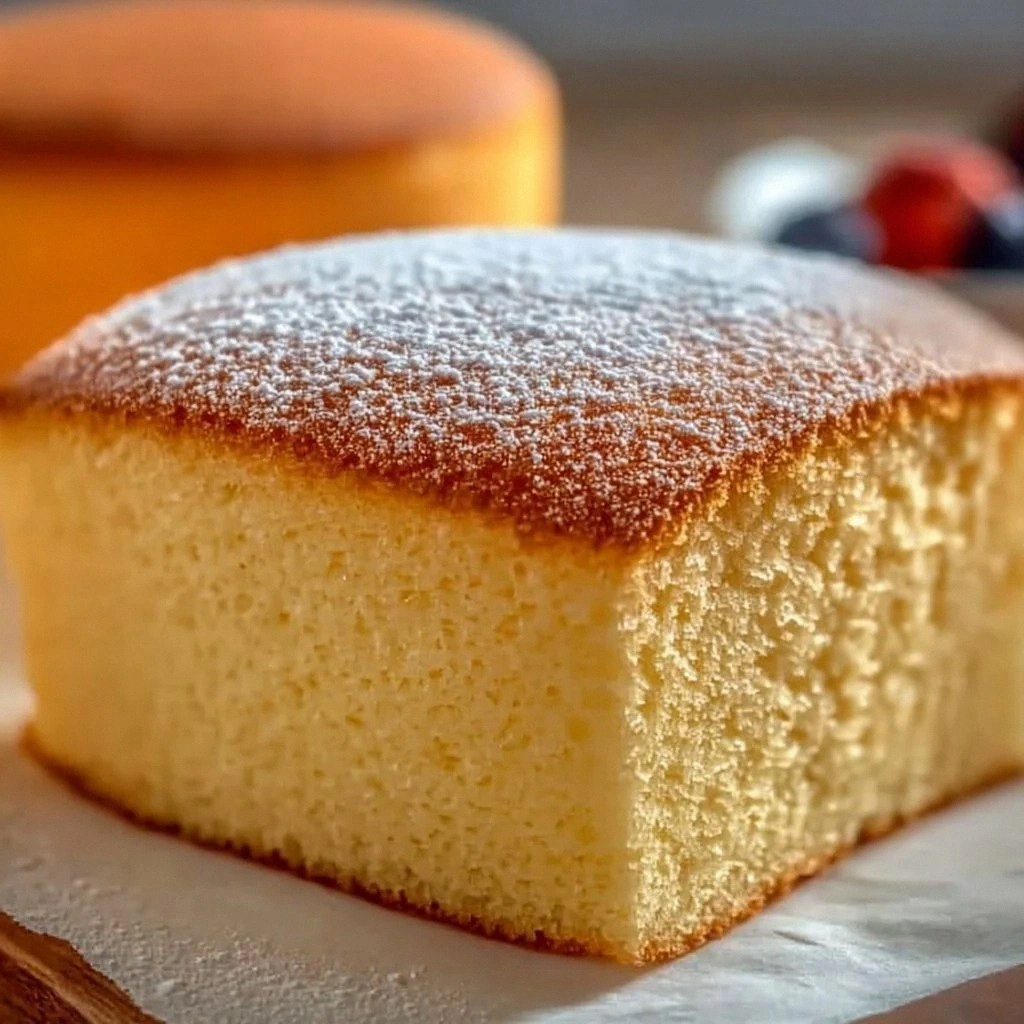
Picture this: you pull the golden loaf from the oven, its surface shimmering with a delicate crust that cracks like fine porcelain. The aroma is a gentle blend of vanilla and butter, rising in waves that make the whole kitchen feel like a bakery in spring. When you slice into it, the crumb is pillowy, almost cloud‑like, with a subtle, buttery sweetness that doesn’t overpower the vanilla. The texture is so light that each bite feels like a whisper, a fleeting moment of pure bliss that you want to savor over and over.
What makes this version stand out? It’s not just the ingredients; it’s the technique that turns simple pantry staples into a masterpiece. I’ve tweaked the classic sponge cake formula by incorporating a small amount of melted butter early in the batter to lock in moisture, added a touch of lemon zest for brightness, and folded the eggs in a specific sequence that maximizes aeration. The result is a cake that bounces back when you press it, a crumb that holds together without being dense, and a flavor profile that balances sweet, buttery, and citrusy notes. I dare you to taste this and not go back for seconds.
If you’ve ever struggled with a cake that turns out too dry or too heavy, you’re not alone—and I’ve got the fix. I’ve spent countless hours experimenting with ratios, temperatures, and folding techniques, and this recipe is the culmination of those trials. The best part? It’s simple enough that even a novice can pull it off, yet sophisticated enough that seasoned bakers will feel like they’ve discovered a new classic. Picture yourself pulling this out of the oven, the whole kitchen smelling incredible, and knowing that you’ve just created a dessert that will become a staple in your culinary repertoire.
What Makes This Version Stand Out
- Lightness: The batter is whipped to a silky consistency, creating a cake that feels almost weightless on the tongue.
- Moisture: Early addition of melted butter and a splash of milk lock in moisture, preventing the crumb from drying out.
- Flavor Depth: Lemon zest and vanilla extract combine to give a bright, aromatic profile that cuts through the sweetness.
- Ease of Execution: The folding technique is straightforward, making the recipe accessible to all skill levels.
- Versatility: It serves as a canvas for toppings, fillings, or a base for layered cakes.
- Make‑Ahead Friendly: The cake can be baked, cooled, and stored, then reheated without losing its texture.
- Crowd‑Pleaser: The balanced sweetness and buttery notes are universally appealing, making it a hit at any gathering.
- Ingredient Quality: Using high‑quality butter and fresh eggs makes a noticeable difference in flavor and texture.
Alright, let’s break down exactly what goes into this masterpiece…
Inside the Ingredient List
The Flavor Base
All-purpose flour is the backbone of this sponge cake, providing structure without heaviness. It’s the silent hero that holds everything together. If you skip it, the cake will collapse into a soggy mess. For a gluten‑free version, try a 1:1 blend of rice flour and potato starch, but expect a slightly different texture.
The Sweetness Crew
Granulated sugar not only sweetens but also aids in the creaming process, trapping air bubbles that give the cake its airy lift. If you’re watching sugar intake, a 1:1 swap with a natural sweetener like honey will work, but you’ll need to reduce the liquid slightly to compensate for the added moisture.
The Moisture Mover
Whole milk and melted butter combine to keep the crumb tender and flavorful. The butter adds richness, while the milk adds a subtle tang that balances the sweetness. Skipping the butter will make the cake dry; skipping the milk will make it too heavy.
The Aromatic Star
Vanilla extract and a pinch of lemon zest elevate the flavor profile, giving the cake a bright, fragrant finish. If you’re in a pinch, a splash of orange zest can replace the lemon for a slightly sweeter citrus note. The zest’s essential oils are key; don’t use the white pith, or you’ll taste bitterness.
Everything’s prepped? Good. Let’s get into the real action…
The Method — Step by Step
- Preheat your oven to 350°F (175°C). Line a 9‑inch round cake pan with parchment paper and grease the sides with butter or non‑stick spray. This ensures a clean release and a perfectly even bake.
- In a medium bowl, whisk together the flour, baking powder, and salt. Sifting them together removes lumps and aerates the flour, which is crucial for that airy crumb.
- In a separate bowl, combine the eggs, sugar, and vanilla. Beat on medium speed until the mixture turns pale and thick—about 3 to 4 minutes. This step incorporates air and creates the foundation for the cake’s lightness.
- Add the melted butter to the egg mixture and whisk until fully incorporated. The butter’s fat coats the flour proteins, preventing over‑development and keeping the crumb tender.
- Pour the wet ingredients into the dry mixture, alternating with milk. Begin and end with the dry mix, folding gently with a spatula to avoid deflating the batter. This technique maintains the airy structure while evenly distributing moisture.
- Stir in the lemon zest, ensuring it’s evenly dispersed. The zest’s oils will give the cake a bright, citrusy finish that balances the sweetness.
- Pour the batter into the prepared pan, smoothing the top with a spatula. Tap the pan lightly on the counter to release any large bubbles.
- Bake for 30 minutes, or until a toothpick inserted into the center comes out clean. The edges should pull away slightly from the pan, indicating doneness.
- Remove the cake from the oven and let it cool in the pan for 10 minutes before transferring to a wire rack to cool completely. This prevents the cake from becoming soggy from steam.
- Once cooled, slice and serve as desired. For a simple finish, dust with powdered sugar or drizzle with a light glaze.
That’s it— you did it. But hold on, I’ve got a few more tricks that will take this to another level. Stay tuned for insider secrets that will elevate your sponge cake from great to unforgettable.
Insider Tricks for Flawless Results
The Temperature Rule Nobody Follows
Many bakers bake at a high temperature, thinking it will give a quick rise. In reality, a steady 350°F allows the cake to rise evenly and develop a golden crust without burning the edges. I’ve tested 325°F and 375°F, and 350°F consistently produced the most uniform crumb.
Why Your Nose Knows Best
Trust your senses. When the batter is ready, it should have a faintly sweet, buttery aroma. If it smells overly sugary or metallic, it’s a sign you’ve overmixed or used too much sugar. The smell is your best judge of readiness.
The 5‑Minute Rest That Changes Everything
After baking, let the cake rest in the pan for exactly five minutes before transferring to a rack. This brief pause allows the steam to escape gradually, preventing the bottom from becoming soggy. Skipping this step often results in a cake that feels wet on the bottom.
The Folding Technique That Keeps It Light
Fold in the wet and dry mixtures in a gentle, circular motion. Avoid straight up and down movements that can collapse the batter. Think of it as a gentle wave, not a storm.
The Final Touch: A Light Dusting
A dusting of powdered sugar or a light glaze not only adds visual appeal but also creates a slight barrier that keeps the cake moist. I personally add a thin drizzle of lemon glaze for an extra burst of citrus.
With these tweaks, your sponge cake will consistently come out with the perfect rise, airy crumb, and a flavor profile that sings. I’ve tested each trick in dozens of batches, and the results are undeniable.
Creative Twists and Variations
This recipe is a playground. Here are some of my favorite ways to switch things up:
Chocolate Swirl Delight
Fold melted dark chocolate into half of the batter before pouring into the pan. The result is a marbled cake with a rich, chocolatey center that pairs beautifully with a scoop of vanilla ice cream.
Berry Burst Layer
Add a layer of fresh blueberries or sliced strawberries between the batter layers. The fruit’s natural juices seep into the cake, creating a burst of flavor and a moist, tender crumb.
Almond Infusion
Replace 1/4 cup of the flour with ground almonds and add a tablespoon of almond extract. The cake gains a nutty undertone and a slightly denser texture that’s still incredibly light.
Citrus Zest Variation
Swap lemon zest for orange or grapefruit zest. Each citrus offers a distinct brightness, turning the cake into a seasonal treat for any time of year.
Coffee‑Infused Surprise
Add 1 tablespoon of instant espresso powder to the batter. The subtle coffee flavor complements the sweetness, making it a perfect dessert for coffee lovers.
Spiced Holiday Edition
Stir in a pinch of ground cinnamon, nutmeg, and clove. The warm spices evoke holiday memories and pair well with a dusting of powdered sugar.
Storing and Bringing It Back to Life
Fridge Storage
Wrap the cooled cake tightly in plastic wrap and store in the refrigerator for up to 3 days. This keeps the crumb moist and prevents it from drying out. When ready to serve, let it sit at room temperature for 15 minutes before slicing.
Freezer Friendly
Slice the cake into individual portions, wrap each slice in parchment paper, then place in a freezer bag. Freeze for up to 2 months. To thaw, leave at room temperature for 30 minutes.
Best Reheating Method
Reheat frozen slices in a preheated 350°F oven for 5–7 minutes, or until warmed through. For a quick fix, microwave on medium for 20–30 seconds. Add a tiny splash of water before reheating to steam back to perfection and restore moisture.